
Many people are interested in robot mowers, even more so than robot vacuum cleaners, because let's face it, mowing the lawn every weekend is a chore we could do without! Unfortunately, the installation of a perimeter wire around the entire property is a major obstacle to the adoption of this type of device. The Segway Navimow H I'm presenting today could well change all that, as it requires no perimeter wire at all! Its numerous sensors, GPS and antenna enable it to be rapidly autonomous on any terrain, in less than 15 minutes, using virtual limits. I've been testing it at home for a few weeks now, so let's find out more about it…
Unpacking the Segway Navimow H
The Segway Navimow arrives in a rather heavy and bulky box. In fact, the robot alone weighs almost 16kg!

Inside, we find the robot mower, accompanied by its charging station, various accessories for installation, a user manual and a brand-new VisionFence module, which enhances the robot's operation thanks to a camera and artificial intelligence. More on this later.

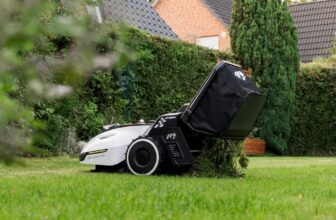
The Segway Navimow looks very much like a typical robot lawnmower, with the exception of a cylinder that seems to protrude from the top.

The rear has an integrated handle, making it easier to carry the robot if it needs to be moved. A welcome feature, given the robot's weight.

However, its orange color stands out from the competition, which is generally much more discreet. But this slightly more high-tech look is a matter of course!
At the front, a silicone bumper cushions the impact in the event of an obstacle.

On the top, there's a small control screen, along with three buttons for validating the unlock code, navigating the menus, and a big red “Stop” button. The rain sensor can also be seen on the underside:

Turning the Segway Navimow upside down, you can see its deck with three pivoting blades, providing a cutting width of 21cm. As you can see, the deck is eccentric to the robot, enabling it to get as close as possible to the mowing line.

This is another classic feature of this type of product, which enables mulching: the grass is cut into tiny pieces to nourish the soil and the lawn. There's no need to collect the cut grass, allowing the robot to operate in total autonomy.

At the rear, two motorized wheels with notches enable the robot to navigate on most terrains, with slopes of up to 45%.

At the front, on the other hand, there are two much smaller wheels that can swivel freely to follow the robot's movements:

The Segway Navimow comes complete with charging station, power supply and extension cable, mounting screws and antenna.

It's the first robot mower of its kind that I've had the opportunity to test: no more perimeter wire, just an antenna to be planted, which will enable the robot to communicate and find its way all over the terrain:


The antenna is attached to a pole with teeth, making it easy to plant wherever you want:

The station, on the other hand, simply accommodates the robot for recharging. It also has the necessary connectors to link the antenna and the power supply.

Finally, this Segway Navimow comes with the VisionFence module, which can be purchased as an option. It enhances the robot's vision capabilities.

It is installed on the front of the robot, by removing the cover shown here:


Simply connect the VisionFence module, and secure it with the two screws supplied:

The Segway Navimow is now equipped with a camera that will literally become its eyes!


Let's move on to the installation…
Installing the Segway Navimow H
Usually, the installation of a robotic lawnmower involves the installation of a perimeter wire, which must not only run around the entire lawn, but also around the various elements to be avoided: flowerbeds, trees, posts, playground equipment, etc. This allows the robot to delimit its working area. This delimits the robot's working area. Installation takes time (from half a day to several days), and must be carefully thought out. Some even opt for a professional to hide the cable underground, using a machine to facilitate installation. This is clearly the point that deters many people from investing in a robotic lawnmower. The good news is that installation of the Segway Navimow is much simpler, and doesn't even require reading the manual: the mobile app takes you step by step by hand, and you'll have a robot ready to mow in less than an hour!
First, of course, you install the app, available on iOS and Android, then create your user account.

The first phase consists of a number of questions to determine the type of terrain and installation required:

Surface area, existence of buildings, narrow passages, etc. This phase inventories all possible difficulties.


In fact, this is something that can be done without even having a robot: the checklist will enable us to determine the model and options best suited to our terrain.
Then comes the installation of our Segway Navimow robot. The first important step is to determine where to position the antenna, which needs to be more than two meters from any high obstacle (building, tree).

We then connect the antenna to the charging base, and the latter to its power supply.

It is possible to offset the antenna from the station, as a fairly long cable is supplied. The antenna doesn't have to be close to the charging station. The manufacturer even sells brackets and cables if you wish to mount the antenna on a roof, for example. Don't worry, unless you really have big obstacles all around your garden, this shouldn't be necessary.

Once connected, the antenna should light up green:

The charging base must be secured to the ground using the plastic screws supplied. These will prevent the station from moving when the robot comes to charge.

Our Segway Navimow robot can now be charged.

And we can continue with the configuration, which first involves pairing the robot with our user account:


Small animations detail the whole installation: the stakes and scratch strips to hold the cables, and so on. It's all very educational.


We then connect the robot to the network: the Segway Navimow has a Wifi connection, but also an integrated 4G connection.

Like all connected devices, the robot mower is entitled to its share of updates. This is a good thing, as it allows the hardware to evolve and any bugs to be corrected. In fact, I received 3 updates during my tests, all of which improved mowing behavior.

Finally comes the important step: creating the map. Although there is no perimeter wire, the robot still needs a map to find its way around the garden. So it's a mandatory step before the first mowing.


Here again, the application guides you step by step, with a video that you're obliged to watch. You'll then need to attach a small cardboard ruler, supplied in the package, to the back of the straight road. This will force you to leave a margin between the robot and the mowing line when creating the map.

All that's left is to make the map. And here, it's literally child's play: we pilot our robot mower like a remote-controlled car from our smartphone:

We then pilot the Segway Navimow with our smartphone, making it follow the entire contour of the terrain, using the joysticks in each corner of the screen:

Once back at the starting point, we click on “Done”. And the map is saved in memory.

It's as simple as that, and takes just a few minutes to complete, depending on the size and complexity of the terrain, of course.

For example, here's what my plot looks like, with a slightly narrow area on one side:

If necessary, you can add zones or places to avoid. We'll follow the same procedure to show him the path to take to get from one zone to another (even if he has to cross a paved or asphalt zone, for example, to get from one zone to another). Once the map has been created, the robot saves it in its memory.


Last step: check the map to make sure the robot is receiving the antenna signal from anywhere. If this is not the case, you may need to reposition the antenna:

Here, as seen on a plot of almost 1000m2, the signal is green everywhere, even though the antenna is at one end of the plot:


The installation is complete! It may seem a bit long when you look at it like that, as it goes through several stages. But 15 to 20 minutes are more than enough, the longest part having been the robot update. It's a far cry from installing a perimeter wire, which can sometimes take one or two days. It's not Plug&Play yet, but we're getting very close, and installing this robot mower is really quick and easy.
Using the Segway Navimow H robotic lawnmower
Using the Segway Navimow is very simple: just press the mowing button on the robot or the app to start the job. The robot then manages everything on its own: the route, whether it needs to return to charge, and so on. Indeed, on a large plot of land, it can stop its task and return to charge if it reaches the end of its autonomy. He can then return to continue his work where he left off.
The ideal solution, of course, is to program the robot's operation directly, in particular via its calendar. Here's an example, programmed from Monday to Thursday, 8am to 12pm:

Avoid mowing at night to avoid disturbing small nocturnal animals (such as hedgehogs). But early-morning or late-day operation is no problem at all, as the robot is very quiet (only 54dB in operation).
The settings menu provides access to a wide range of settings. In addition to time programming, this is also where you set the cutting height, from 30 to 60mm. No adjustment is required on the robot itself. You can also activate or deactivate the rain sensor: if it rains, the robot won't go out to mow, resulting in a more beautiful lawn.

Then there are settings for the robot's brightness and sound effects. The sound effects can be useful to keep you informed of the robot's operation (rest assured, it won't disturb your neighbors).

The dark mode makes the robot a little more discreet at night. Here's the default lighting:

While it's pretty and high-tech, it's not very discreet at night, so you can dim it if you wish.

Other interesting features include the BladeHalt sensor, which stops the blades if they hit an obstacle. Then there's the VisionFence, which we installed on the robot at the very start of the test.

For orientation, the Segway Navimow is equipped with EFLS: Exact Fusion Locating System. This is far more precise than GPS alone, as the real-time kinematic positioning system (RTK) combines data from several sensors to improve positioning accuracy (to within a centimeter, according to the manufacturer). This enables the robot to handle complex terrain without any problems, such as my terrain with a narrow passage, which is usually a real trap for this type of robot.
The robot then mows in a zigzag pattern to cover the entire working area, taking care to avoid any obstacles. But the robot automatically adjusts its path and modifies the mowing direction according to its algorithms, so as not to create wheel tracks due to repeated passages in the same place. No random path, as with the Husqvarna Automower 305 for example, but rather an orderly mowing pattern, in rows, as with the Bosch Indego model, but optimized to create as few marks as possible. In short, a perfect result!
In use, the precision of the map is quite impressive: no random movements, the robot knows where it's going and where it shouldn't go!
Note that the robot automatically stops its work if it loses the GPS signal (which has never happened in a month of testing). Of course, to get around safely, the Segway Navimow needs a reliable GPS signal, to avoid mowing the flowerbeds or getting stuck in the pool.
While the robot can also be fitted with an ultrasonic sensor to detect obstacles and avoid impact, the new VisionFence accessory goes much further.
VisionFence is a module that adds a camera to the robot, but above all a touch of artificial intelligence. Much as we've already seen on certain robot vacuum cleaners (from Roborock, for example), thanks to VisionFence, the Segway Navimow is able to recognize objects and adjust its behavior accordingly: trees, flowerpots, fences, lawn edges, toys, etc. With 140° vision, it can quickly adapt to any situation.
A short video demo:
Obstacle recognition even makes it possible to avoid programming restricted areas on the map. Here, I voluntarily tested with a flower pot in the middle of the lawn, or the poles of the clotheslines:


The robot detected them perfectly and turned away from them, without colliding with them. On the downside, it does leave a slightly wide area around it, which you'll have to trim yourself to finish off. This is something that could be improved in a future update.
The application allows us to monitor the robot's progress, its battery, and any error messages that may occur:

Operation is quite impressive. The robot has a few slow-motion passages, when it seems to be “thinking”, but once it's at work, it leaves nothing to chance and knows perfectly well where it's going and what it needs to do.

Finally, a word on safety. For users, as we've seen, the robot is capable of avoiding obstacles itself, and even moving things, be they a ball, a dog or a child. What's more, the blade system stops automatically as soon as the robot is lifted. It's impossible to get hurt.
As far as theft is concerned, the Segway Navimow features the EFLS (Gps / 4G) localization system, so you know where it is at all times. An alert is sent as soon as the robot leaves its virtual zone. What's more, between the unlock code and the association of the robot with a user account, the robot will be unusable by anyone.
Easy maintenance
The Segway Navimow uses the same floating blade system as most robot mowers. Ideally, they should be replaced every season, but a set of blades isn't very expensive – you can find sets of 30 blades for €17 on Amazon, for example – and I've been using them for many years on my various robot models.

As for cleaning, this model is IP6X certified, so you can hose it down directly to remove grass clippings and other accumulated dirt. Always very practical.
Conclusion
I was surprised to see Segway enter the robotic lawnmower sector, as it's a manufacturer we usually know for all things urban mobility (scooters, gyropods, etc.). So I had no idea what to expect. But I have to admit I was in for an excellent surprise! Segway has come to modernize the domain, with a robot packed with sensors and artificial intelligence. Although I was very happy with my Husqvarna model, which is the leader in the field, I have to admit that technologically, it's possible to do better today.
The elimination of the perimeter cable is of course the first important argument. No cable installation. No risk of cable breakage (from a shovel, mole, etc.). And the possibility of modifying the map very easily if you create a new flowerbed, install a trampoline, etc. What's more, the Segway model makes it considerably easier to manage multiple zones. Indeed, while this was possible on the Husqvarna, for example, it required running a perimeter cable between each zone. And when a cement driveway separates the two zones, this complicates matters considerably. With virtual zone management, it's possible to add any zone you like, and even to modify the layout along the way if you so wish: Madame wants to create a new flowerbed here, no problem, we'll just add a zone to exclude on the cartography! Other manufacturers, such as Husqvarna, do of course offer this type of GPS technology, but generally at a much higher price, sometimes even reserved for professionals (soccer stadiums, etc.).
The VisionFence is the second argument. Now, this accessory is sold as an option at €299. But in use, it's not an option, as this sensor adds intelligence to the robot! If you opt for the Segway model, you need the VisionFence! Boundary recognition is much improved, as is obstacle detection. Whether it's a forgotten tool in the garden, the garden hose, a strolling animal, etc., the VisionFence enables the robot mower to react immediately and adjust its behavior. The result is a clear gain in performance and ease of use.
Returning to the robot itself, the manufacturer offers different versions, depending on the surface to be mowed. Here, we tested the H1500E model, which, as its name suggests, is suitable for surfaces up to 1500m2. But there are also models 500, 800 and 3000. All havethe same capacities, and can accommodate the VisionFence. Prices range from €1499 to €2699, depending on the surface area to be managed, and are available from authorized dealers (notably Iseki in France).
Please remain courteous: a hello and a thank you cost nothing! We're here to exchange ideas in a constructive way. Trolls will be deleted.