
Right now, if you're even slightly interested in photovoltaics, you've probably seen a lot of advertisements for DIY solar kits. This type of kit is proliferating at the moment. And the promise is enticing: a solar panel to place on the ground, an electrical outlet to plug in, and in 15 minutes you'll be producing electricity, which is directly deducted from your electricity bill! No major work required, and no need to hire a professional. As a photovoltaic enthusiast, I couldn't resist testing one of these kits. And for the occasion, I was able to test the Beem Energy solar kit, designed by a French company. How is it installed? How does it work? How is it cost-effective? We'll try to answer all these questions…
Presentation of the Beem Energy solar kit
The Beem Energy solar kit arrives in a fairly compact box weighing around 30 kilos. Compact, due to its relatively short 80cm sides, considering its solar panels.

Inside, we find a very complete kit: 4 photovoltaic panels, an MC4 cable, 4 brackets with their mounting screws and anchors, a micro-inverter, the “Beembox,” which we'll discuss later, instructions, and 4 mounting templates.

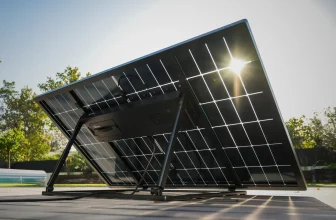
The panels measure 70cm on each side and are 2.5cm thick. They are available with an all-black front, or a more decorative, leaf-shaped front, as seen here. Beem wanted to offer something aesthetically pleasing, and this is one of the things that sets it apart from the competition, which generally offers a single traditional panel.

On the back, we see the connectors and mounting brackets:

Connectors are standard, with MC4 sockets like those found on all photovoltaic panels. One plug for +, the other for -, impossible to make a mistake.

In the two upper corners, we will notice a metal angle, which will allow attachment to the supports:

As well as a support system allowing the panel to be oriented at 30°:


For the curious, I leave you the technical sheet visible on the panel. We therefore have 4 monocrystalline panels of 75w, allowing us to obtain up to 300w, covered with high transparency 3.2mm tempered glass. They each weigh 5.6kg, which makes them easier to handle. They are given to retain 80% of their nominal power after 25 years.

Next come the “T” shaped wall brackets. The option will be selected when purchasing, the panels can be fixed to the wall, or simply placed on the ground using another type of support provided.

The high bar of the supports has two “clamps” into which the panels will clip. A practical system, patented by the company:

Two supports are also provided to secure the inverter:

The bottom of the support also has the same type of clamp, in order to hold the solar panel securely, whether in the “flat” position or oriented at 30°.

This gray box is the 300w micro inverter: its role is important, since it is he who will collect the production of the panels (from 24 to 50V) to convert it to 230V. It offers an MPPT efficiency of 96%, which is excellent. It is also what will synchronize with the electrical line so that the production of the panels can be consumed by the devices in the house.


After the inverter, the BeemBox will be connected: it will count the electrons to monitor the production of the panels. It also has a WiFi connection, which will allow you to consult production information in the associated mobile application.


As you can see, everything is included: the 2.5m MC4 extension cable, pliers for easily removing cables if necessary, and screws and anchors suitable for any type of support (stone, concrete, brick, cinder block).

Finally, the templates to help us with the installation, which reflect the design and size of the solar panels:

Each template will align itself according to the green markings. Then, simply mark the drilling locations, indicated in orange, with a pencil. 3 screws per mounting bracket.

On the back, each corner has double-sided adhesive tape to attach the templates to the wall where the panels will be mounted.

As you can see, everything has been designed to make installation easier!
It's time to get to work…
Installing the Beem Energy photovoltaic kit
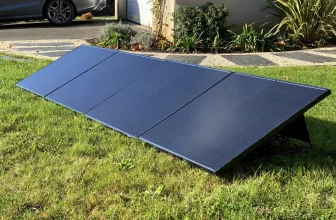
The kit selected is the one that mounts to the wall. The other (simpler) option would have been to opt for the floor-standing kit. But of course, this takes up a bit of floor space (2.5 m²).

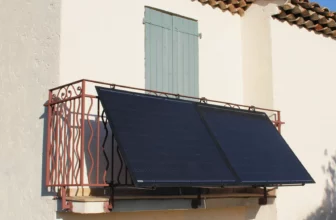
The challenge is finding a spot with the best sun exposure, preferably south-facing, to enjoy the sunshine for as long as possible, with a power outlet not too far away (up to 10m). My terrace faces south, but since the facade of the house is already loaded (windows/French doors, lighting, awning, etc.), I didn't have the space to mount them on the wall of the house. Otherwise, it wouldn't have been a problem, as the design of these panels is rather nice. My wife wasn't keen on a ground installation either, with the loss of surface area on the terrace. So I opted for mounting them on the wall of a building at the back of the garden, which faces south, without any shade (after him, it's a pasture…) and on which I had plenty of space to install a kit. It's less attractive (the plaster isn't done yet), but it gets the job done. Depending on the height, you'll need a stepladder, a level, a drill, a tape measure, and a pencil. Start by placing the templates, which can be aligned as shown here in a 4×1 or 2×2 format. Despite the fact that the concrete blocks are unfinished, the adhesive on the back of the templates sticks incredibly well! We even had to pull on them when removing them :p Mark the drilling locations with a pencil and drill.

3 wall plugs, 3 screws, and here we are with the first support attached:

This is the same process for all 4 supports. This is the most time-consuming operation, depending on the support used. Here, with a concrete block wall, it's best to have a good drill or even a hammer drill. Here we are with our four brackets secured, level, and centered on the wall :)

On the bracket closest to the outlet where the system will be plugged in, screw the inverter bracket using the thumbscrews:

Then attach the inverter, again using the thumbscrews:

All that's left is to attach the solar panels:

These simply clip onto the upper clamps of the wall brackets. It takes less than 2 minutes per panel; it's really very simple.

Next, you can adjust the panels to a 30° angle using the rear bracket, which clips onto the lower clamp. This makes it easier to make connections underneath:

The panels are connected in series, that is, to each other. Each panel has two sockets, so simply connect a female socket to the male socket next to it. It's impossible to make a mistake, given the MC4 format of the sockets. The remaining outlet on the panel furthest from the inverter will receive the 2.5m extension cable so it can be connected to the inverter:

The LED will immediately flash green, indicating that the panels are starting to produce electricity.

The connection diagram may be more understandable:

All that's left is to connect the BeemBox cable to the inverter's 230V output:

In my configuration, they will remain oriented at 30° for the time being, which allows me to optimize my production. We'll see in winter if we need to straighten them, as the sun is lower during this season. Overall, the result isn't shocking and remains relatively discreet.

Our panels are now starting to produce, and our nearest appliances are consuming this “free” electricity.

I filmed the entire setup: you can see that by taking my time, it took me less than an hour to install everything:


The Beem Energy Mobile App

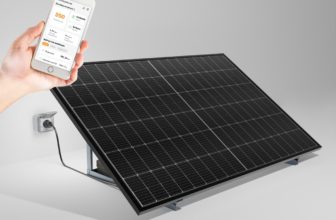
As we're in the era of connected devices, this kit is too, thanks to an app you install on your smartphone! Whether you're using iOS or Android, all you have to do is install it and create a user account.
The first time, you'll need to add your kit.
The app then connects to the Wi-Fi network created by the BeemBox to configure it. All that's left is to select your Wi-Fi network and enter its code, so the BeemBox can connect to the internet.
And this time, the installation is completely complete. The home screen will display our live electricity production since the beginning of the month, and the equivalent in devices powered (1 month of smartphone charging, 1 month of internet box, etc.).

Another screen will provide monthly history, while another will display installations across France and the solar kWh produced by the community, which equates to kg of CO2 avoided.

A recent update added day-by-day tracking, as well as daily tracking, which was sorely lacking. Before this update, we only had the cumulative total since the beginning of the month, with no way of seeing if one day was more productive than another. We now have all the details:

The daily production curve allows you to ensure that everything is running smoothly and that the panels are correctly oriented. It's also possible to enter the cost per kW of electricity, thus obtaining a euro equivalent of the savings made thanks to Beem Energy. In short, there are a few small things to do, and the good news is that the team behind Beem Energy responds quickly and is open to suggestions. I already know that the application is expected to evolve in the coming months ;-)

Note that a

plugin for Jeedom

has also been released, which allows you to retrieve all production information (and much more) directly from the home automation system!

Beem Energy: How does it work?
Given such simplicity, one might wonder how it works? Solar panels that you plug directly into an electrical outlet? Doesn't plugging a power source into an outlet that's already powered risk tripping the meter? Etc. In fact, the system works based on two things. First of all, the inverter synchronizes with the electrical grid to function (you'll also need a Linky meter to use it). Therefore, it won't work in the event of a power outage (a shame), and it can't work in an isolated location (also a shame :p) that isn't connected to the electrical grid (like my property deep in the woods, for example). On the other hand, this also prevents you from getting electrocuted if you touch the BeemBox's plug: as long as it's not synchronized with a power outlet, no current flows. Then, the system relies on a simple rule of physics: electrons take the shortest path. Like any fluid, if you can visualize that.
In practice, solar panels capture the sun's rays and transform the photons into electrons. The inverter, synchronized to the electrical grid, injects the solar electrons into the home's electrical circuit. The solar electrons diffuse and power the nearest electrical devices that are consuming electricity at the same time. Thus, for each solar electron produced and consumed by a device in the home, it's an electron from the electrical grid that doesn't pass through the meter, and therefore isn't billed.
In my home, this installation is plugged into an outlet in my workshop, so it probably powers part of the pool pump, the Wi-Fi access point, and my backup server, which are the devices closest to the BeemBox :)
The goal isn't to produce as much electricity as we consume each day, since that would require a much larger and more expensive installation. The goal is to eliminate your home's “electrical tail.” The electrical limit is the minimum electricity consumption of your home, which is present no matter what, even when no one is home. It corresponds to the consumption of the refrigerator, internet box, home automation box, VMC, appliances on standby, etc. If you don't turn on any specific appliances, and you take a look at your electricity meter, you'll see that it still displays an electricity consumption that easily reaches 300W in general. This is the consumption we're trying to eliminate with the Beem Energy kit. And if your electrical limit is higher, it's possible to multiply the Beem Energy kits (up to 3 per circuit breaker/power line).
And the regulations in all this? The great thing about the Beem Energy solar kit is that it can be installed anywhere, without any complicated formalities. If the panels are installed on the ground or less than 1.80 meters high, no declaration is required at the town hall. The only thing to do is to declare the installation to Enedis, the company that manages the electricity grid. The declaration is done directly online at
https://connect-racco.enedis.fr/prac-internet/login/
ideally one week before the kit's installation. However, this doesn't really have any impact, as Enedis doesn't have to intervene in any way, and it's a purely legal formality. The declaration takes less than 10 minutes, especially since Beem Energy provides a step-by-step guide that tells you exactly what needs to be declared. The big question: cost-effectiveness
Obviously, this was the first question that came up when I talked about it on social media: what about cost-effectiveness? Because the Beem Energy kit still costs €663 (thanks to the manufacturer's discount until January 31st, which gives you a 15% discount on the kit). A somewhat high price considering the cost of a 300W panel and an inverter. But a panel and an inverter aren't everything: there's the BeemBox technology, as well as the design, allowing these panels to become decorative elements :p Not to mention the service: even if the installation documentation is extremely clear, the team is available to advise you before, during, and after installation, via a dedicated WhatsApp channel. Extremely responsive service, worth mentioning (don't expect to get any help from AliExpress for panels you've shipped from China…).
My production took 17 days.
Coming back to profitability, I'm based near Orléans, and I produced 20.8 kWh in 17 days, an average of 1.22 kWh/day. A very decent production, but we had a particularly sunny week :p But we know that solar production isn't stable throughout the year, especially in winter, when the sun is lower and the days are shorter. And the current production is undoubtedly exceptional given the superb week of sunshine we've had. In Orléans, statistics indicate that it would be possible to bank on 320 kWh per year. At a rate of €0.1853 per kWh (EDF's current peak rate), this represents a saving of €60/year.
Let's not forget the increasing cost of electricity each year. We are among the cheapest countries in Europe, but the price of electricity in France is expected to catch up with the average for European countries by 2023, currently around €0.21/kWh. By 2030, the increase should be at least 50% compared to 2020, or between 3 and 5% per year to achieve this goal. Therefore, if we take into account a 3% annual increase:
(2021) the savings in the first year would be €60 (2022) second year: €62 (2023) third year: €63 (2024) fourth year: €65 (2025) fifth year: €67
(2026) sixth year: €69
(2027) seventh year: €71 (2028) eighth year: €73 (2029) ninth year: €76

This gives us a total of €687, or the kit's depreciation after 10 years. Yes, it's a long time. But with solar power, you can't count on dazzling profitability today. It's all about the long term, as the panels have a lifespan of over 20 years. In more southern regions, where there are more sunny days, production could rise to 450kWh/year, which shortens the depreciation period to 7/8 years.
And while we're on the subject of investment, should we mention the meager 0.5% of the Livret A savings account (Livret A) where most people invest their money? For comparison, a Beem Energy kit is 16 times more profitable…
And then, aside from the financial aspect, solar power is also a conviction. As you know, I've had solar panels on the roof of my house for 10 years, with a resale contract with EDF. And on my isolated property, with no connection to the electricity grid, everything is powered by solar panels. If I could be completely self-sufficient thanks to solar energy, with an installation I can afford, I'd be the first to sign up, if only to avoid being dependent on an external grid :p In short, I'm personally convinced.
- Conclusion
- Beem Energy was a little crush for me when I discovered the idea. Of course, while studying the subject, I quickly realized that several companies offered easy-to-install kits, using the same principle as Beem Energy. But Beem Energy is the fruit of a French company (based in Nantes), with a really nice team behind it. The kit has also been well thought out, with various wall or ground mounting options, very clear documentation, and a design that changes a little from the rest, and which allows these solar panels to appear as an element of exterior decoration. Despite my choice for a wall installation, the installation was very simple thanks in particular to the patterns and supports provided, and in less than an hour everything was working (with time to take the photos for the article). In short, it really is a kit within everyone's reach.
- Of course, this has a significant cost, and the return on investment is quite long. You should not imagine saving money in the first year (well, you will make some on the electricity bill, but it will not cover the cost of the kit right away), but play it over time. If I take my photovoltaic installation on the roof, it also took me 10 years to amortize it. But for the next ten years, my resale to EDF is entirely profitable and almost pays my annual electricity bill. Beem Energy is to a lesser extent, with only 300w on a kit, but allows you to erase the heel of electricity consumption in the house. As they say, there are no small savings!
- So should we invest in such a kit? It is impossible to guess the future, and everyone will act according to their own beliefs. Personally I am convinced, and I simply base myself on this rule in investment:
- The best time to start investing was yesterday, the second best time is today, and the worst time is waiting until tomorrow.
- The kit is sold at a retail price of €780 in the official store, as well as in select brick-and-mortar stores like Leroy Merlin and Boulanger. But you can take advantage of a €100 discount with our exclusive code MD100, bringing the kit down to “only” €680!
- Completely convinced by this solution, I expanded it a year later with an extension kit to further reduce my electricity consumption.

Please remain courteous: a hello and a thank you cost nothing! We're here to exchange ideas in a constructive way. Trolls will be deleted.