
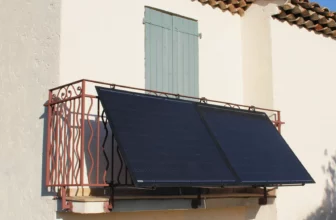
Sunology needs no introduction: in the field of solar stations, the French company has become a leader in France, thanks to its solutions that are always at the forefront of innovation, as we discovered a few days ago with the announcement of the PLAY Max. While the manufacturer is best known for its ground-mounted solar station, which can be set up in less than 2 minutes to immediately reduce your electricity bill, the company also offers a rooftop solution, Sunology Home, as well as a balcony solution, Sunology City, which is of particular interest to us today. This solution shares the same principle as the PLAY, but has been completely redesigned for easy installation on a balcony, making it ideal for apartment dwellers, who were previously overlooked in this area. For those new to this type of product, this is a photovoltaic station that can be installed yourself in just a few minutes. It plugs into an electrical outlet, and its energy production is directly deducted from the electricity you consume. Given the rising cost of electricity, this type of installation is very attractive and has become much more accessible over the past two years. However, until now, apartment dwellers have had difficulty benefiting from it, unless they have a very large balcony. The Sunology City solution meets this strong demand.Discovering the Sunology City solar stationA surprising thing about solar stations: the box is quite compact and light (around ten kilos)! No large pallets to carry between two people; here, the box can be carried by a single person and loaded into a car without any hassle. Inside, there are many components: two 150Wp panels, all black (shingled black model), a micro-inverter, mounting brackets, straps, cables, assembly instructions, and a Wi-Fi meter in the form of a connected outlet.This kit system is less plug-and-play than the PLAY version, but it can adapt to many environments. It will therefore be possible to install the various components according to your needs, wherever you want, and in any direction.
Since the requirement here was to be as light as possible to be able to be attached to a railing, the manufacturer opted for flexible panels. Instead of heavy glass plates, the photovoltaic cells are cast in resin to protect them. This is a more expensive manufacturing method, but it allows for many other uses than traditional glass panels. This type of surface is typical of flexible panels.
This allows for thin and much lighter panels, as we saw with the EcoFlow models, for example. However, these had one drawback: they weren't tiltable, and production was therefore far from optimal.
Flexible Panel Mounted on Aluminum Structure

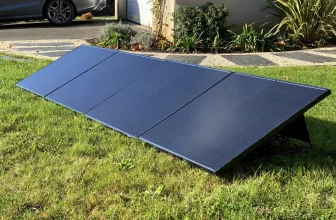
Here, Sunology mounted these flexible panels on a black lacquered aluminum structure with grooves that allow for tilt adjustment. Despite this, they maintain a very light weight of only 4 kg per panel, which allows them to be easily attached to a railing.
In terms of dimensions, they measure 115 cm high by 68 cm wide, making them a versatile format, especially since they can be mounted both vertically and horizontally.

Here's a quick look at the technical details of these panels, which are rated to maintain 80% performance after 25 years:

They are equipped at one end with a bracket that can be tilted to the desired angle: And at the other end, a plate that will attach to the railing. Sunology has thought of the small details, including a foam strip to avoid damaging the railing: Even though the box contains a lot of components, assembly remains relatively simple. Simply insert the mounting brackets into the grooves of the panel:

These brackets can be slid into the grooves to secure the panel vertically or horizontally. It's up to you!
The frame then contains drilled notches for the straps:

Simply insert the straps into these notches for the upper attachment:

Since the panels are very lightweight, these straps allow them to be held in place without any problems. These are polyester straps, each capable of supporting 100 kg, and are UV and moisture resistant for 20 years.

Once these elements are in place, the panel can be positioned on the balcony railing (tested here on a rigid mesh fence):

One strap holds the mounting bracket on the railing, so it doesn't lift in the wind:

The top is held in place by two other straps:

The same procedure is used to secure the two panels:

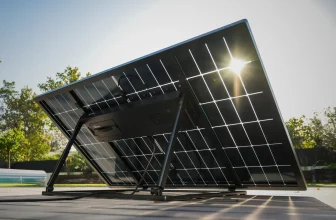
The advantage of this system is that the retaining brackets can be freely slid up or down for a more or less pronounced tilt. Simply loosen the bracket screw slightly, slide it, and tighten the screw when you're at the desired position. The ability to tilt the panels as desired is a real plus, as the sun's height varies from season to season. The sun is particularly high in the summer and very low in the winter. To produce optimally, the sun's rays must be at a 90° angle to the solar panel. The panel tilt can therefore be adjusted each season to maintain optimal production.
All that's left is the microinverter to install. Still from Hoymiles, a well-known manufacturer in the field, this time in a 300W version, since we have two 150Wp panels that will be connected in series.

On the left, we have two small MC4 connectors, a standard connection in the photovoltaic field. Above, a larger socket allows you to daisy-chain multiple inverters if necessary (for example, if you want to install two or three Sunology City kits on the same balcony). On the right, the output cable will be connected to a power outlet once the cord is in place.

The microinverter is then attached to the back of one of the panels, ideally the one closest to the electrical outlet where you want to plug in the system. The microinverter is held in place simply by a screw that fits into the panel's groove, as with the other components. Once in place, the panels are connected together, in series, and then to the microinverter. There's no risk of making a mistake:
Don't forget the small connecting cable between the two panels, still held in place by a screw that slides into the panel's groove:

This small cable provides grounding between the two panels, which is then grounded using the microinverter attached to the panel.

All that's left is to connect the power cable to the microinverter's socket. It's 3 meters long, so you'll need to have a nearby electrical outlet. If necessary, Sunology offers optional 10 and 25 meter extension cables.

The last element: the smart plug. A very classic Wi-Fi-connected plug, but designed for outdoor use, and capable of measuring the power consumption of the device connected to it. Or, in this case, its production.

It's an outdoor smart plug, equipped with a weatherproof cover.

This plug is simply inserted between the Sunology City cable and the power outlet to measure the solution's power production.
Installation takes about twenty minutes, which is still very quick! You'll simply need to find a spot with good sun exposure, ideally facing south, with no shade, to optimize solar production. Here, since there's no balcony, the station was simply placed on a rigid fence, facing south.

The strap mounting system and the lightweight nature of these panels ultimately allow them to be mounted on many surfaces:

Balconies, of course, but also rigid fences like here, or even wooden fences:

This can give you plenty of ideas!
The mobile app

The final step: install the mobile app to monitor your production. This is the SmartLife app, which allows you to control many connected objects. However, the Tuya app, well-known among home automation enthusiasts, is also compatible. Whether you're using iOS or Android, simply install it and create a user account. Then add a new device. The outlet should be automatically detected by the app.

We configure the Wi-Fi and confirm. All we need is a 2.4GHz Wi-Fi network accessible at the location where the Sunology City solar station is located. Generally, on a balcony, this shouldn't be too much of a problem. But if used in a garden, on a fence or pergola, for example, we may need to add a Wi-Fi repeater.


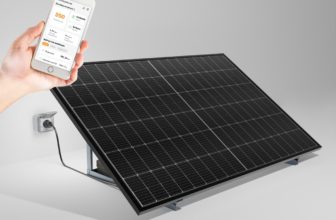
The home screen of our plug is really that of a classic smart plug, with an On/Off button. Of course, we'll have to make sure the plug is set to On, otherwise we won't be able to collect our solar production. To monitor production, we need to click on the “Electricity” icon in the bottom right.
We then get a screen with the current power and the production since the beginning of the day. Here, for example, we see that our power is 125W.

This allows us to monitor it day by day or by month.


We find the same type of information as what ekwateur or Supersola offer, for example. The app is significantly less user-friendly than Beem's, but let's just say it gets the job done.

Furthermore, since the system uses a simple connected plug, nothing prevents you from using a connected plug with consumption monitoring that's compatible with your system, via Wi-Fi, Zwave, or ZigBee, for example, to retrieve the information in your Jeedom, eedomus, or Home Assistant system (or others!). There, you can have a representation as you wish, perform efficiency calculations, receive a report, etc. This is what we saw here with ZigBee plugs.
Interesting detail: the inverter used by Sunology is also OpenDTU compatible, meaning it's possible to retrieve all the production information via a wireless connection. All you need is an OpenDTU box, which then allows you to use all this data in Jeedom or Home Assistant, for example.
OpenDTU retrieves all possible information from the inverter.

In short, if the outlet isn't enough for your production monitoring, there are many other ways to monitor it ;-)

Sunology City solar station: how does it work?
If you're new to this type of self-consumption station, you might be wondering how it works? Solar panels that plug directly into an electrical outlet? Doesn't plugging a power source into an outlet that's already powered risk tripping the meter? Etc.

An electrical outlet works both ways. When you plug your toaster into the outlet, you draw current. If you plug a solar panel into the same outlet, the current flows back the other way to your meter. If it encounters an appliance that consumes energy along the way, it will compensate for all or part of it. If you produce more than you consume, the surplus will benefit your nearest neighbors. Sunology
In fact, the system works on two levels. First, the inverter synchronizes with the power grid to operate. Therefore, it won't work in the event of a power outage (which is unfortunate, but it's also a safety feature for those working on the power grid), and it can't work in an isolated location that isn't connected to the power grid (like my property deep in the woods, for example). On the other hand, this also prevents electrocution if you touch the kit's plug: as long as it's not synchronized with a power outlet, no current flows. So, there's no risk for children either.Note that it's still possible to connect the Sunology City to a battery when you want to store the day's power or when you're “off-grid.” Sunology explains this here.
in detail. Once again, this is the only manufacturer to clearly explain this use. Ground station or flexible panels on railings, the operation is the same.Then, the system relies on a simple rule of physics: electrons take the shortest path. Like any fluid, in fact.

The goal isn't to produce as much electricity as we consume each day, since that would require a much larger and more expensive installation, particularly using batteries. The goal is to eliminate your home's “electrical tail.” The electrical tail is your home's minimum electricity consumption, which is present no matter what, even when no one is home. It corresponds to the consumption of the refrigerator, internet box, home automation box, VMC, appliances on standby, etc. If you don't turn on any specific appliances and take a look at your electricity meter, you'll see that it still displays an electricity consumption that easily reaches 300W in general. The consumption tail represents 10 to 20% of your annual energy needs, or between 300 and 1500 kWh per year! It is this consumption that we are trying to eliminate with the Sunology City solar station.
If your electrical load exceeds the 300 to 400W typically found in most homes, it's possible to install multiple stations (up to 4 per circuit breaker/power line).
And what about the regulations?
The strong point of the Sunology solar station is that it can be installed anywhere, without complicated formalities. Be careful, though: if you live in an apartment, you'll probably need to ask the condominium for permission.
The only formality to complete is to sign a Self-Consumption Agreement Without Injection (CACSI) with Enedis, the company that manages the electricity grid. The declaration can be made directly online at
https://connect-racco.enedis.fr/prac-internet/login/ . The declaration takes less than 10 minutes, with the manufacturer providing all the necessary information on its website.
The big question: profitability The big question: what about profitability? Because the Sunology City solar station still costs €599. Beem Review: The DIY solar kit to save electricity! 48

Feel free to use these sites to calculate your solar exposure and your profitability:
JRC Photovoltaic Geographical Information System
Sunearthtools
In Orléans, if I take an average of 350kWh per year, and at a rate of €0.2460 per kWh (currently the EDF rate during peak hours), this represents a saving of €86/year.
Let's not forget the annual increase in the cost of electricity. We are among the cheapest countries in Europe, but the price of electricity in France is expected to catch up with the average European country. And we know that
the tariff shield is due to disappear by the end of 2024. For 2024, we can therefore safely expect the same increases as in 2023, namely +15% and +10%, which we'll round up to +25% for simplicity.
Electricity price trends Beem 420W review: even more electricity savings with the DIY solar kit! 44 Source: The National Energy Mediator,
CRE
We can then take into account a 5% annual increase (yes, I'm being very optimistic here, though…):
(2025) second year: €113 (2026) third year: €118 (2027) fourth year: €124
(2028) fifth year: €130
- This gives us a total of €594, which is the kit's payback period after only 5 years in my case. In the south with a full southern exposure, where production will be even better, the return on investment drops to between 4 and 5 years. With the increase in electricity prices in recent years, the return on investment for such a solution has melted like snow in the sun, almost halving it. A return on investment over 4 to 5 years is therefore very attractive. Especially since the panels have a lifespan of over 20 years.
- Then, aside from the financial aspect, as I always say, solar is also a conviction. As you know, I've had solar panels on the roof of my house for 13 years, with a resale contract with EDF. And on my isolated plot, without a connection to the electricity grid.

Regarding the ecological aspect, sometimes criticized in photovoltaics, you should know that the panel manufacturing process and their recycling have evolved significantly in 10 years. Most panels are now certified low carbon: after one year of use, the energy required for their manufacture has been offset. As for recycling, this panel is 95% recyclable. And things will have evolved even further by the time it's scrapped, with its lifespan given as 40 years by the manufacturer. But in reality, a photovoltaic panel has an enormous lifespan, and even if its output declines over time (80% efficiency guaranteed after 25 years), a panel can still be used for many years beyond its official lifespan. I know people who use panels that are 40 years old and still work perfectly, even though the technology was far inferior to today's.ConclusionSolar stations have been multiplying on the market for the past two years. There is a real need for this type of solution, especially given the current energy crisis. Solar stations like the Sunology Play, which can be installed on your terrace or in the garden, have been a real hit. However, in France, nearly half of all residents live in apartments. These are just a few households that were previously deprived of this type of solution to reduce their electricity bills. This Sunology City solution is one of the very few products available today in France for balconies. As we've seen, the manufacturer has carefully thought out its solution, which is lightweight, flexible, and very easy to install, while remaining aesthetically pleasing.
Another advantage of this type of product: it can be installed whether you own or rent. Installation is so simple that it's quick to disconnect the panel and dismantle it to move it to a new home. It's therefore an investment that will last, unlike a roof-mounted installation. The app's only weakness is that it does the bare minimum, with an austere display. In this respect, no one has yet done as well as Beem :) But it gets the job done, allowing us to monitor production. Afterwards, it will be possible to use another connected plug to retrieve its production in a more attractive interface, in Jeedom or Home Assistant, for example. An example of photovoltaic monitoring on Home Assistant for those who want to go deeper into monitoring…So, should you invest in such a station? It's impossible to predict the future, and everyone will act according to their own beliefs. Personally, I'm convinced, and I simply base my investment on this rule:


Please remain courteous: a hello and a thank you cost nothing! We're here to exchange ideas in a constructive way. Trolls will be deleted.