
The field of 3D printing has progressed considerably in recent years, making this creative process increasingly simple. This is the goal of the company Kokoni, founded in 2010. And its latest model, the Kokoni EC2, is here to prove it: we have a 3D printer that stands out for its ease of use and innovative features, incorporating AI, or artificial intelligence. Having been in testing for several weeks now, I invite you to discover it in more detail. Unboxing the Kokoni EC2 3D Printer Here, there's no big, heavy, and bulky box like I often encounter with this type of equipment. And there's more attractive packaging, showcasing the 3D printer, which is also available in several colors. You can tell the aesthetics have been carefully considered so as not to scare off the general public! Moreover, you can notice the small logo on the packaging, indicating that this product has been awarded the famous “iF Product Design Award” for its design. It's not for nothing!
Another promise of the packaging: this is a Plug&Play 3D printer, which can be set up in seconds and fully controlled from a smartphone!
Inside, we find, of course, the 3D printer, along with its power supply, a small clamp, sticky tape, and instructions.

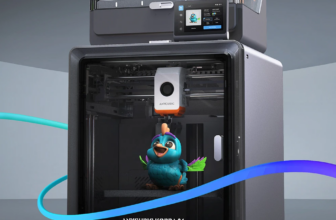
When I unboxed the Kokoni EC2, the first thing that struck me was its compact and elegant design. Delivered fully assembled, it eliminates the hassle often associated with assembling 3D printers, even if recently this usually boiled down to inserting four screws.

With its dimensions of 189 x 302 x 231 mm and a weight of only 3.2 kg, it easily fits into any workspace, whether it's a home office or a small workshop. This is also another important argument: most of the models I've tested so far offered a 40x40cm worktop, but required a lot of space to use it. The Kokoni EC2 can easily fit on the corner of a desk.

The design of the Kokoni EC2 is not only aesthetically pleasing but also functional. The secure front door is a major asset for families with children, reducing the risk of accidents. It's worth remembering, however, that a 3D printer nozzle can heat up to 260°C here—no small feat! The only opening is on the top, for the filament to pass through a protected sleeve:


The filament spool is located at the back, in a completely enclosed case. This protects not only the filament, but also the users.

A button pivots on the top to release the spool, which can then be replaced:

Also noteworthy is the presence of a fan at the back:
At the bottom right is the power connector, as well as the power button. Note that this printer only consumes 60W, a factor that is becoming increasingly important with rising electricity prices.

On the left is a red button used for pairing with the app.

The bottom is equipped with four rubber pads to limit vibrations and keep the machine in place.

As you can see, the machine is completely enclosed, protecting users, but also maintaining a certain temperature in the print chamber, for better quality results.

This also keeps the noise level below 30 dB, another strong point, making the printer pleasant to use in quiet environments. I've actually used it many times right next to me while working at my desk, and it really doesn't pose any problems.

When you open the front door, you see the “traditional” mechanics of a 3D printer. But in a (very) small format, since here we have a bed that's only 10 cm on each side.

Almost a “toy” format. Yet, it's a perfectly functional 3D printer, as we'll see.

Using the Kokoni EC2 3D Printer

The user experience with the Kokoni EC2 is exceptional, mainly thanks to its mobile app, which makes it really easy to use. The app, available for iOS and Android, transforms your smartphone into a command center for 3D printing. To get started, simply install the app on your smartphone and create an account:
Then add the printer to your account via “New Device” (yes, the app is currently only in English, but other languages are coming soon).

Next, follow the guide: select your Kokoni EC2 model, then press the red button on the back to pair it with Bluetooth:
You can then enter your Wi-Fi network name and password: and there you have it, your printer is connected to Wi-Fi and the app! Along the way, you'll find various controls, such as remaining filament, firmware version, and the ability to update it.
You can then choose from a vast library of over 2,000 pre-designed models, or start creating your own.
Simply select the model you want, like a vase, for example. Specify the 3D printer you want to use, and the app creates a 3D representation with various controls, allowing you to change the object's size, move it, and more. By default, the settings are generally good:

For the first print, the app offers various tutorials on using 3D objects, which are always interesting to know, especially if you're new to the field.

If everything is OK, you can start printing:

The app estimates the approximate print time and filament consumption. Note the small TV-shaped icon in the top right corner, which allows you to activate the timelapse video if desired. This will allow you to have a time-lapse video of the creation of the 3D object, thanks to a 720p camera integrated into the Kokoni EC2! You can confirm the start of the project and keep an eye on its progress if you wish, thanks to the integrated camera:

And the work is underway! You can follow it via the app, or live through the transparent door, especially since LED lighting illuminates the interior :)


Once the work is finished, the 3D printer bed is placed in front of the door for easy retrieval:

There you have it, our perfectly crafted little vase!

The practical removable bed, the lower part being magnetic:

Just gently twist the upper part for the 3D object to easily detach:

And there you have it!

For this first 3D object, this Kokoni EC2 did very well, with a very thin, spiral-shaped vase, which is not easy to achieve.

And all this in 4 clicks in the app, without bed adjustments, adhesives, lacquer, etc. In short, extremely simple! The Plug&Play promise is truly fulfilled! And the little timelapse preview automatically generated by the printer:


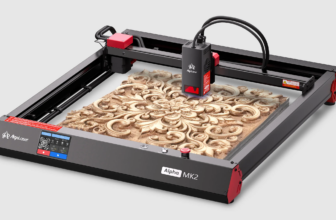
Of course, to test the Kokoni EC2, I undertook several printing projects, ranging from small decorative objects to functional pieces. Each print revealed the printer's ability to handle fine details and produce consistent results.

A few examples of soap dishes, accessories that are always very practical and relatively easy to make:

Here's a hexagonal model, with supports automatically created to create a hollow base (the supports are removed at the end of the print).

Another model, here rectangular:

Moving on to much more complicated things: printing articulated objects all at once, without any assembly, like this well-known octopus:

Or this fully articulated dragon:
In terms of print quality, the Kokoni EC2 holds its own very well. With a maximum print speed of 100 mm/s and an accuracy ranging from 0.1 to 0.3 mm for print layers, the results are quite sharp and detailed.
Most prints were completed in just two clicks in the app, without touching the printer. I did, however, “miss” a print, which came loose from the bed, and I had to stop:

Using the provided blue sticky tape, or with a little 3D hairspray, no more adhesion problems ;-)


If, despite the number of models available in the app, you don't find what you're looking for, it's possible to import most external files via the manufacturer's website (via the “Upload” option in the top right corner). There are many resources available online, such as the excellent Printables.


You should, of course, pay attention to the file size and the model, but the limits are quite broad.


The various models are then found both on the web account and on the mobile app, under “My Models.”


The app also allows you to create objects using artificial intelligence. A feature that's undoubtedly very appealing is the ability to print your torso using a simple selfie. Just a selfie, and the AI takes care of turning it into a 3D model.


Well, I had to try it several times, even though I followed the rules carefully. But once the result was calculated, I can't say it's very realistic, the rendering being too smooth and far from reality (I have less hair and a beard :/ ).
Another feature of the app allows you to transform photos into 3D models. Here again, the AI rendering leaves me doubtful. While the Kokoni EC2 does a great job printing the STL files provided, the AI results currently leave me wanting more. But the company is still working on it, as the feature is currently in beta.

A word now about the filament used. The Kokoni EC2 uses very standard PLA filament, offering eco-friendly and biodegradable printing, without releasing toxic fumes. Perfect for use in enclosed spaces with children. What's less standard is its packaging in a ready-to-use case, which clips onto the printer. This protects the filament, simplifies its installation, and you use filament approved by the manufacturer, thus avoiding many problems, as you can find anything and everything in terms of filament quality on the market. In the end, it's almost as if you're changing the ink cartridge in your usual printer; it's no more complicated! The feeling of ease is therefore a success! Sold for €11.95The refill, which contains 220g of filament (or 70m), is priced slightly above the market average. However, if you don't want to depend on the manufacturer for your filament, it's still entirely possible to use your own roll, as the filament itself is standard 1.75mm. This short video explains how to do it:

https://youtu.be/Cu5EbZCyUMA ConclusionThe Kokoni EC2 is a 3D printer that stands out for its ease of use, print quality, and innovative approach to 3D printing. There are no cables other than the power supply, no need for a computer or complicated application, and no adjustments to make before each print. 3D printing becomes child's play! It's ideal for beginners, families, and even more experienced users looking for a compact and high-performance printer. Sure, the build plate size is small, but not everyone prints cosplays :) For many toys and replacement parts, to repair a device, or anything else, it will be more than sufficient. It's so easy to use and so secure that you can easily imagine letting a young teenager use it without any problems.

In short, with the Kokoni EC2, 3D printing becomes accessible to everyone, opening the door to limitless creativity. Whether you're a technology enthusiast, an artist, or simply curious to discover 3D printing, the Kokoni EC2 is an excellent and affordable choice, since it's available for less than €250. For me, it's the first model that's so easy to use, and I've enjoyed printing many things with it without having to worry about settings and calibration :)

If you're looking for an easy-to-use and affordable 3D printer, I highly recommend it! A special Christmas offer is also available

on the manufacturer's website
using the code

LOVEKOKONI
, which drops its price to just €233!

Kokoni EC2

Please remain courteous: a hello and a thank you cost nothing! We're here to exchange ideas in a constructive way. Trolls will be deleted.