
I had the opportunity to discover the new Segway Navimow i108E at an event organized by the brand in Germany. To say the least, it made my mouth water! This model stands out for its use of advanced technologies such as the EFLS 2.0 localization system, eliminating the need for peripheral cables, or artificial intelligence, facilitating set-up. At a time when lawn care can be time-consuming, robotic mowers like the Navimow i108E offer a practical and efficient solution. We've been testing it for just over a month now, so let's find out more about it.
Unpacking the Segway Navimow i108E robotic lawnmower
The Segway Navimow i108E is delivered in a cardboard box that perfectly protects the robot. Beware, it's a heavy and bulky package ;-)


Inside we find several boxes, protecting and organizing the contents, including the accessories.

As soon as you open the box, it's clear that this model stands out for its meticulous design and high-quality materials.

Box contents include:
- Segway Navimow i108E robotic mower
- Robust charging station
- Power cable for charging station
- Stakes to secure the charging station to the ground
- Antenna with stake and cable
- Detailed, multilingual instruction manual
- Spare blades


As you can see, the contents are extremely comprehensive.

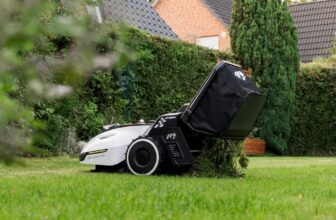
Of course, the robot is the highlight of the show. First impressions are extremely positive. The mower itself is compact, with a durable plastic finish and modern lines that give it an elegant yet functional appearance. The robot itself measures 545 × 385 × 285 mm and weighs around 11 kg, which is still very compact for this type of device.

On the top is a large numbered wheel: this controls the cutting height, which can be adjusted from 20 to 60mm. This is a manual setting, unlike other automatic models. But it's a setting that's rarely altered during use, so it's not a major inconvenience.

This round part also features lighting around the perimeter. The color will indicate different robot states: under load, working, in trouble, etc.
Right next to it is the big red “STOP” button, mandatory on this type of device. It can be used to stop the robot in an emergency. And just below is a digital display with 3 buttons for navigating the robot's settings. As this model comes with a mobile application, we'll see how little we actually use this screen.

On the front, there's an opening for recharging the robot. When the robot reaches its charging station, a connector is automatically inserted here.

Above all, the front features a camera with a 140° field of vision, which will enable the robot to identify obstacles, like the accessory we saw on the Navimow H last year. The only difference is that this function is now integrated directly into the robot, and its quality has improved considerably.

Aside from the camera, the design of the robot itself has changed very little.
Underneath, you'll find the 18 cm platform, equipped with 3 razor-sharp blades.


Interesting detail: the front has a handle concealed behind the bodywork, which is always useful for easily carrying the robot when it needs to be moved manually.

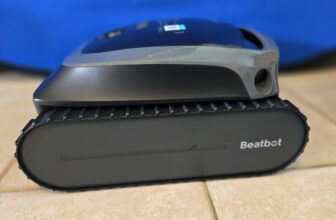
At the rear, the robot is equipped with two small wheels capable of swivelling in all directions. When I first discovered this model, I was afraid that the manufacturer had done what most of its competitors had done: use tiny wheels at the front. In use, this type of configuration tends to block the robot at the slightest hole. One dog, one mole, and it's all over. But here, Segway has placed these tiny wheels at the rear, which is far more thoughtful…

And it's used large 24cm notched wheels at the front! You might as well say that with such wheels at the front, this model can go anywhere! It's surprising at first, because when you're used to this type of machine, you always get the impression that it works in reverse compared to the competition. But no, the big wheels and camera are at the front. Bravo to the engineers, who have finally understood this!

As for the charging station, it's designed to be unobtrusive yet sturdy, capable of withstanding the elements.

It's relatively classic: a large, sturdy plastic platform, which prevents the robot from being in constant contact with the dampness of the ground. And at its end, the recharging contact, which is inserted into the robot when it is parked.

At the rear of the station, two connectors: one for the antenna, the other for the power supply.

One of the highlights of the Segway Navimow i108E is the absence of peripheral cables, thanks to EFLS 2.0 (Exact Fusion Localization System). This technology enables the mower to navigate with centimeter precision and avoid obstacles, making installation much simpler than with other models requiring complex cable deployment. In this case, all you need to do is position an antenna on its post:

Let's move on to installation…
Installing the Segway Navimow i108E robotic lawnmower
Before installing the Segway Navimow i108E, it's essential to prepare your lawn to ensure a smooth installation and optimum performance. This means clearing the area of any major obstacles such as branches, toys or stones. Make sure the lawn is evenly mown, which will facilitate the initial navigation of the mower. If the lawn has not been mowed for some time, it will need to be mowed manually before the robot is put into operation.
Unlike traditional robots, as we've seen with the Husqvarna Automower 305 for example, there's no need to install a perimeter cable here. And that makes all the difference! Installation is much simpler, and much faster.
The first step is to position the charging station. Choose a spot on your lawn that's easy to access and, above all, flat, otherwise the robot may have trouble parking there. Secure the charging station with the stakes supplied to ensure its stability.


Next, assemble the antenna. It should be positioned so as to be clear, at least 2m from a building.

Velcro strips are supplied to secure the cable along the pole. We would have preferred to be able to pass the cable through the post, for aesthetic reasons and to protect the cable, but this isn't provided for, which is a pity.

The antenna is then connected to the rear of the station. There's no risk of making a mistake, as the connectors are different between the antenna and the power supply. Note that the antenna cable is long enough to move the antenna to a more open area if necessary. So you can easily have the station in one place, and the antenna 4-5m away, for better reception.

For my first tests, I positioned the antenna next to the station, but then I had to move it. But basically, the installation works like this:

We connect the station's power supply, and place the robot on its station to charge it. In 5 minutes, our robot is up and running.

The green light on the station confirms that everything's ok!

All that's left to do is set up the Navimow mobile application. This is of course available on both iOS and Android.

Simply request to add a device, and choose the I series model. The app will then guide you through the initial set-up steps, including mapping your lawn.

We start by connecting the robot to our Wifi network:

The assistant then helps us with the installation.

And reminds us how to position the antenna and station:

Everything is clear and precise enough so that you don't have to spend hours in the user manual :)

If you ever have trouble positioning the antenna correctly, you can control the robot via the smartphone to take it around the terrain: a map is then drawn up with colors indicating the quality of reception. Place your antenna in one of the green zones, and that's it.

Once the unit is connected, an update will undoubtedly be proposed. Of course, you'll need to leave it alone, as it will correct potential problems and improve the robot's behavior.

Once all this is done, the next step is to map the lawn. This is the most important stage, enabling the robot to know its working area. Simply use the application to delimit the mowing zones and define prohibited areas (such as flowerbeds, for example). EFLS technology enables the mower to understand the boundaries of the lawn without the need for cables.

Here again, the assistant explains in detail what to look out for, and how to proceed with the mapping.


We start by creating the boundary of the area, i.e. the perimeter of the land to be mowed.

There can be two types of boundary:
- the standard boundary: the robot will mow within the delimited area. It will leave a small border all around, which will need to be cut from time to time with the rotary harrow. Along a wall, a fence, a flower border, etc., this is the type of boundary that will be used by default.
- overlap boundary: if you have a driveway at the same level as the lawn, for example, you can select this type of boundary. The robot will then mow straddling the lawn and driveway, leaving no border to finish. A perfect job! But both must be at the same level, otherwise the robot's blades may be damaged.


The Segway Navimow i108E also features a highly innovative function: the use of AI to automatically delimit the area to be mowed, thanks to its camera!
All you have to do to map the area is drive the robot like a remote-controlled car from your smartphone, and it will circle the terrain. It's a principle we've seen before, on the Ecoflow Blade model for example. But thanks to AI, if an edge of the area is along a wall, a fence, a flowerbed or a driveway, for example, the robot will be able to find the edge itself, without you having to do anything! It's quite amazing!

Now that we've got all that out of the way, we can start mapping. First, we move the robot to the starting point of the area to be mowed. After all, the recharging base may be off-center and not in the area to be mowed. How convenient!

Once you've reached your starting point, you can start mapping the area. Left and right joysticks are used to steer the robot with your fingertips.

If the robot detects an edge it can manage on its own, the “Assist Mapping” mode is activated.

You can ignore it and continue mapping manually. Or we can accept it and let the robot discover the area on its own. If he needs help, he'll call us. But frankly, this assisted mode makes life much easier! Mapping like this was already much easier than having to run a cable all around the terrain. But now the AI has made it even easier, making mapping almost automatic (depending of course on the complexity of the terrain).

Example of automatic mapping behavior (unfortunately, the rooster got in the way :/):
This takes you all the way around the terrain, back to your starting point. Once you're there, all you have to do is click on “Finish”.

And save your map:

We can then add other work zones, or forbidden zones, if we wish.

If you create several zones, you'll need to create a path between them, so that the robot can find its way from one zone to another. In this way, the robot can walk along a driveway on its own to reach a second mowing zone, as long as the driveway is accessible to it.


Creating a passageway is done in the same way, by manually piloting the robot from one zone to another.

And here's a second zone created, with its passageway in between:

Here, I've even gone one step further by creating a third zone and a slightly more complicated passageway: but the robot manages perfectly! It can mow the garden, the side of the house, and when I need it, the places where we park the cars.

In 15 minutes, the map was ready. Whereas it would have taken several hours to install a perimeter cable! The other advantage of this type of mapping is that it can be easily modified if the layout of the garden changes (new flowerbeds, installation of a trampoline or swimming pool, etc.). This is much more complicated when a cable has been laid…
Conveniently, if you make a mistake when mapping, the “erase” function allows you to go back and redo the problematic part of the route. No need to redo the entire map.
Then simply press the “Mow Now” button to start mowing the entire terrain. Or select the area or areas to be mowed on the map. The robot goes to work immediately, then returns to charge when it's finished (or runs out of battery if the area is large).
Of course, automatic mowing times can be programmed. The Navimow i108E offers the flexibility to define specific time slots, avoiding times when the lawn is usually used by the family or pets. You can define the days and times, as well as the areas to be mowed if you don't want to do everything at once.
In this case, I mow every weekday morning, since nobody uses the garden. On weekends, however, the robot is off to let us enjoy the garden. The advantage of a robotic lawnmower is that it can be used almost every day. In fact, it's advisable to run it regularly, as it uses the mulching technique: it will cut just a few millimeters of lawn each time, which will be transformed into natural fertilizer for the lawn. It's good for the lawn, and eliminates the need for a bin that has to be emptied regularly.

The application offers many other customizable parameters, such as the robot's lighting and sound effects, if you prefer a more discreet robot.

You can even check the satellite distribution to ensure that the antenna is receiving the correct signal:

Rain detection is also included: if you activate it, you can avoid mowing when the grass is too wet. Finally, mowing reports keep you informed of the various mowings carried out, the time spent, etc.

For larger gardens, the manufacturer offers the optional Navimow Access+ accessory (€99.99). This module adds a 4G mobile connection to the mower (subscription included for one year) in the absence of full Wi-Fi coverage in the garden, as well as anti-theft protection (geofencing).
Segway Navimow i108E: in use
In performance tests, the Segway Navimow i108E stood out for its efficiency and cutting-edge quality. Thanks to its EFLS 2.0 navigation system, the mower moves methodically, covering the entire lawn without leaving any unmown areas. The rotating blade ensures a precise, even cut, which is essential for maintaining a healthy lawn.
As shown here, once all the edges have been cut, the robot mows the center straight down in rows:

And it overlaps each line to make sure it doesn't miss a single strand:

Ditto in this area: clean and homogeneous!

But there's another important detail: the robot doesn't always mow in the same direction! One day it'll mow in one direction. The next day at 90°. The day after at 45°. This method means there are no streaks in the grass, which occurs when you always cut in the same direction. After a few days, you have a super-clean lawn, worthy of a soccer stadium :) And there's nothing to set here – it's automatic.
Only the edges will remain to be trimmed with the rotofil if the limits have been set in standard mode (and the robot can therefore not overlap the edges). Between the cutting distance and the central position of the cutting deck, allow for about fifteen centimetres that will not be cut by the robot. But this is unfortunately the problem with all robotic mowers today. Unlike a robot vacuum cleaner, its cutting deck cannot be moved to the side – for safety reasons, of course.

As for the type of terrain, the robot is capable of adapting to different types very easily, including slopes of up to 30%, which should satisfy most needs.
To get around, the Navimow i108E uses advanced sensors to detect and avoid obstacles on the lawn, without having to declare them first on the map. It combines an RTK processor with a camera featuring VisionFence technology, enabling it to avoid most obstacles perfectly, even if it no longer receives a GPS signal.

During tests, the mower demonstrated a remarkable ability to navigate around objects such as trees, flowerbeds and garden furniture. If an obstacle is detected, the mower adjusts its trajectory without interrupting the mowing process. This reduces the risk of collision and ensures continuous, efficient mowing.

Another important point to note is the impressive silence of this robot! So quiet, in fact, that you often wonder if it's actually cutting. It's clearly the quietest robot I've ever tested. While we'd advise against mowing at night, to leave all those little creatures alone (hedgehogs, etc.), there's no need to worry about mowing early in the morning or even on Sundays: there's no risk of disturbing the neighbors, you simply can't hear it!
The Navimow i108E's battery offers impressive autonomy, allowing the mower to run for several hours before needing a recharge. At home, it manages to mow everything in one go. It has to be said that this model is fast thanks to its methodical mowing, unlike the old “ping pong” models, which change direction at every obstacle and take forever to do a patch of garden. Here, it's fast and efficient.
Recharging time is relatively quick, at around 2-3 hours, so the mower can get back to work quickly if needed.

The Navimow i108E is of course equipped with a number of safety features to ensure safe operation. It features lift and tilt sensors that instantly stop the blades if the mower is lifted or tilted. In addition, the device is equipped with collision sensors to avoid obstacles and minimize the risk of damage.
Not forgetting, of course, its camera, which recognizes a wide range of objects and manages them efficiently.
Finally, a word on maintenance: the mower is designed to be virtually maintenance-free. Blades should be inspected regularly and replaced if necessary to ensure a clean cut. What's more, the application keeps a close eye on things, with a usage counter:

The charging station and mower just need to be cleaned periodically to prevent debris build-up. Thanks to its IP66 waterproof rating, it can be hosed down without any problem.
Conclusion
The Segway Navimow i108E is an outstanding solution for automated lawn care. Thanks to its EFLS 2.0 navigation technology, it eliminates the need for peripheral cables, greatly simplifying installation and configuration. Its mowing performance is outstanding, delivering a precise, even cut even on complex terrain. With solid autonomy and fast recharging, this robot mower is ready to take on any challenge in your garden!
This Segway Navimow i108E is, in my opinion, a top choice for those looking to automate their lawn care with a reliable, high-performance device. Its ability to navigate without cables, combined with robust functionality and ease of use, makes it a must-have on the robotic mower market. What's more, given its very tight price tag of €1299, it's, in my opinion, the best value for money in the field this year. Personally, it's become my favorite model! Other models are being tested in parallel, and frankly it's the Segway model that comes out on top! We'll come back to this at the end of the season, but this model has everything it takes to become THE reference.
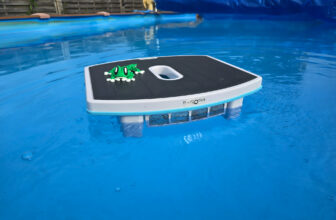
The only flaw I can find? The lack of height obstacle management. For example, the bumper of a parked car, which is a bit high, or solar panels on an elevated support, like this one, about thirty centimetres high:

The robot sees no obstacle at its level, and goes to do its job. But passing underneath it can damage or even trap it. Unfortunately, mine already has a few scratches as a result :/

Solution: create no-go zones for those tricky spots. And we can look forward to a future update, as the robot may improve over time thanks to automatic updates :)
Note that there are two models: i105E and i108E. The difference lies mainly in the recommended plot size, the i105E being suitable up to 500m2, and the i108E version (tested here) for plots up to 800m2. The battery is slightly larger on the i108E. The rest is identical. If you have a plot of less than 500m2, the i105E version is less than €1,000 (€999 )!
Please remain courteous: a hello and a thank you cost nothing! We're here to exchange ideas in a constructive way. Trolls will be deleted.