Although it's not a good idea to use a home automation system as an alarm system, it's still very practical to be able to integrate certain information from your independent alarm system into your home automation system. By knowing the current mode of the alarm, the home automation system can, for example, close the shutters, deactivate certain scenarios, or launch the robot vacuum cleaner. What's more, certain sensors can be reused, such as opening or motion detectors, so there's no need for duplicate sensors (one opening sensor for the alarm, another for the home automation system…). You can switch off the heating if a window is open, turn on a lamp when someone enters the room, and so on. I've been using the excellent Ajax alarm for some time now, so I decided to integrate it into Home Assistant. Not so easy, but it works!
To integrate the Ajax alarm into Home Assistant, there are currently two methods: one that's easy, but far from complete; and one that's a little more laborious, but much more satisfying! Let's take a look at both.
Easy method: Ajax Home Assistant plugin
When a plugin exists for Home Assistant, it always makes life a lot easier. This is precisely the case with the Ajax alarm, which uses the SIA protocol for remote monitoring. This method declares Home Assistant as a monitoring center, enabling it to communicate with the alarm.
Installation is a two-step process. First, on the Ajax application itself. You'll need to go to the control unit's settings via the cogwheel in the top right-hand corner, then to “Security Companies” at the very bottom of the menu, then to “Monitoring Center”.
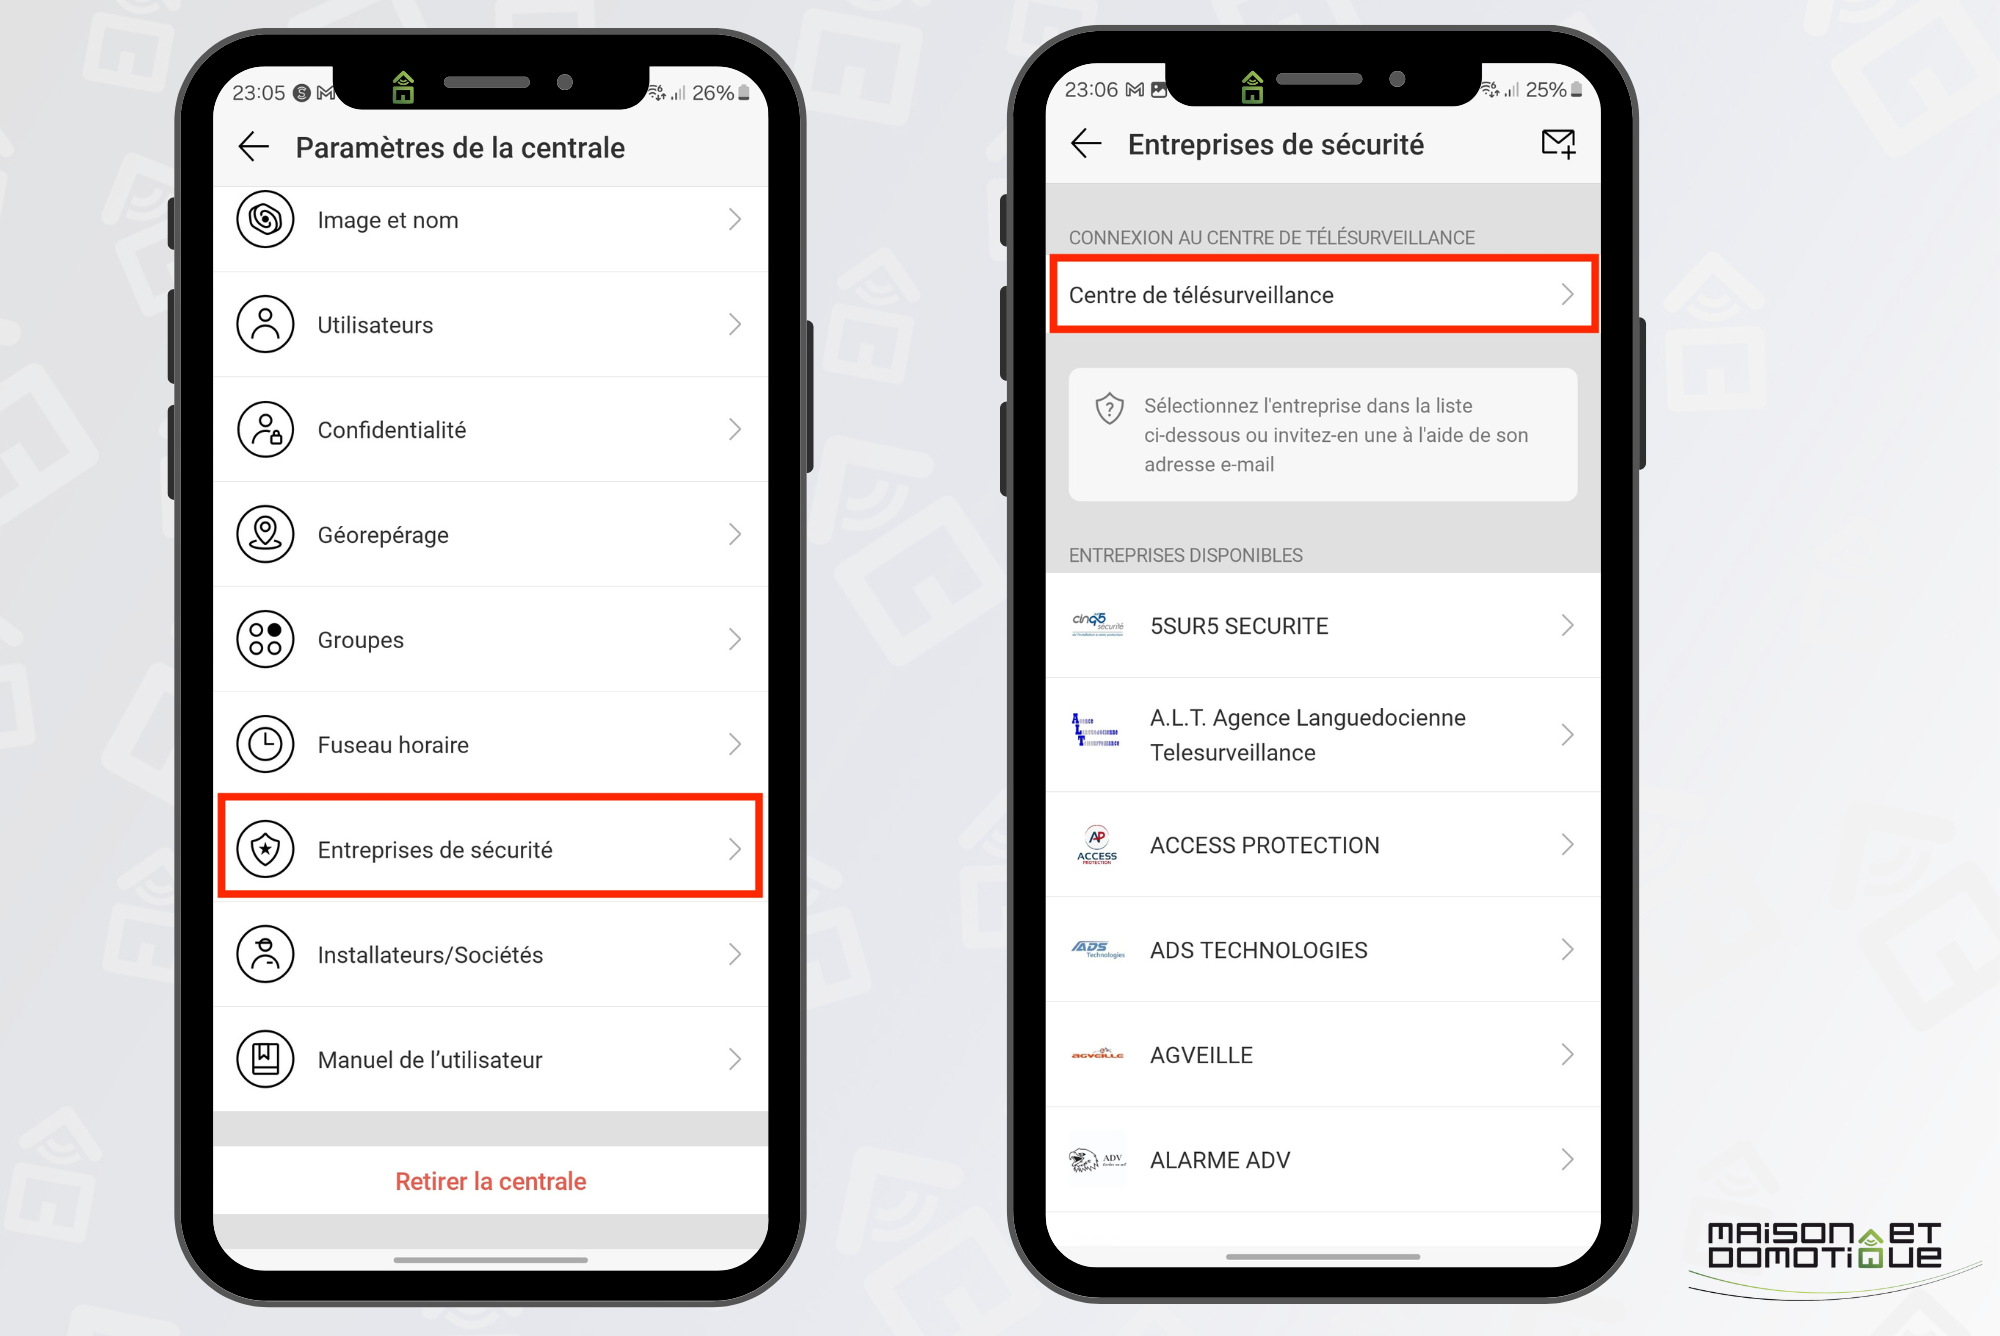
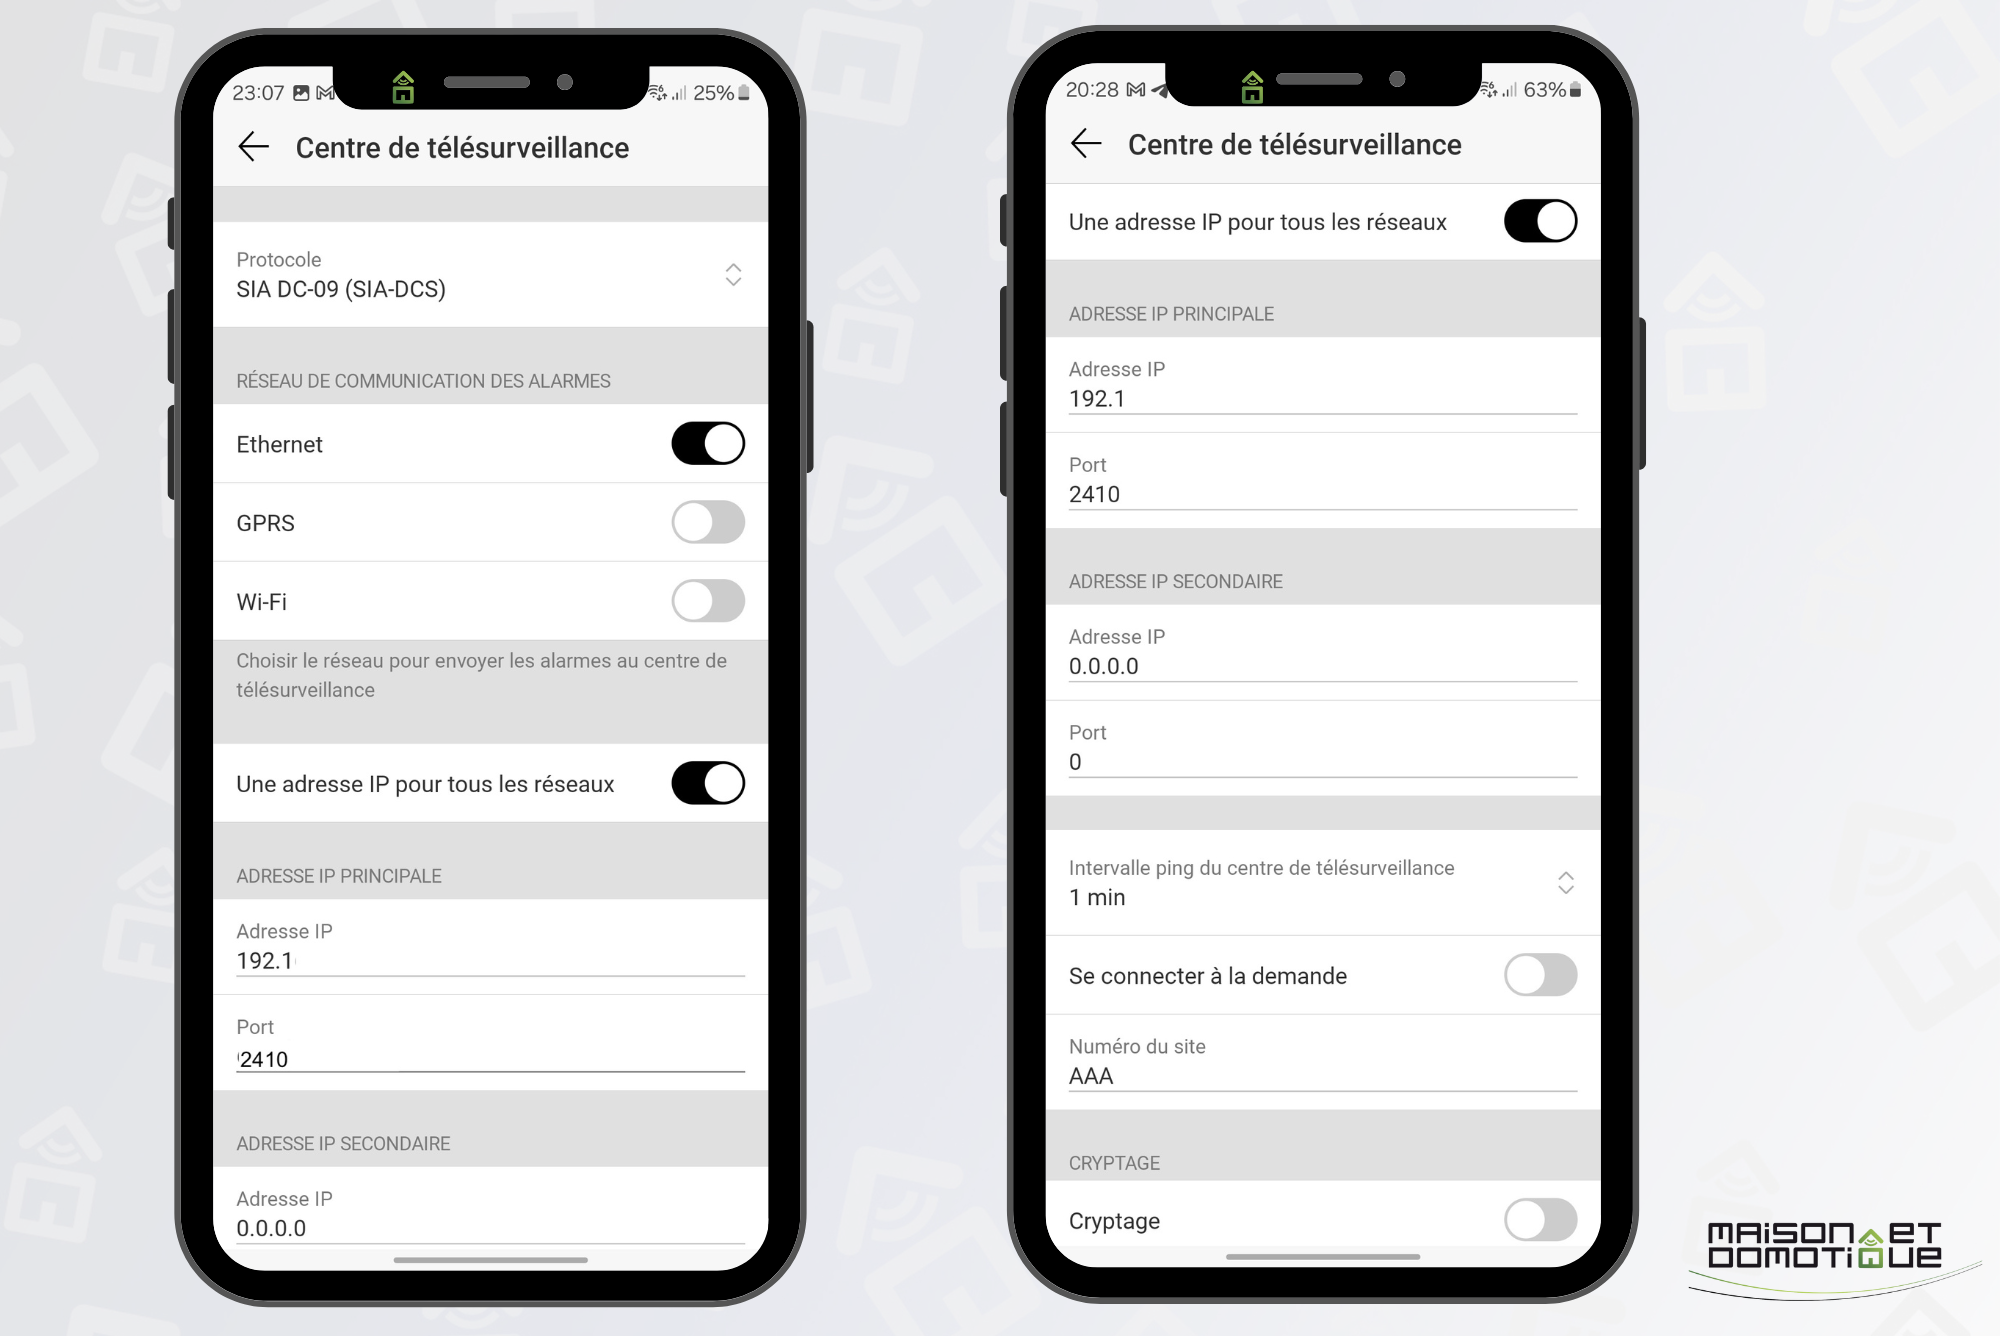
Select the “SIA DC-09” protocol. Check “one IP address for all networks”, and enter the IP address of your Home Assistant. For the port, however, you need to use a port that is not used by Home Assistant, such as 2410 (at random :p).
In ping interval, enter 1min, and in site number “AAA” for example. That's all. Go back, and the settings are saved.
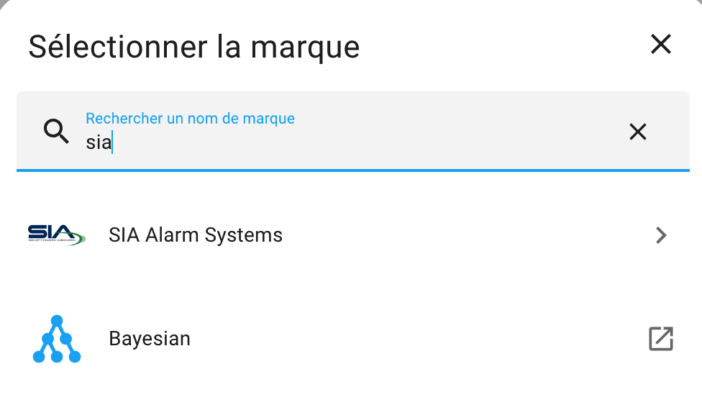
On the Home Assistant side, you now need to install the plugin. Go to the Devices section, add an integration, and search for “SIA Alarm Systems”. This is not a plugin dedicated to Ajax, but to the SIA protocol, used by many alarm systems, including Ajax.
In the configuration dialog box, simply enter the port indicated in the Ajax application (here 2410), the AAA account identifier, and the number of existing zones in our Ajax configuration (here 2, as I have, for example, the ground floor and the first floor).
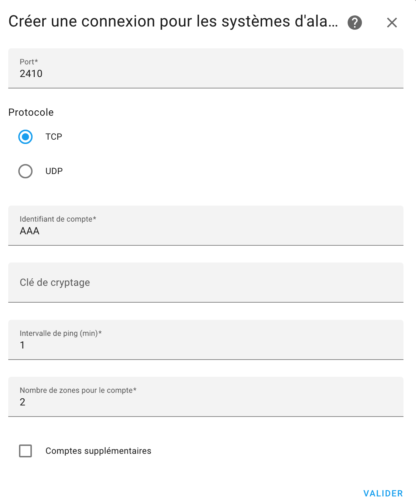
Validate: configuration complete!
A series of new devices is then created in Home Assistant, according to the number of zones configured:
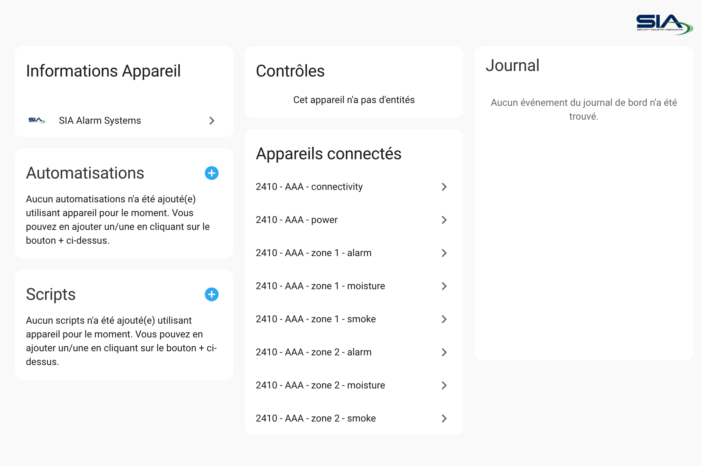
As you can see, we retrieve the alarm status, the flood alert status and the fire alert status.
If you select the alarm status, you can see its status changes:
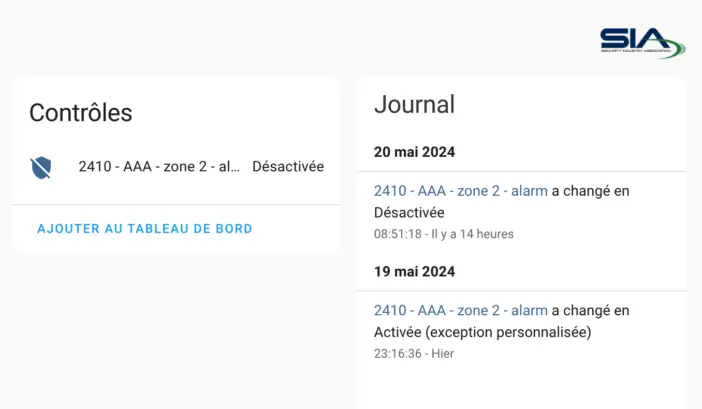
These states can then be used for various scenarios, such as those mentioned in the introduction: automatic closing of shutters when the alarm is activated, switching on the vacuum cleaner when the system is fully armed, etc.
Unfortunately, as you can see, the data is very succinct, and you don't get the status of the alarm system's various sensors, nor is it possible to control the alarm from Home Assistant. Interest in this first option is therefore limited.
Advanced method: MQTT via Jeedom
While the information provided by Home Assistant on the Ajax alarm is very succinct, the same cannot be said of the Jeedom plugin, which is very complete!
Judge for yourself:

The trick is to use the Ajax plugin on Jeedom, then send all the information to Home Assistant via MQTT. Okay, it may seem a bit complicated, but it's really not!
To get started, you'll need a running instance of Jeedom that's accessible from the outside. No need to buy a Jeedom home automation box for this, rest assured. You can install it under Proxmox, as we've already done with Home Assistant, or in a virtual machine on a Synology Nas, for example (raise your hand if you also need a guide to installing Jeedom under Proxmox?). And a reverse proxy will allow access from the outside.
Ajax plugin installation
You'll then need to install the Ajax plugin (paid, €8). Activate it, then click on the “Connect” button. You'll then need to enter your Ajax account username and password (you can create a dedicated account for this in the Ajax application).
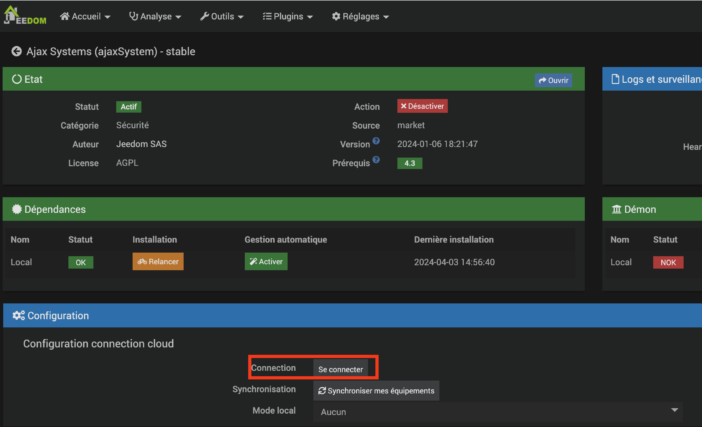
In the Ajax application, you'll also need to declare the user [email protected] in the Hub parameters (the invitation will always remain pending, which is normal).
From here, we can synchronize the devices: Jeedom will automatically create all the devices present on our Ajax system.
Installing the MQTT plugin
We now install the MQTT Manager plugin via the Jeedom store. This time it's free ;-)
Once installed, we activate it, and configure it as follows:
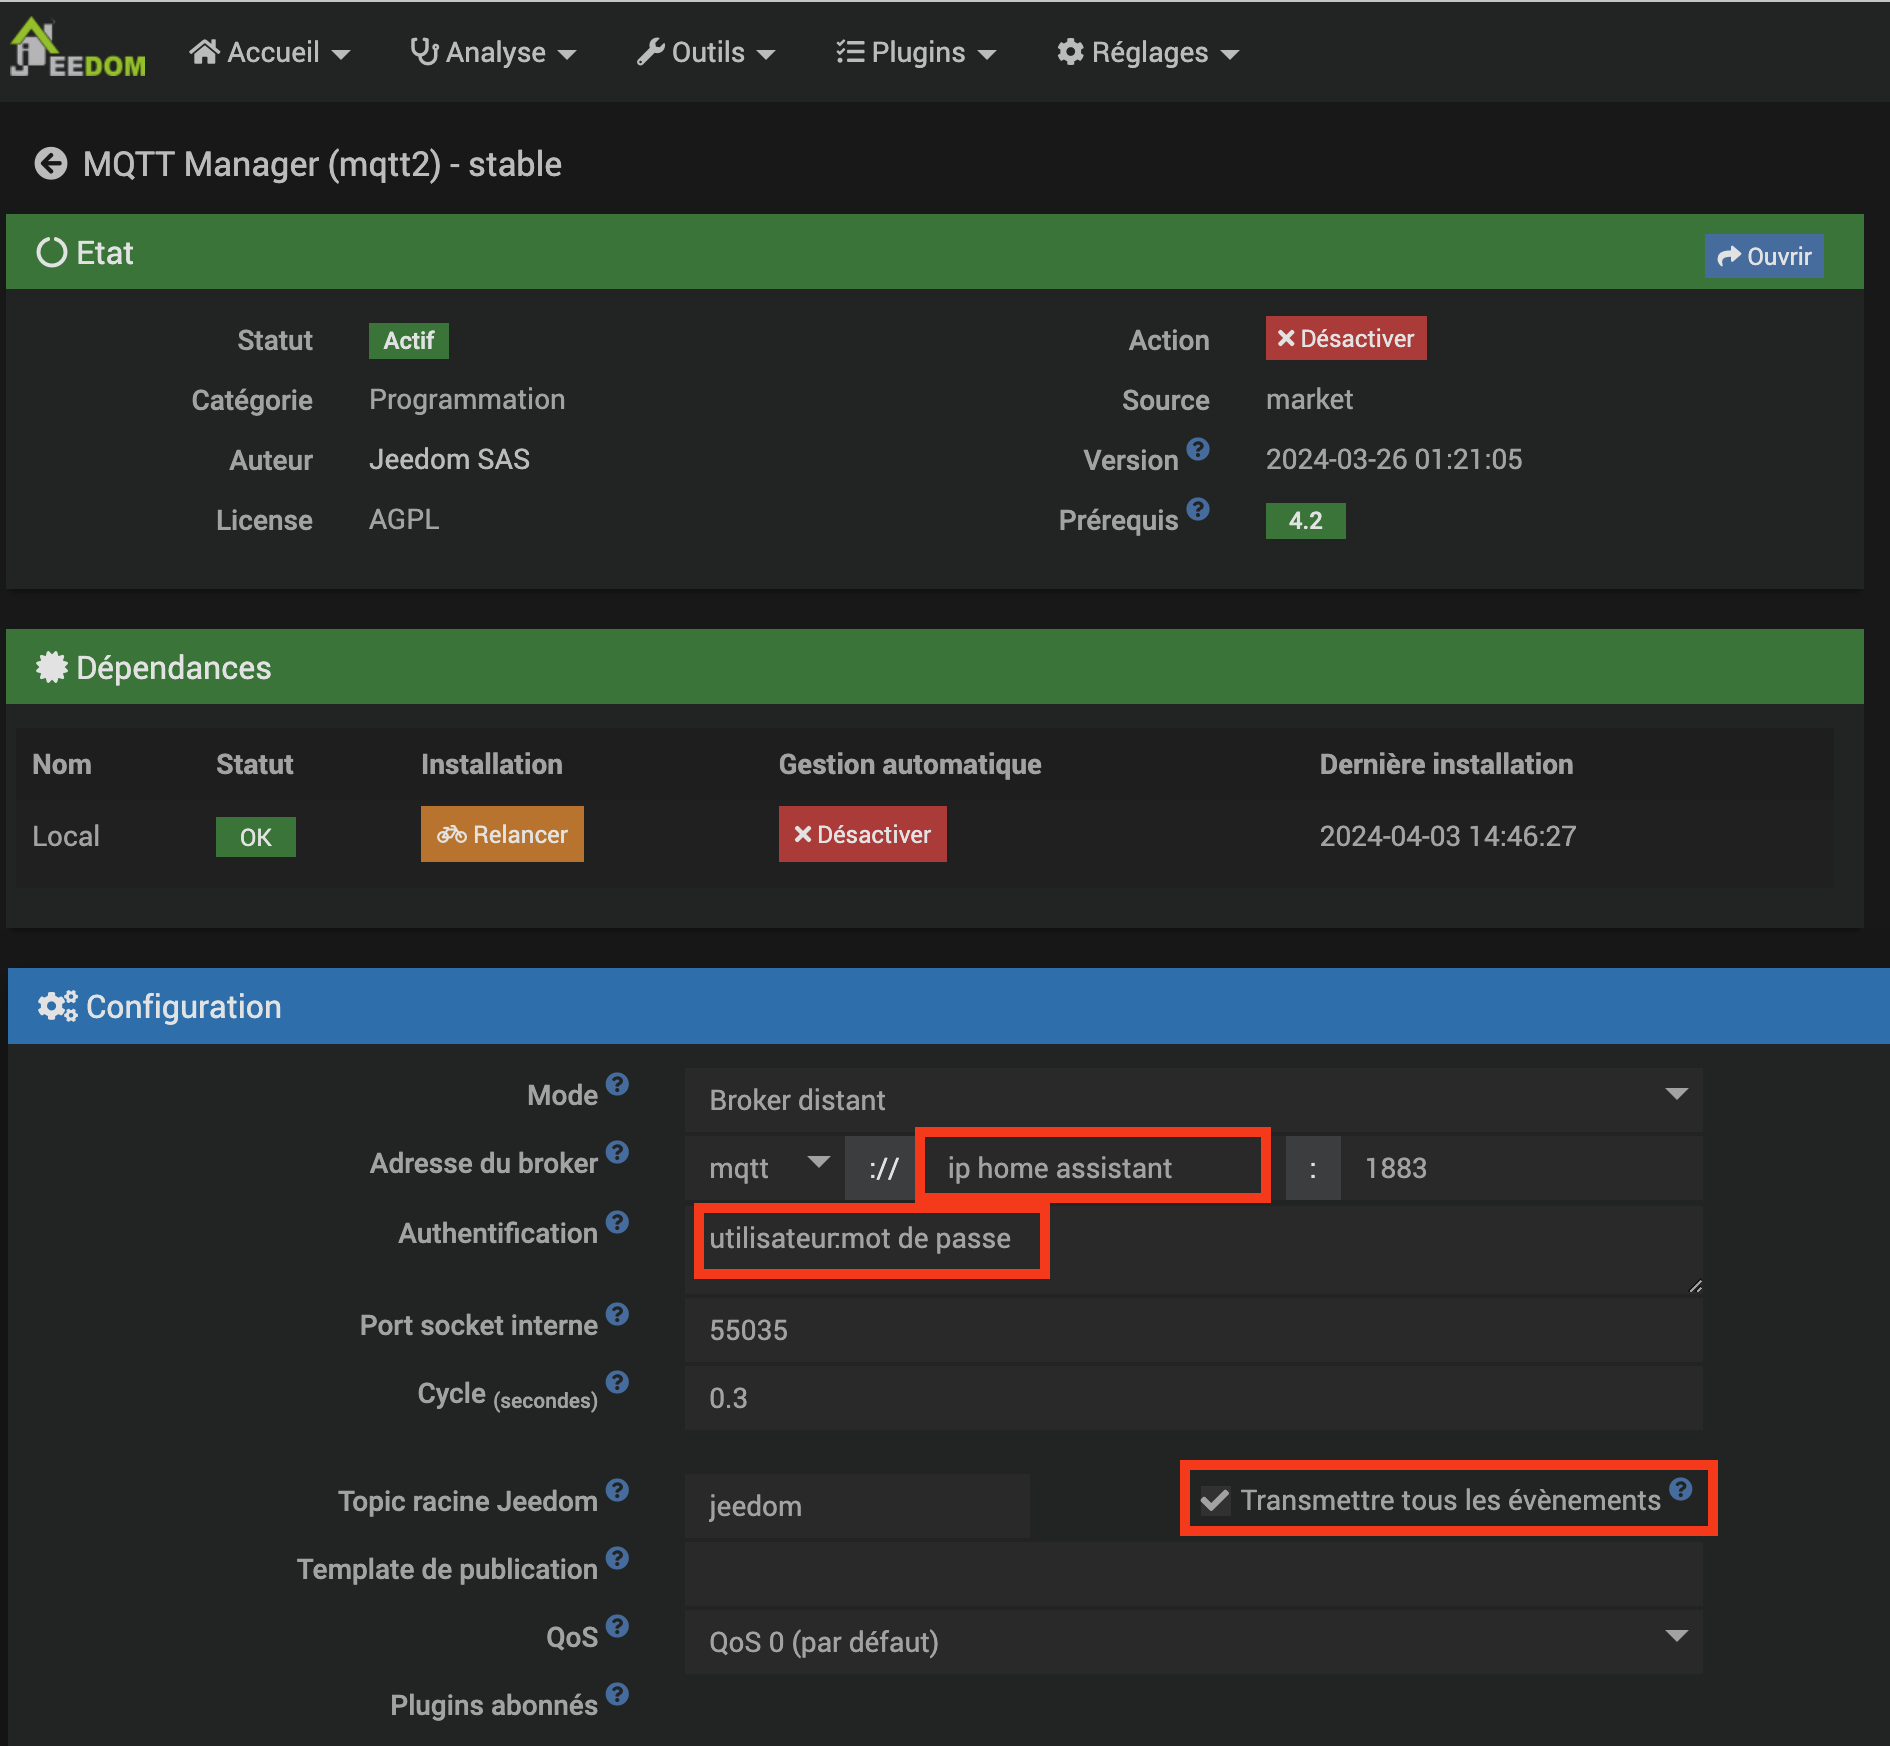
The mode must be set to Remote Broker, since we're going to use Home Assistant's MQTT broker (which you'll need to have configured beforehand, if you haven't already). So, just below, we indicate the username configured on our Home Assistant broker, as well as its password, both separated by “:”. Finally, check “Transmit all events”. Thanks to this, everything that happens on Jeedom will be communicated to the MQTT broker. Including all our Ajax alarm events!
That's it for Jeedom configuration! You can now, if you wish, use a client like MQTT Explorer, for example, if you want to check that the events in question are indeed transiting on the MQTT broker. But there's no obligation.
All that's left is to declare our devices on the Home Assistant side.
Creating devices on Home Assistant
This is the most tedious part, as we'll have to create our devices one by one in Home Assistant. Fortunately, you only have to do this once, and I'll provide you with the configuration file ;-)
For my part, to avoid overloading my configuration.yaml file, I've split it into several parts. The MQTT sensors are therefore in a mqtt.yaml file. If you don't already have one, you'll need to add this line to your configuration.yaml file:
mqtt: !include mqtt.yamlThen create the mqtt.yaml file in question.
To begin, I create 3 buttons corresponding to the Armed, Night, and Disarmed modes of the Ajax alarm:
button: - name: "Alarm Arm" command_topic: "jeedom/cmd/set/58" unique_id: "control_armement_ajax_from_jeedom" payload_press: "ARM" retain: false device: identifiers: "Alarm AJAX via Jeedom MQTT" name: "Alarme AJAX" model: "Hub 2 Plus" manufacturer: "AJAX" - name: "Alarme Mode Nuit" command_topic: "jeedom/cmd/set/59" unique_id: "control_mode_nuit_ajax_from_jeedom" payload_press: "NIGHT MODE" retain: false device: identifiers: "Alarme AJAX via Jeedom MQTT" name: "Alarme AJAX" model: "Hub 2 Plus" manufacturer: "AJAX" - name: "Alarme Désarmement" command_topic: "jeedom/cmd/set/60" unique_id: "control_desarmement_ajax_from_jeedom" payload_press: "DISARM" retain: false device: identifiers: "Alarm AJAX via Jeedom MQTT" name: "Alarm AJAX" model: "Hub 2 Plus" manufacturer: "AJAX"Here you only need to replace the numbers /58, /59 and /60 with your own. To find the corresponding numbers in your home, you'll need to go to Jeedom, Plugins / Security / Ajax System, and visit the control panel created in Jeedom:
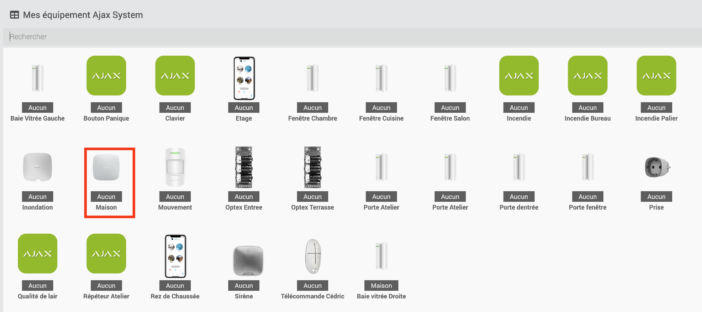
There, go to the commands tab, and search for arming/disarming commands:
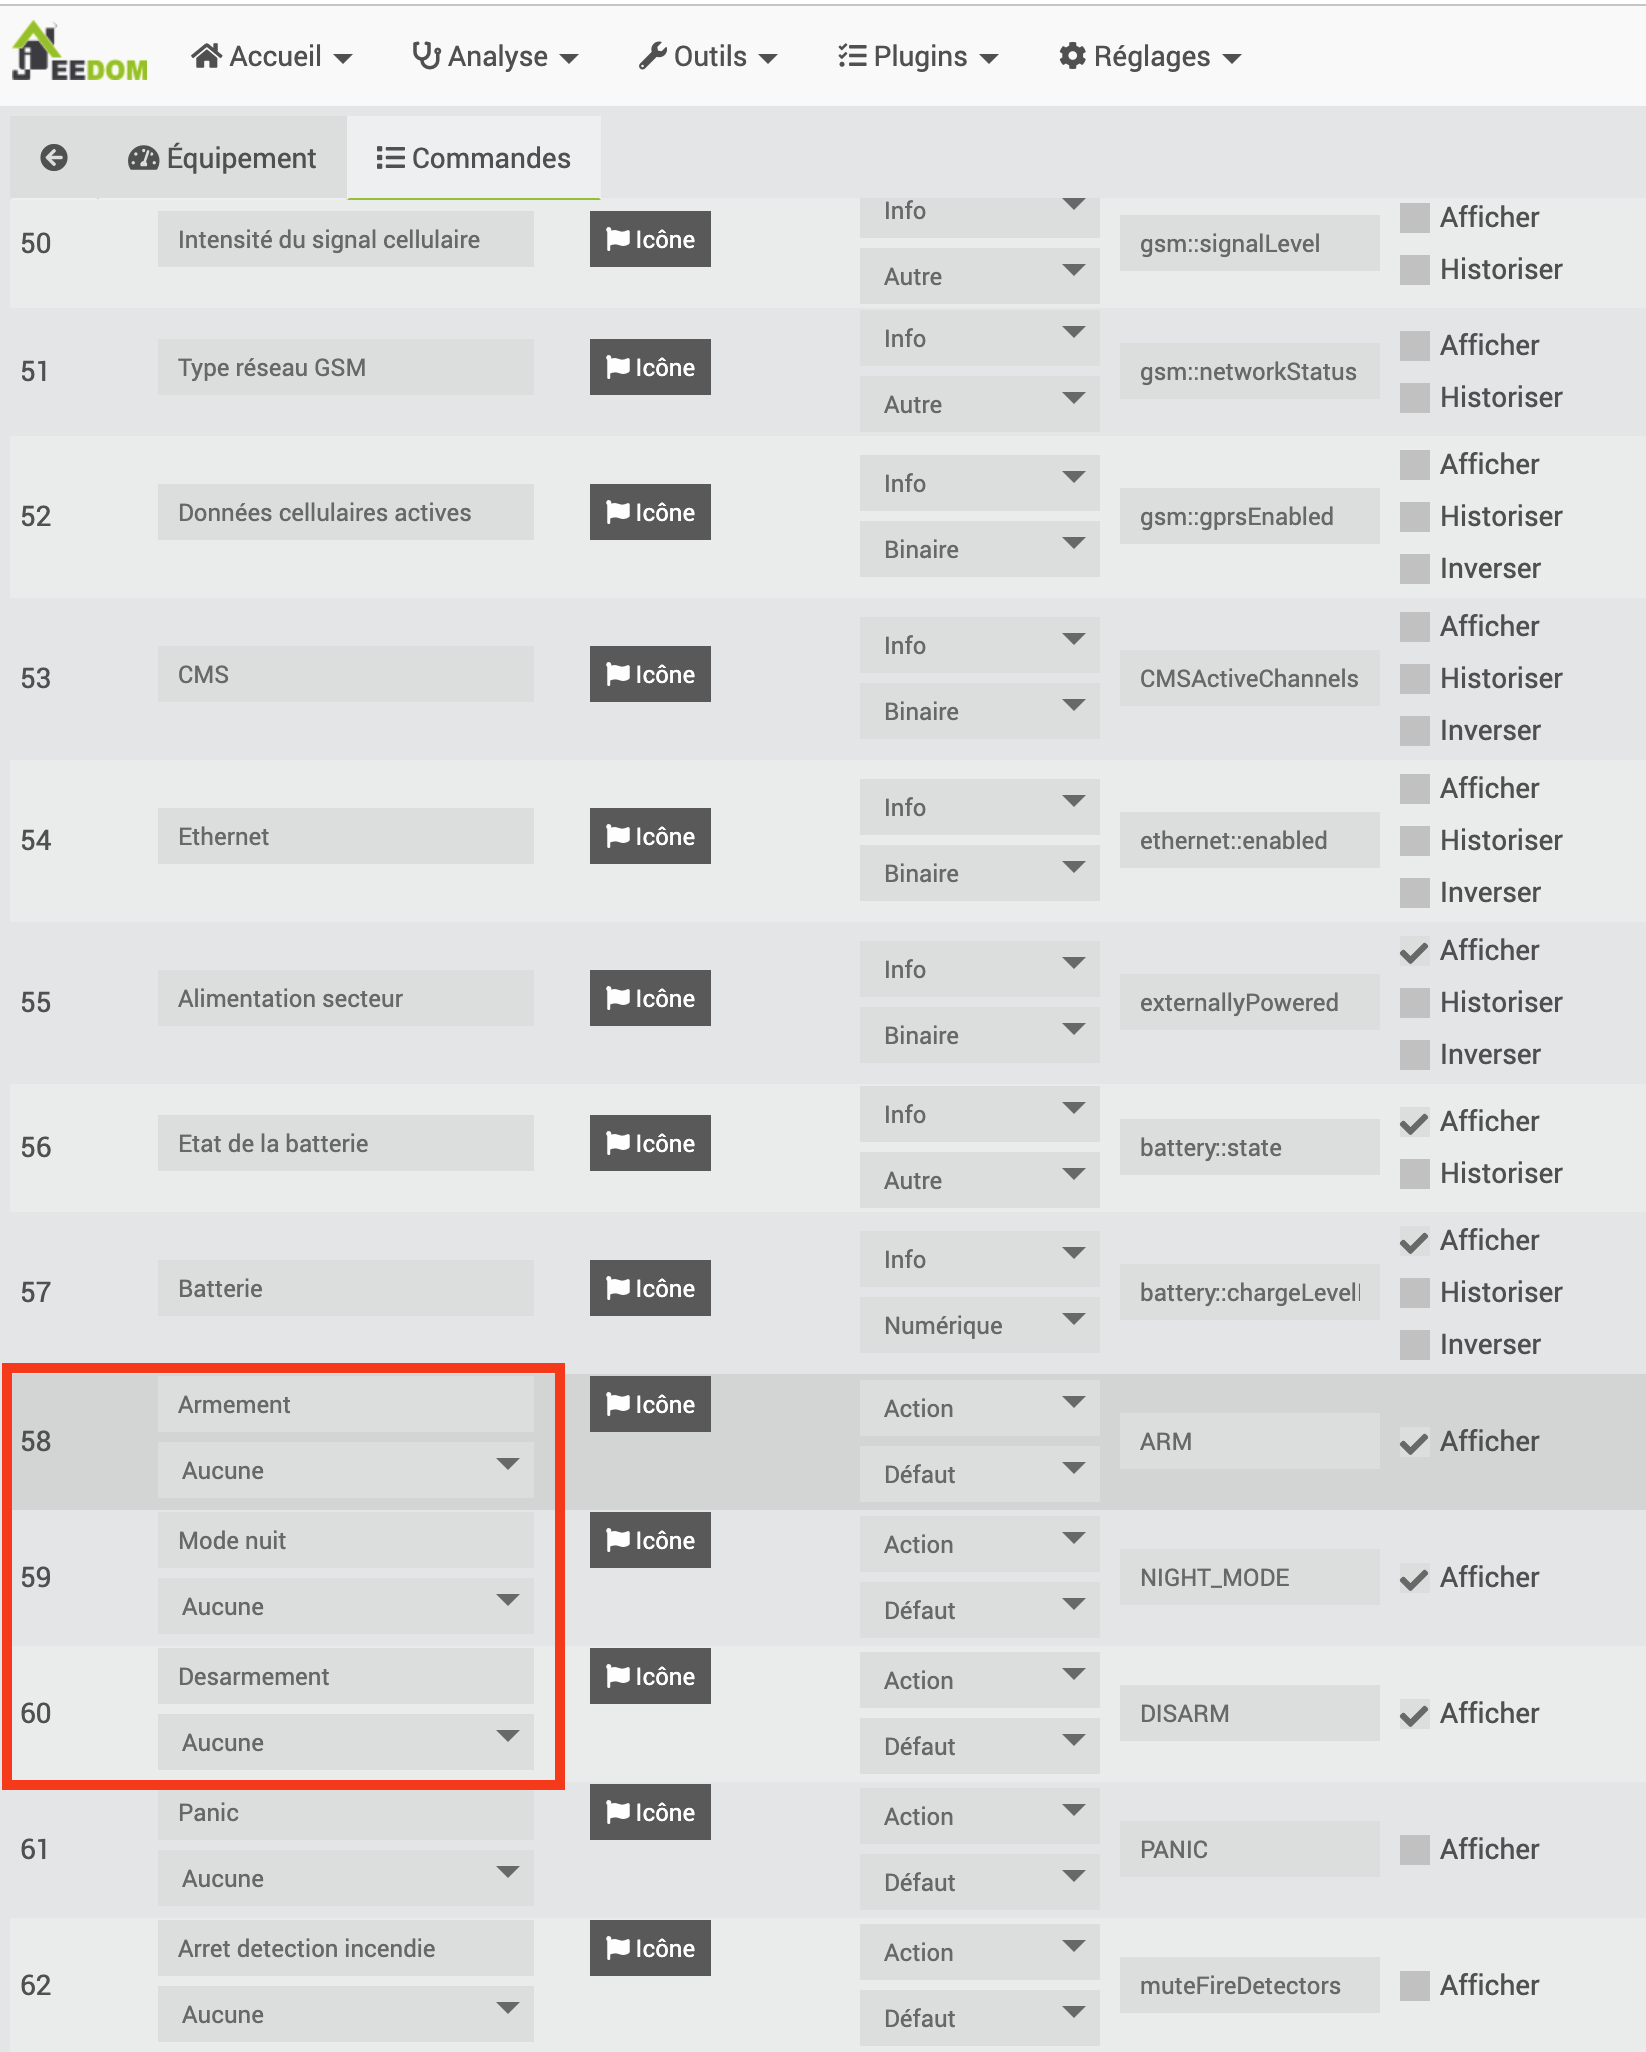
Read the numbers in front of each command, and enter them in the mqtt.yaml file. The principle will be the same for all subsequent commands.
Next, we create “binary sensors” for the opening and flooding detectors, since they only have an open or closed state:
binary_sensor: - name: "Bay window right" state_topic: "jeedom/cmd/event/239" unique_id: "etat_baie_vitree_droite_bureau_ajax_from_jeedom" device_class: window value_template: '{{value_json.value}}' payload_on: "0" payload_off: "1" device: identifiers: "Alarm AJAX via Jeedom MQTT" name: "Alarm AJAX" model: "Hub 2 Plus" manufacturer: "AJAX" - name: "Door Window" state_topic: "jeedom/cmd/event/144" unique_id: "etat_porte_fenetre_ajax_from_jeedom" device_class: door value_template: '{{value_json.value}}' payload_on: "0" payload_off: "1" device: identifiers: "Alarme AJAX via Jeedom MQTT" name: "Alarme AJAX" model: "Hub 2 Plus" manufacturer: "AJAX" - name: "Porte Entrée" state_topic: "jeedom/cmd/event/180" unique_id: "etat_porte_entree_ajax_from_jeedom" device_class: door value_template: '{{value_json.value}}' payload_on: "0" payload_off: "1" device: identifiers: "Alarm AJAX via Jeedom MQTT" name: "Alarm AJAX" model: "Hub 2 Plus" manufacturer: "AJAX" - name: "Flooding SdB" state_topic: "jeedom/cmd/event/135" unique_id: "etat_inondation_sdb_ajax_from_jeedom" device_class: moisture value_template: '{{value_json.value}}' payload_on: "0" payload_off: "1" device: identifiers: "Alarm AJAX via Jeedom MQTT" name: "Alarm AJAX" model: "Hub 2 Plus" manufacturer: "AJAX"You'll also need to replace the /239, /144 and /180 numbers with your own. In Jeedom, by going to the commands tab of the opening detector we're interested in, simply find the “Opening” command (or “Leak detected” for flood detectors) and note the number opposite:
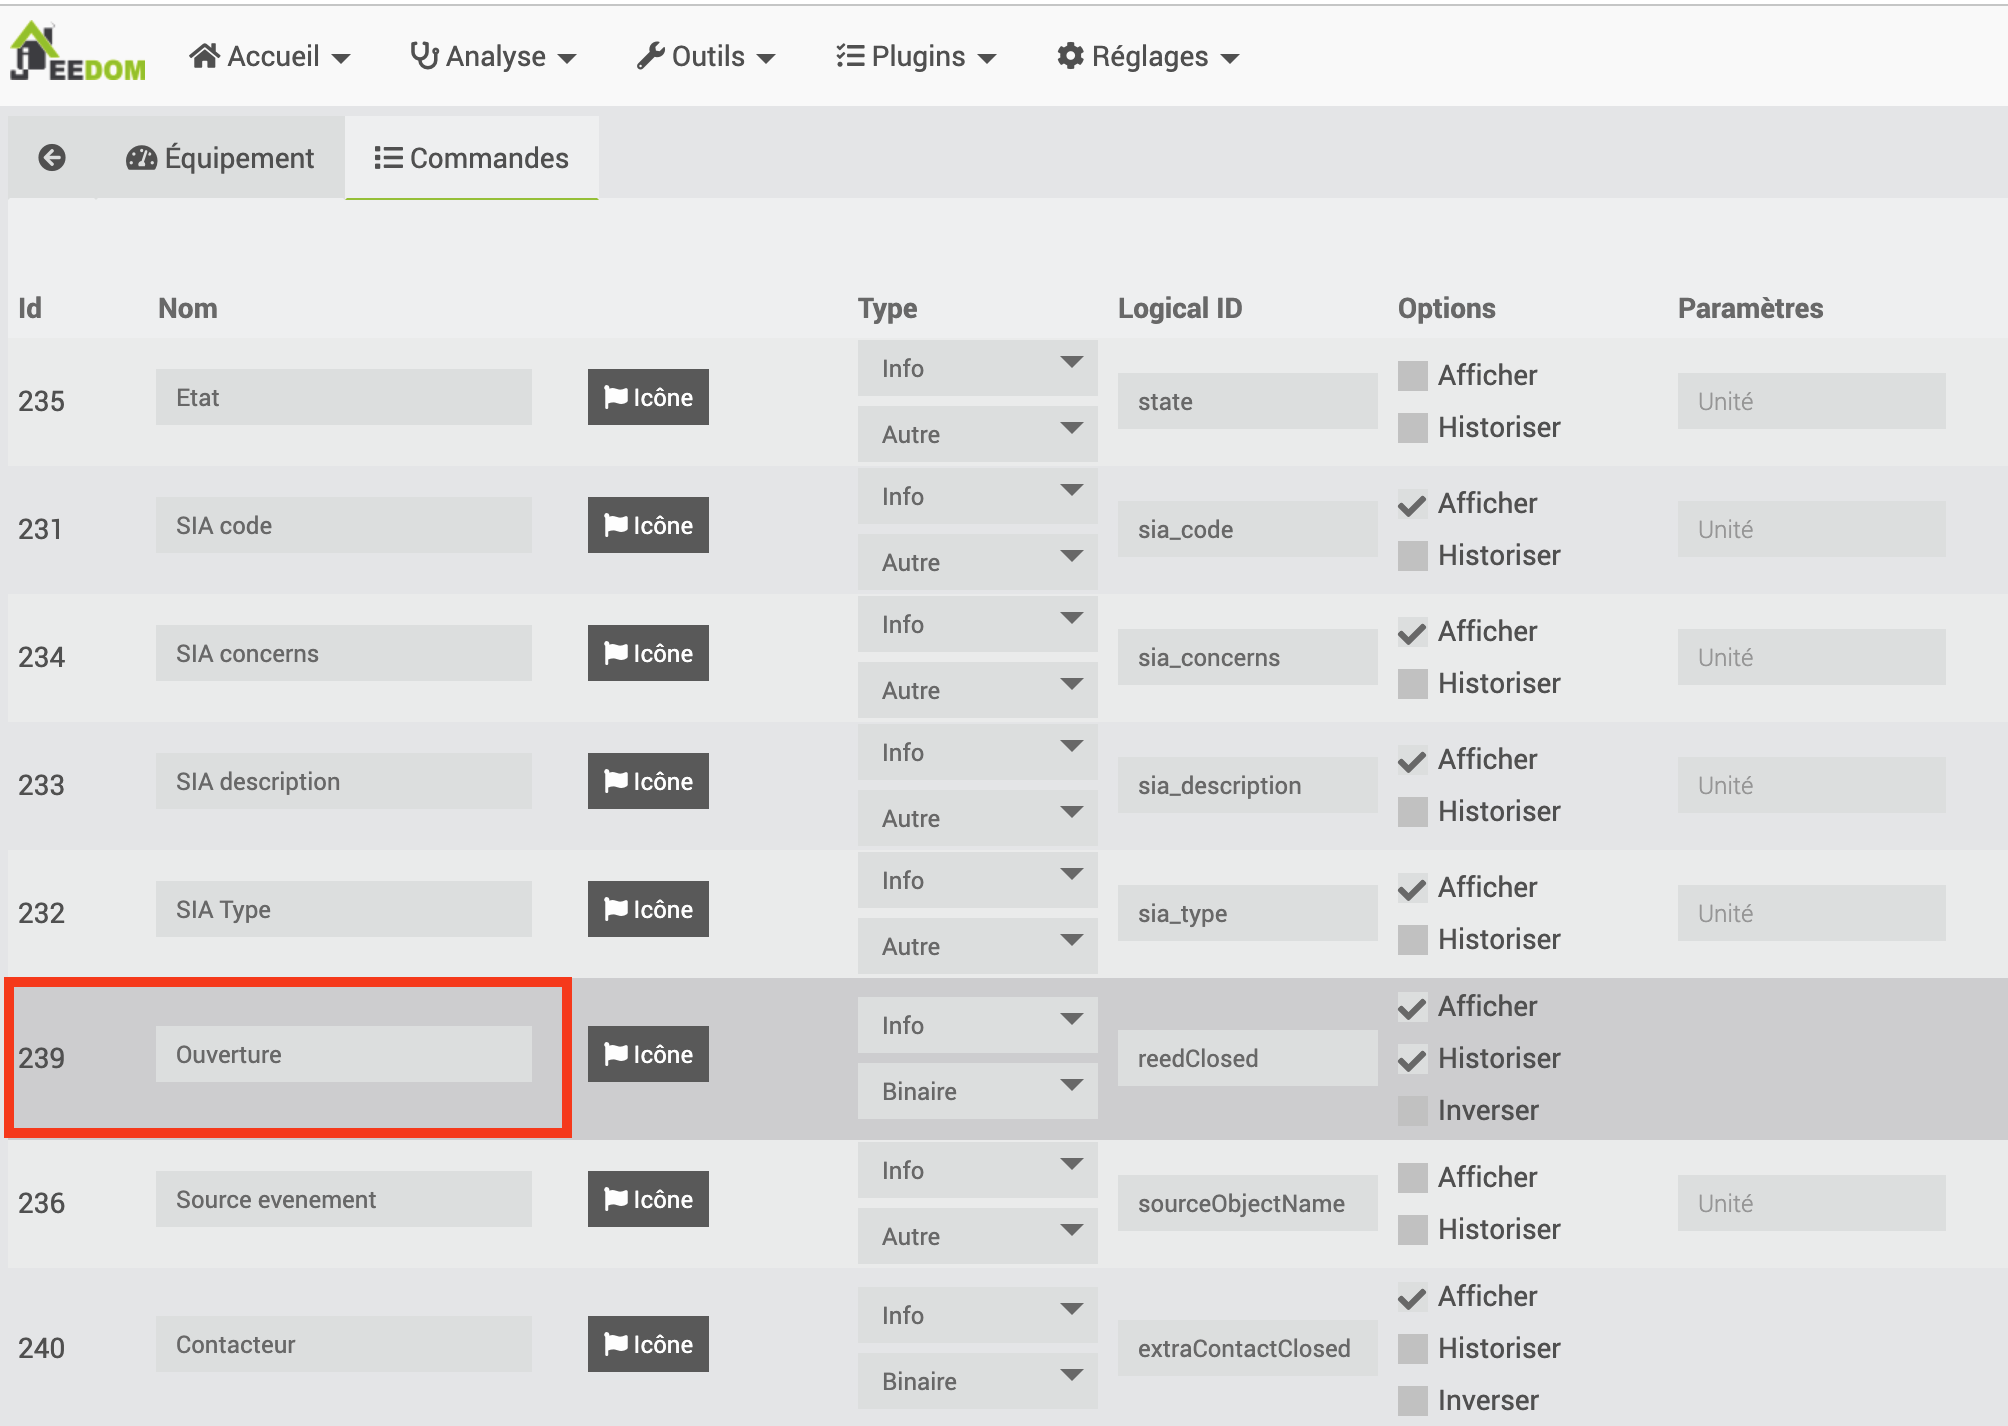
Do the same with all the opening sensors you wish to add to Home Assistant, duplicating the diagram. Don't forget to modify the “name”, which will be the name displayed in Home Assistant, and the “unique_id” which, as its name suggests, must be unique. You can also modify the “device_class” to display the right icon: window, door, etc. depending on the type of opening monitored. You can find a list of possibilities here.
Finally, we're going to create “sensors”, which can take a value, such as a temperature:
sensor: - name: "Etat Alarme Ajax" state_topic: "jeedom/cmd/event/44" unique_id: "etat_alarme_ajax_from_jeedom" value_template: '{{value_json.value}}' device: identifiers: "Alarm AJAX via Jeedom MQTT" name: "Alarm AJAX" model: "Hub 2 Plus" manufacturer: "AJAX" - name: "Baie vitrée droite Température" state_topic: "jeedom/cmd/event/241" unique_id: "temperature_baie_vitree_droite_bureau_ajax_from_jeedom" value_template: '{{value_json.value}}' device_class: temperature state_class: measurement unit_of_measurement: "°C" device: identifiers: "Alarm AJAX via Jeedom MQTT" name: "Alarm AJAX" model: "Hub 2 Plus" manufacturer: "AJAX" - name: "Door Window Temperature" state_topic: "jeedom/cmd/event/146" unique_id: "temperature_porte_fenetre_ajax_from_jeedom" value_template: '{{value_json.value}}' device_class: temperature state_class: measurement unit_of_measurement: "°C" device: identifiers: "Alarme AJAX via Jeedom MQTT" name: "Alarme AJAX" model: "Hub 2 Plus" manufacturer: "AJAX"The first sensor declared here will be used to retrieve the alarm status. Its number will be found on Jeedom, in the “Status” line of the control unit commands.
The following sensors are used to retrieve the temperature monitored by the opening detectors. Here again, you'll find the number in Jeedom, in the commands for the opening detector in question, in the “Temperature” line.
In this way, we declare all the sensors we wish to retrieve in Home Assistant.
Pay particular attention to the indentation of the yaml file. You can download mine below for a correct template file:
Once the file is complete, save it, then validate the configuration via the “Development Tools” menu, “Check configuration”. If all is ok (green message), you can restart Home Assistant to take these new devices into account.
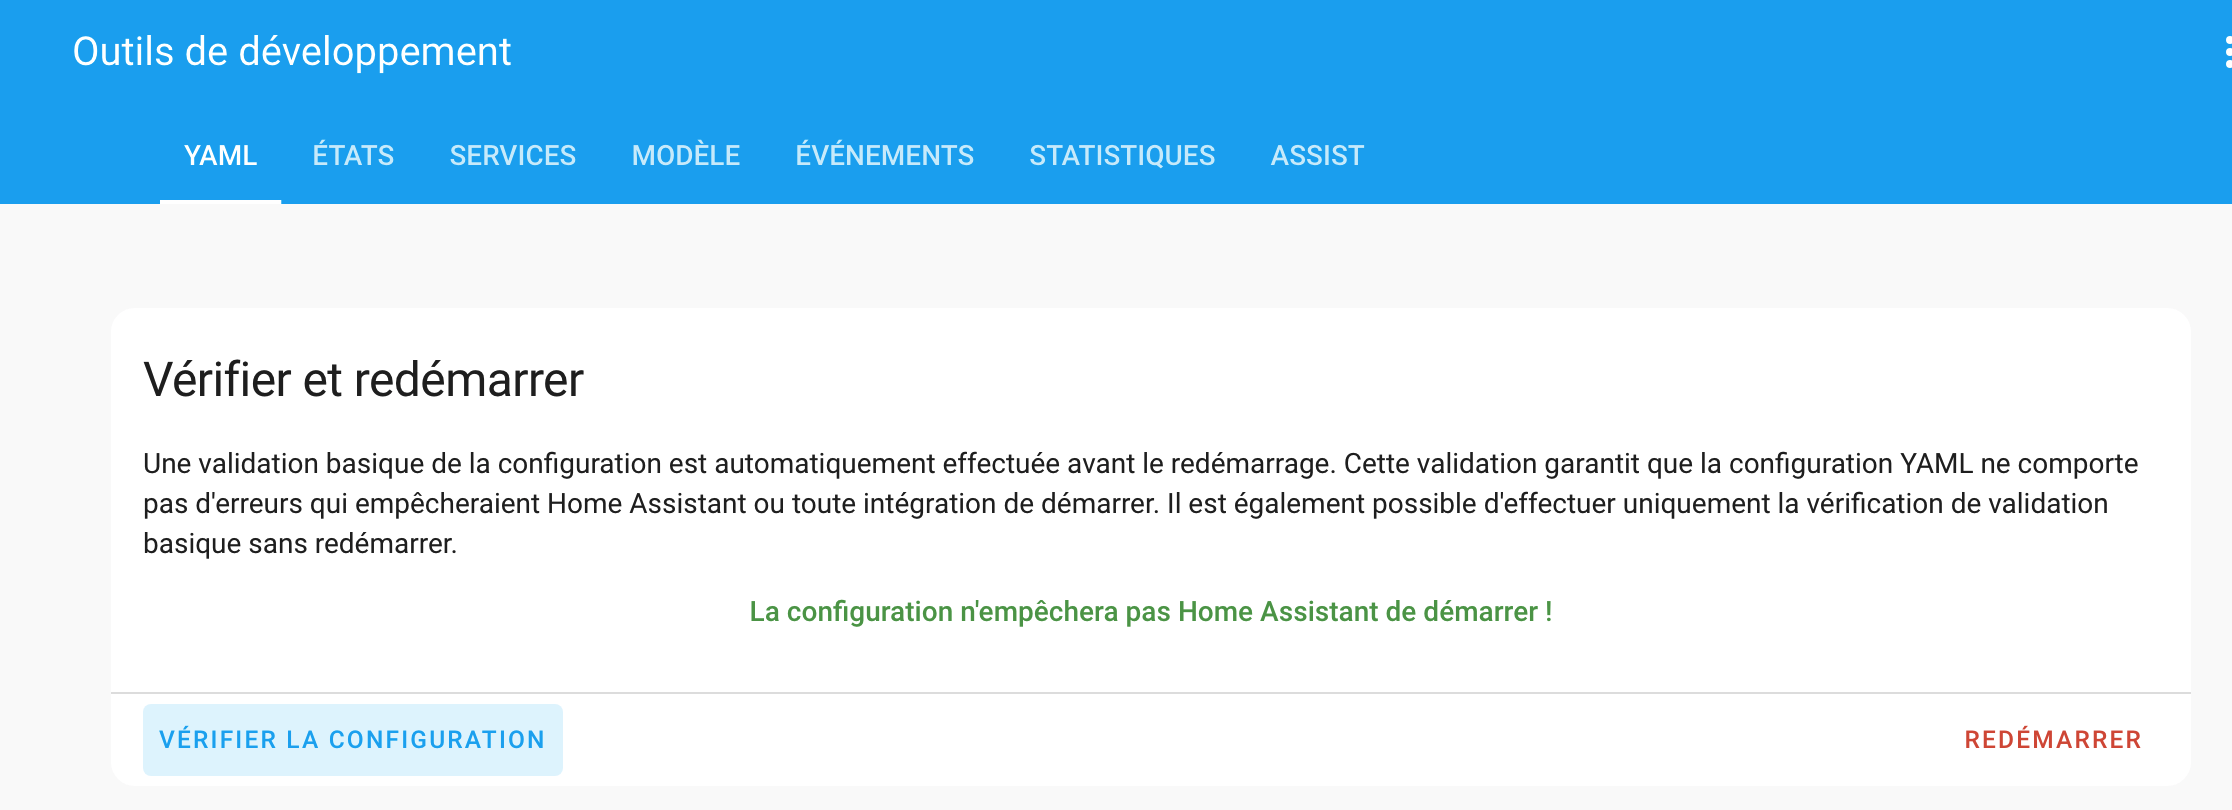
By going to Devices, MQTT, and searching for “Ajax”, you should have the list of devices created:
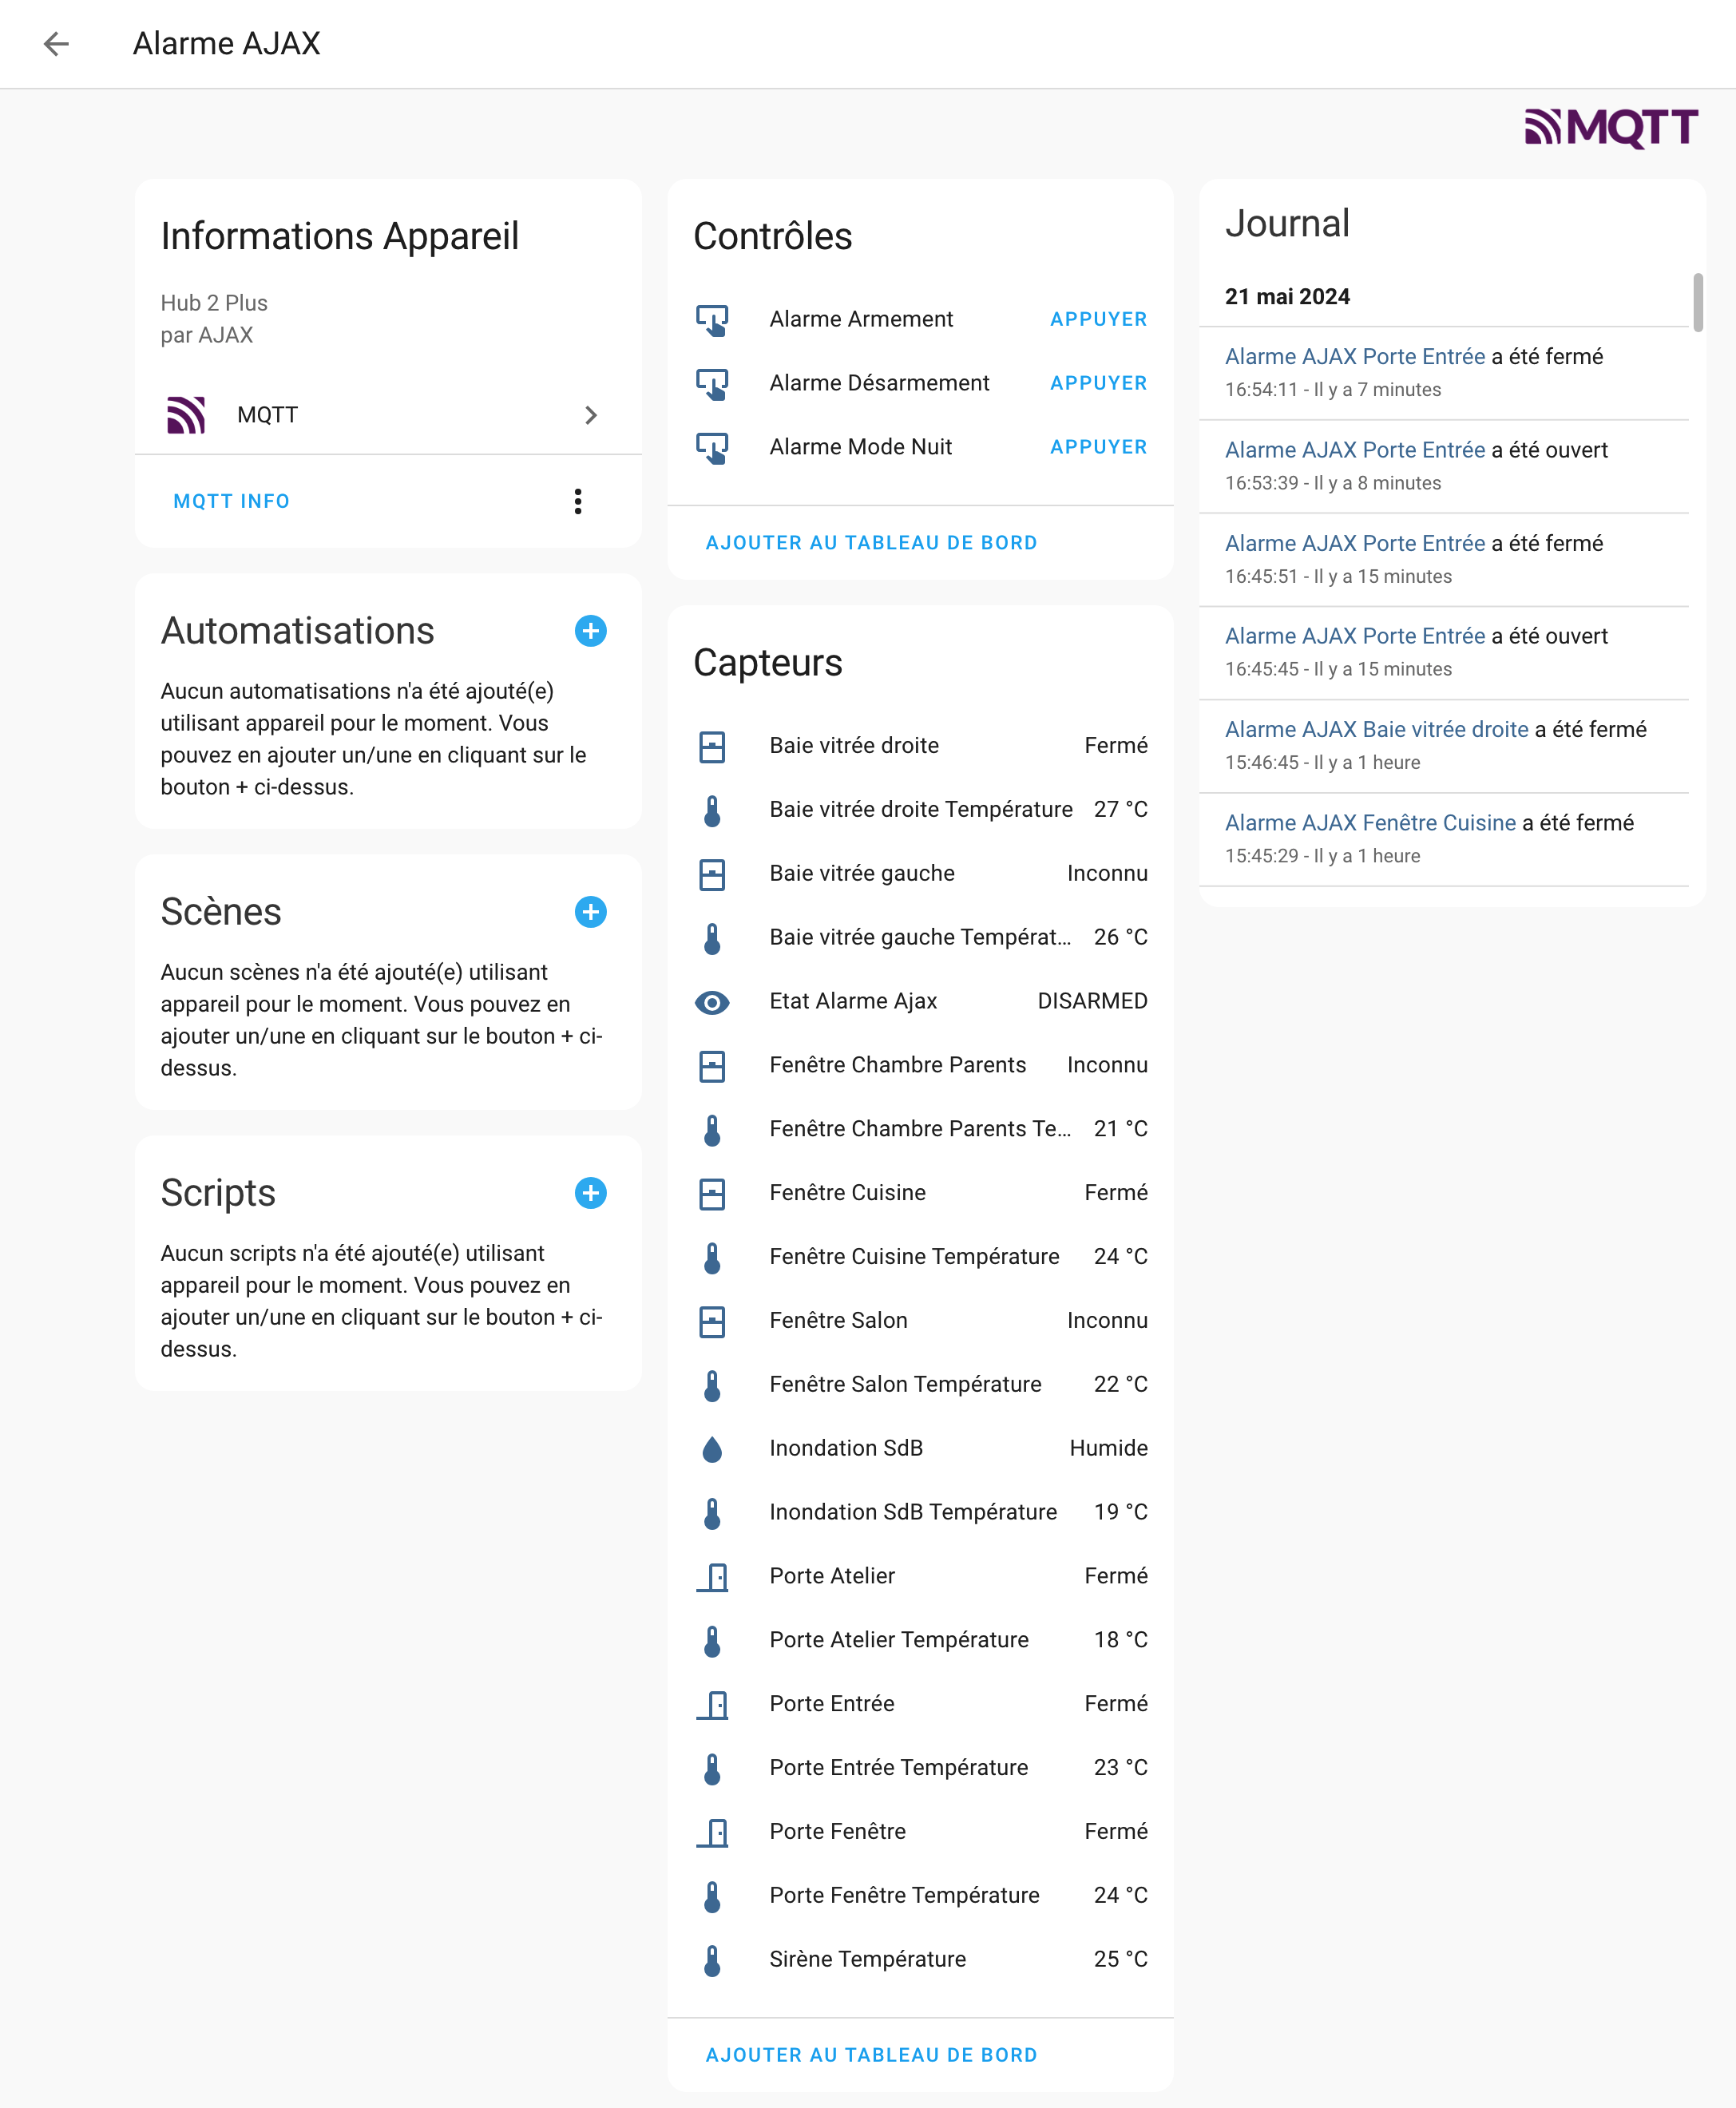
Please note that states are only updated when they are modified. So you'll need to open or close a door or window for its status to be updated (the update in Home Assistant is almost instantaneous as soon as the status changes). On the other hand, you'll have to wait for the temperature to be updated, as this too is only sent when a modification is made.
Fire detectors, on the other hand, don't seem to show up in Jeedom, so not in Home Assistant either, of course. But most of the information is still retrieved, much more so than the Home Assistant SIA plugin seen above.
You can then format it as you wish, as shown here for example:
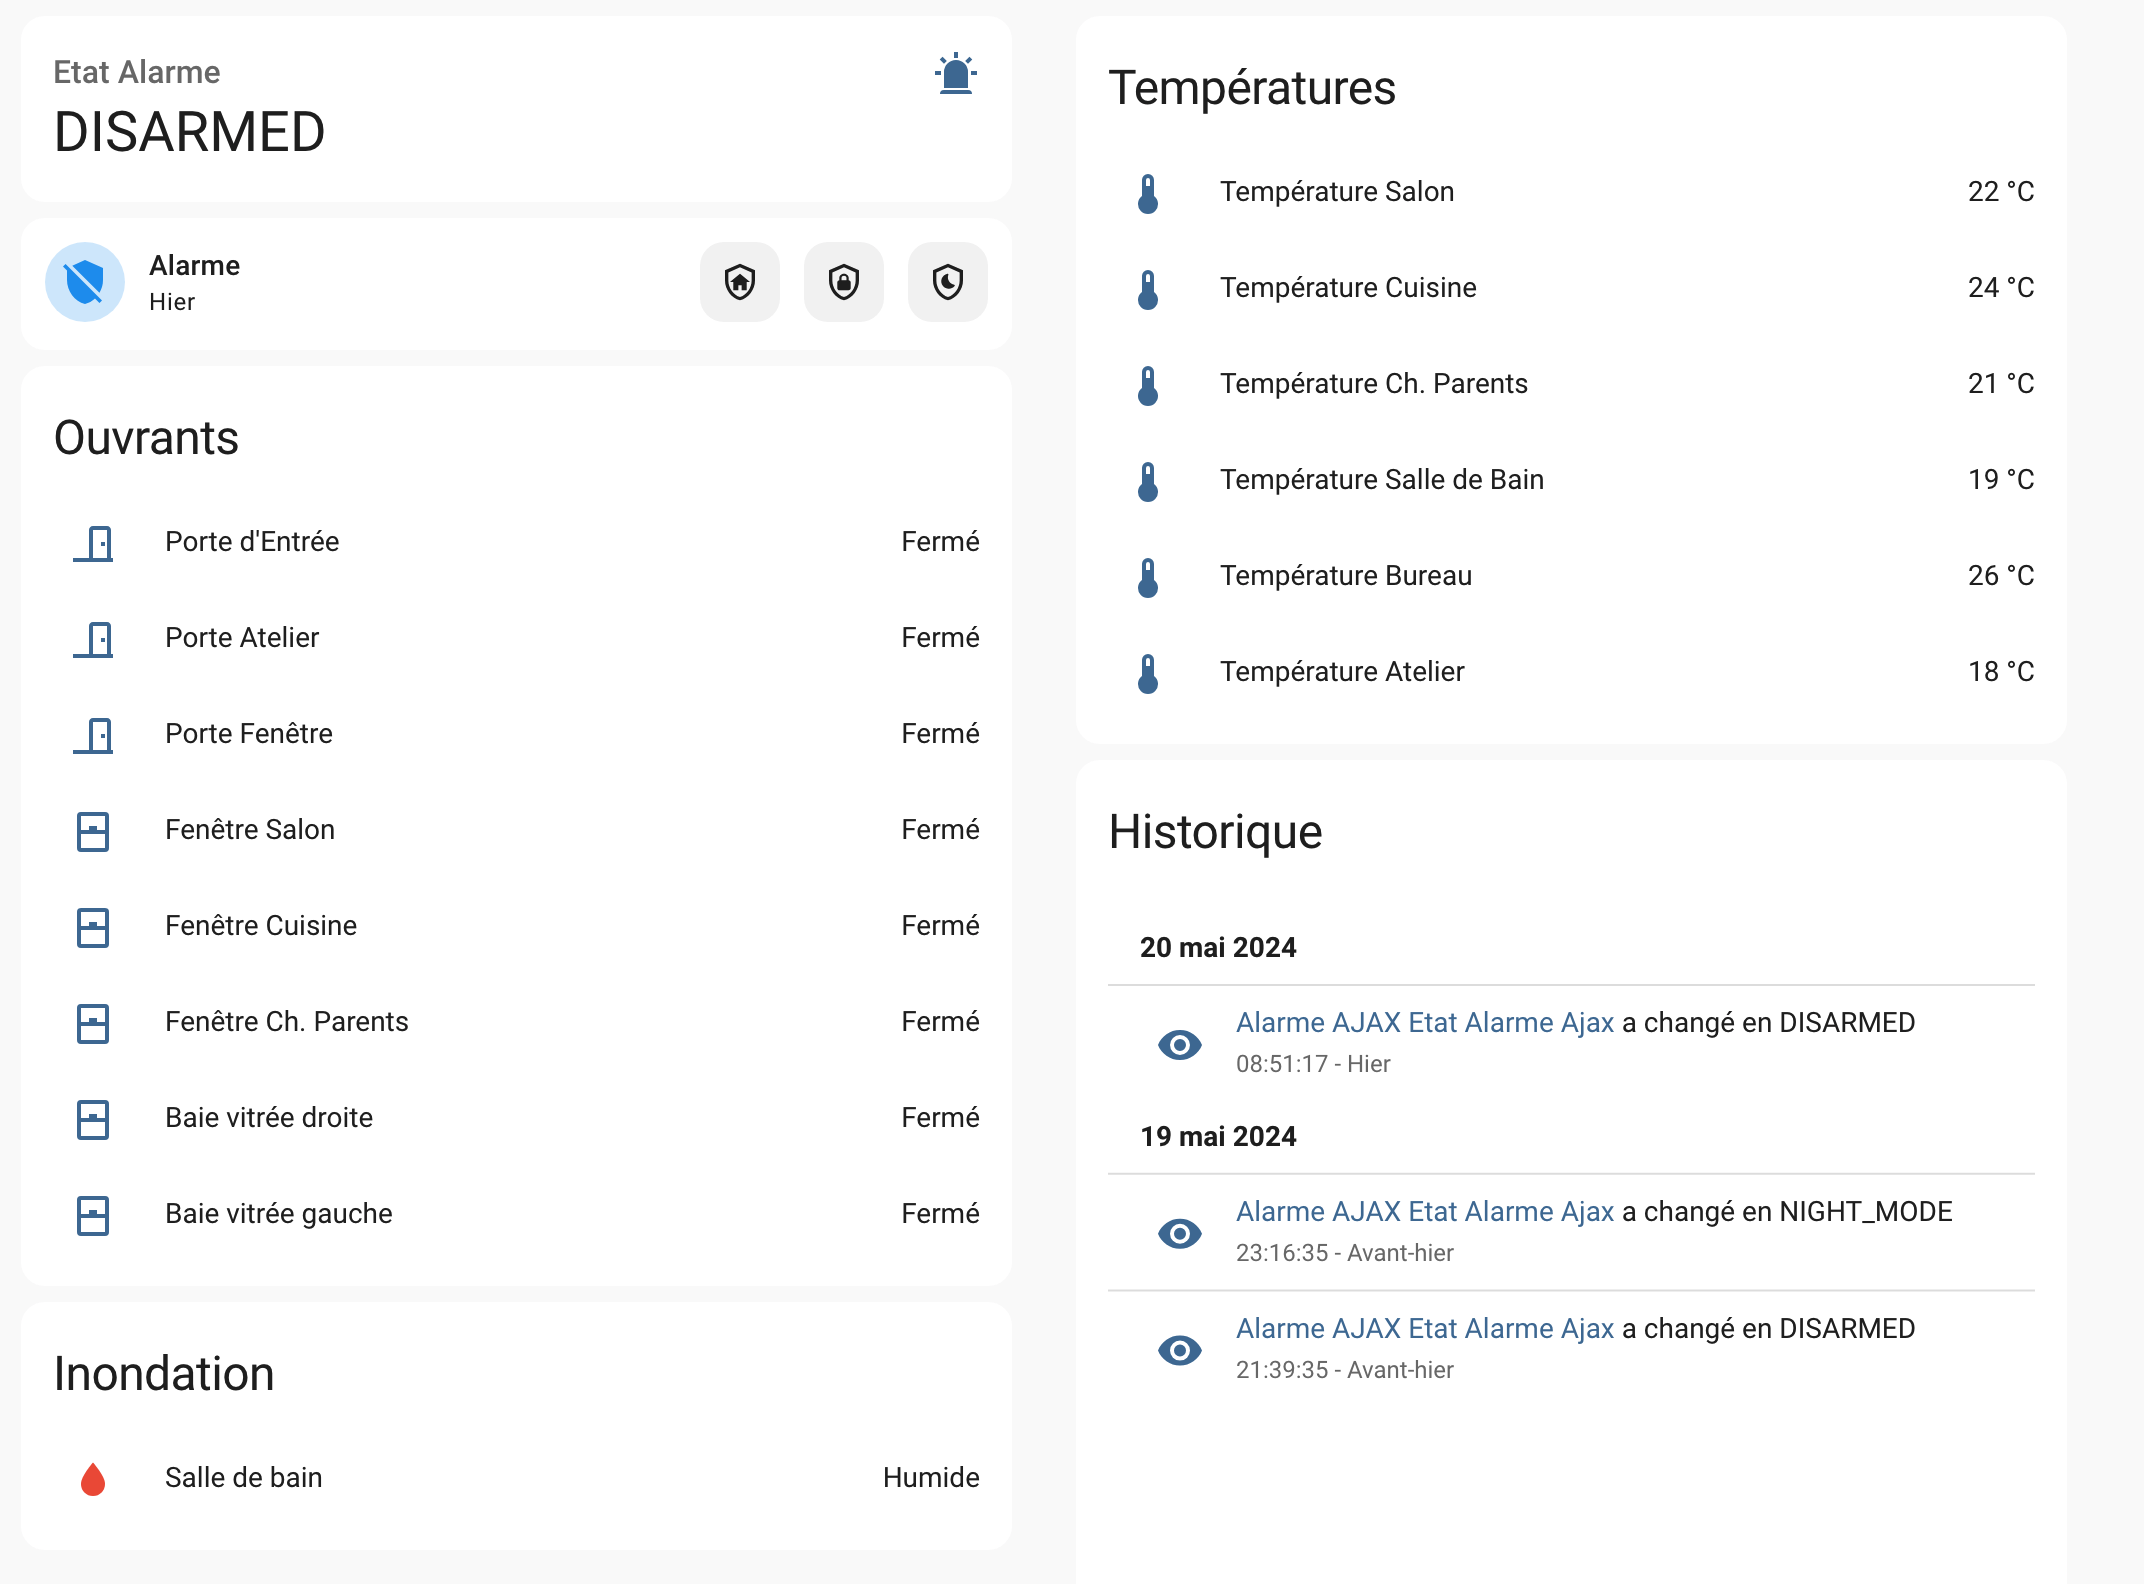
And of course it's entirely possible to use the states to trigger scenarios, or even activate/deactivate the alarm for those who wish to do so. Switch off the heating if a window is open, send an alert if a door has been left open too long, start the vacuum cleaner when the alarm is in total mode (and the house is therefore empty), and so on. It's all possible!
Conclusion
So it's far from being as simple as some integrations where everything is retrieved from Home Assistant in just two clicks. However, the developers have tried to negotiate with Ajax, which understandably refuses to open up for security reasons. Jeedom has managed to gain access, however, and now offers a very complete plugin :( Too bad, if nothing else, for the moment an instance of Jeedom with MQTT is doing the job, allowing us to retrieve Ajax alarm information from Home Assistant. Some users have opted to configure everything on the Jeedom side: by correctly configuring the MQTT commands on the Jeedom side, it is indeed possible to create them automatically in Home Assistant. This is the kind of setting you need to make:

In both cases, all sensor declarations must be made, and if not in Home Assistant, then in Jeedom. There's no right or wrong way to do it. For my part, I wanted to have as few things as possible to manage in Jeedom, and centralize all settings on the Home Assistant side. The important thing is that it works, that it's fast and reliable.
We're still keeping our fingers crossed for an official integration, but for now we'll have to make do with this, and it's perfectly possible to combine this MQTT and SIA integration if you wish.




Please remain courteous: a hello and a thank you cost nothing! We're here to exchange ideas in a constructive way. Trolls will be deleted.