
I've been 3D printing for 10 years now (already!), but there's one area I've never really looked into: 3D scanning. 3D scanning is a technology that captures the shape and details of a physical object by creating a precise digital replica. Using advanced sensors, it measures the surface of the object from different angles to generate a 3D model that can be used in various applications, such as 3D printing, virtual reality, or computer-aided design (CAD). Used in fields as diverse as architecture, medicine, and entertainment, 3D scanning makes it easy to create, restore, and customize objects with great precision. Projects had been done in the past using webcams, but the results were disappointing. But Creality, a 3D printing specialist, recently launched a range of 3D scanners. So I tested the Creality CR-Scan Otter model this summer to discover this field, which I suggest you discover in more detail. Unpacking and presentation of the Creality CR-Scan Otter The Creality CR-Scan Otter comes in packaging that clearly shows the product in question. A case full of cameras!
Inside we find a rectangular bag with the brand logo.
All the equipment is carefully stored there. A first compartment stores the manual, a strap, USB cables, etc. It smells like a “high-end” product.

The other part contains the scanner itself, accompanied by an owl figurine, for testing.

We therefore have a very complete set, with different USB adapters depending on the configuration we have, a calibration plate, stickers for scanning large surfaces, etc.

These stickers will be stuck on large surfaces to be scanned, and will serve as markers for the scanner

As you can see, the Creality CR-Scan Otter 3D scanner combines compactness and high precision. With dimensions of 165 mm x 37 mm x 59 mm and a weight of 390 g, it is both handy and easy to carry, making it ideal for mobile uses. On the front, it has many “lenses”. The scanner is actually equipped with four-lens stereo vision technology, with two pairs of dual lenses. This configuration allows you to capture objects, whether small or large, with an exceptional level of detail. The telephoto lenses capture the finest details up close, while the wide-angle lenses offer a wide view for large objects. This is one of the most impressive aspects: its precision can reach 0.02 mm, ensuring the capture of the smallest details of an object. Its scanning resolution varies between 0.05 mm and 2 mm. And with a scanning speed of up to 20 frames per second, this is a pretty fast 3D scanner!


In terms of ergonomics, the CR-Scan Otter is equipped with touch buttons and interactive displays that guide the user intuitively through the scanning process. LED indicators, visible around the buttons, and color-coded, show the operating status and the optimal scanning distance.

It has a USB-C port to power it and send data to the computer. Because this model is not autonomous: it is a device to connect to a computer, whether Mac or PC.

A screw on the cable keeps it in place on the scanner
A priori it should be possible to use it wirelessly on Android and iOS soon, but additional accessories will be necessary. We don't know more yet for the moment.

That's all for the owner's tour, the other sides were completely blank.


A quick look at the official specifications:
Accuracy: Up to 0.02 mm at 60 mm

3D resolution: 0.05-2 mm

Scanning speed: Up to 20 frames per second
- Minimum scan volume: 10 mm x 10 mm x 10 mm
- Working distance: 110 mm to 1000 mm
- Colour capture: Yes
- Auxiliary lighting for colours: 2 white LEDs
- Marker detection extension: 8 infrared LEDs
- Laser safety: Class I (eye-safe)
- System compatibility: Windows, macOS
- Data ports: Type-C, USB 3.0, USB 2.0
- Device dimensions: 165 mm x 37 mm x 59 mm
- Device weight: 390 g
- So let's get to the use without further ado! Calibrating the Creality CR-Scan Otter
- To use the Creality CR-Scan Otter, you will first need to install the software simply called
- Creality Scan
, available for both Windows and Mac. I have not found the minimum configuration, but you will still need a computer that can hold up a bit, because 3D modeling is quite demanding. On my Macbook that is about ten years old, you can feel that it suffers a little and ventilates quite a bit. On a
Mini PC like the Geekom seen recently
, no worries though, they are small machines but they hold up well, as we could see during the tests ;-) At the first launch, the scanner is detected (you must of course have connected it via USB). A scanner update is generally proposed. Then a calibration phase. This is to be carried out using the white plate supplied, with many black dots arranged in a specific pattern:The scanner must be held at different angles above the plate and at different distances until the calibration is complete. Just follow the steps indicated by the software. This process also allows you to familiarize yourself with the optimal way to handle the scanner and orient it towards the object. Overall, the calibration process was rather simple and quick.First 3D Scan test!

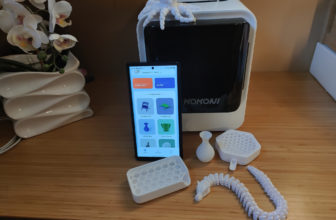
That's it, once the calibration is complete, we can finally launch our first 3D scan! The kit includes a small owl figurine, ideal for carrying out this first test.

Setting up the parameters is the first step before starting the scan. You can choose the type of object, its size, its characteristics, the precision and enable the use of the turntable if you have one (it's an investment that I will have to make, because it must make life much easier…).
I placed the owl on the black background provided and launched the scanning process in the software.
The user interface displays the scanned areas of the object on the right, and the two camera views, including the infrared image, on the left. Right next to it, an indicator informs you if you are too far or too close to the object to capture the details optimally. This indicator is actually one of the most important features, because it makes it very easy to maintain the correct distance. By keeping a regular eye on the screen, it is possible to immediately adjust the scanner distance. Because this is the trickiest part to do.
Another feature that greatly improves the ease of use is the automatic recapture of the object once the scanner or the software has lost it. If you lose sight of the object during the scanning process and the software no longer recognizes it, simply return the scanner to the last known position (or to any known angle or view of the object). After a few seconds of waiting, the software recognizes the object again and you can continue scanning without interruption.

The scan can be started, paused and stopped from the software controls, or directly via the buttons on the back of the 3D scanner.


Everything is green, we are at the right distance!


By slowly moving the scanner, I made sure to keep the test object centered in the software preview window. Once the model was completely colored green, I paused the scan, rotated the owl statue, then resumed the process.

Once I had scanned all sides of the owl, I ended the scan process. The scan evaluation then opened automatically.

Up to this point, I did not need any instructions, the software is very intuitive. However, it is a little more complicated when it comes to optimizing the scanned object with many settings. I strongly advise you to consult the

, which offers videos that explain everything clearly and quickly. Because the material itself is excellent, but you have to get the hang of it, orient the scanner correctly, not go too fast, etc. Rest assured, after a few tries you quickly get the hang of it ;-)
In post-processing, it is possible to manually delete all the data points that do not correspond to the object. The surface is then automatically optimized, the holes are filled, and the color data is interpreted and projected onto the object. In general, the default settings do the job well.

Since this involves a large number of data points, the calculation takes some time. On this owl, for example, I have a little over a million points. For a figurine that is not very large. Of course, it depends on the power of your computer. It still takes several minutes for each individual step to be completed. But it was definitely worth it, because the result is very close to the original!Quite similar, right?

Performance: What to think?

Once you understand the principle, I have to say that the process goes smoothly, with the Otter capturing the smallest details with ease. The software's one-click processing feature made it easy to get quick results on most of my tests.
I scanned a variety of objects and was impressed each time by the reliable tracking and minimal loss. Even a shiny object, which is often difficult to scan, was captured successfully, demonstrating the capabilities of the CR-Scan Otter.

I found the automatic mode particularly useful for optimizing point clouds and creating meshes.
The strength of this model is that it can scan a huge number of very different objects, from coins to cars (real size!). It offers good results even on small objects, capturing complex details.


A 4cm Lego character

A few settings need to be fine-tuned, but we can scan a face, or even an entire person
Once the object is correctly scanned, we can export it if we wish in obj or stl format, formats suitable for 3D printing in particular.


Of course, you can rework the object, personalize it, enlarge or reduce it, etc. In short, once digitized, you can do whatever you want with it! Whether it's to print a personalized gift (portrait of grandchildren for example) or scan a broken part to reprint a new one, everything is possible.


Conclusion

So this Creality CR-Scan Otter is my first real 3D scanner, so it will be difficult for me to make a comparison. But I was impressed by its efficiency, especially its ability to capture fine details on difficult surfaces without the need for pre-scan spray, as I had read on some forums for other models. Here we manage to obtain precise and high-quality 3D scans, relatively easily once we have gotten the hang of the scanner. This opens up new possibilities, especially when we already have a 3D printer!

Well, on the other hand, quality has a price, and the Creality CR-Scan Otter is still sold for €969 directly on the manufacturer's store. It won't be a purchase on a whim to test, but a real piece of equipment, almost professional.


Please remain courteous: a hello and a thank you cost nothing! We're here to exchange ideas in a constructive way. Trolls will be deleted.