
Avidsen is well-known in home automation, as the French company has been distributed for many years in many DIY stores such as Castorama and Leroy Merlin, for example. Gate automation, video door entry systems, smart plugs, and more. Avidsen has a very wide catalog of devices, all integrated into the Avidsen Home home automation app. And a new device has joined this large family, which is of particular interest to us: the Avidsen Soria solar solution! A self-installed solar kit, like many others found on the market today, except that the solution's connectivity opens up numerous possibilities for interacting with the connected home! I invite you to discover it in more detail. Presentation of the Avidsen Soria solar kit Upon receiving the Avidsen Soria solution, what immediately strikes you is the size of the box, which is only about 80x80cm. A very compact size compared to other solar stations we're used to seeing. The box weighs around thirty kilos, and while the packaging recommends carrying it by two people, it's still perfectly manageable on your own, unlike panels measuring nearly 2 meters…
But above all, here, the box fits in the trunk of a car! The manufacturer even demonstrated it for us in a Twingo, which is saying something! This size, of course, has a commercial impact: since Avidsen is distributed mainly in DIY stores, customers had to be able to discover it and take it with them immediately, without having to use a carrier or rent a truck, which complicates things considerably. But it must be said that it's also much easier for anyone to handle and install during installation!
Inside, we find not one panel, but 4 photovoltaic panels of 100wc each, therefore increasing the overall solution to 400w. A power completely within the norm of what is done today. This format will not be unlike the Beem solution that we had tested, the manufacturer having been the first to launch a 4-panel format two years ago. But we must admit that it is a practical and quite versatile format, thanks to only 5kg per panel.

These monocrystalline panels measure 80cm x 70cm side, 2.5cm thick. They were developed in collaboration with

QN SolarPV
, a Chinese manufacturer specializing in the field of photovoltaics. In addition to these 4 panels, we find all the necessary accessories, perfectly stored in their boxes: As we see it is rather complete:


We thus have an MC4 cable, 4 supports and their screws and fixing plugs (and even the tools!), a micro inverter, and here the wall fixings accompanied by their metal plugs. The kit can be placed on the ground or fixed to the wall according to needs (and even on a balcony via an optional adapter). The panel connections are very classic, with MC4 sockets as found on all photovoltaic panels (this is a standard in the field). One socket for +, the other for -, impossible to make a mistake. All of course perfectly waterproof.The panel frames have holes, which will allow attachment to the supports:

Please note that all frames are protected by plastic film. A bit of a hassle to remove, but at least it protects the paint during transport :)

Next comes a black box, which is the 400W microinverter. Its role is important, as it collects the panels' production and converts it to 230V. It offers an MPPT efficiency of 99.8%, which is excellent. This means there are virtually no losses during conversion. It also synchronizes with the power line so that the panels' production can be consumed by household appliances.

But this inverter also has the distinction of being connected: it natively includes a Wi-Fi connection to communicate with the Avidsen Home app.

On the left are the two connectors for the solar panels, the Wi-Fi antenna, and the mains output.
Thanks to this Wi-Fi connection, it will be possible to view production information in the associated mobile app. There's no Tuya smart plug here, as is often seen with this type of solution; this inverter does all the work. As you can see, everything has been thought of! And to make installation easier, everything is explained in a video on the manufacturer's website:

Rest assured, it's not very difficult ;-) It's time to get to work…

Installing the Avidsen Soria photovoltaic kit

Here we have a solar kit, not a plug & play solar station like a Sunology station, for example. It will therefore need to be assembled before use. But it's not very difficult to install, don't worry! If this is your first kit, you'll need to watch the manufacturer's video, which explains how to install it in a few minutes.

The first panel to be installed will be the one with the inverter, which attaches to the panel support:
The assembly is then attached to the solar panel using two screws:

Then the last part is attached to the other end:
We repeat this step on the other three panels, the only difference being that only the first one has an inverter.
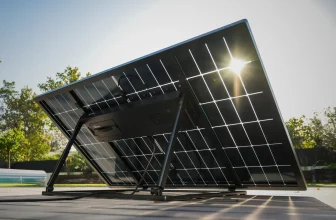
The panels are connected in series, that is, to each other. Since each panel has two outlets, simply connect a female outlet to the male outlet next to it. It's impossible to make a mistake, given the MC4 format of the outlets. The remaining outlet on the panel furthest from the inverter will receive the 2.5m extension cord so that it can be connected to the inverter: And here are our four panels assembled: Example of a floor-standing installation
No tilt adjustments here: the panels are fixed at 30°, which is a good compromise for year-round production.

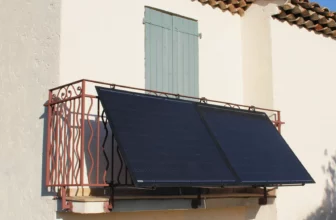
After a test period here to compare the performance with other solutions, the Avidsen Soria panels were finally moved to another location, still facing south, but this time attached to a “wall” (if we can call it that here :p). Be careful, when wall-mounted, the tilt angle is reversed, and is therefore 60°. This is better for summer, less so for winter. It saves floor space, and there's less risk of a child falling over it while playing :)

Assembly is quite simple, and by taking my time, it took me less than an hour to set up the whole thing.

The Avidsen Home Mobile App
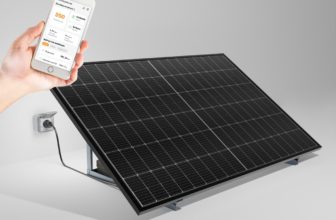
This Avidsen Soria kit comes with a mobile app to track your solar production. Whether you're using iOS or Android, all you need to do is install it and create a user account. When starting from scratch, you start by creating an account. Here, I already had Avidsen devices, including my connected mobile air conditioner, so I simply asked to add a new device.

The inverter is automatically detected by the app. You enter the Wi-Fi network to use, give it a name, and the setup is complete! You immediately arrive at the production monitoring page:

But it's also possible to track production over the month or even the year. Here we see, for example, that these Avidsen Soria panels produced 32 kWh over the month despite the inclement weather this year (the forecast was for 50 kWh).
Among the settings, it is possible to limit the inverter's power if desired:
This can be useful if the solution produces more than our consumption benchmark, to avoid reinjecting electricity into the street for free. The benefit is limited for the moment, but if Enedis ever decides to charge for these injections, it will always be possible to reduce them to a minimum thanks to this function.
The settings are limited to this, except for the ability to indicate the electricity price. This information, however, is currently unused in the information output.

Avidsen Soria: how does it work?
People are always surprised when you explain that you plug solar panels into an electrical outlet. Doesn't plugging a power source into an outlet that's already powered risk tripping the meter? The way it works is surprising and gives rise to many questions, which is entirely legitimate!
In fact, it's based on two things.
First, the inverter synchronizes with the electrical grid to function. You'll need an electronic meter to benefit from it. Not that the old-fashioned disc meter doesn't work, but using it with solar panels is prohibited: technically, it works, but in the event of overproduction, the disc meter starts spinning in the opposite direction, thus decreasing the electricity bill…. This is actually a principle used in Belgium, which is very profitable. But this is France :p Anyway, when you declare your panels, if you still have an old meter, Enedis will automatically replace it. https://www.youtube.com/watch?v=Cn_fyewi_uk Because of this necessary synchronization with the power grid, solar stations of this type do not operate in the event of a power outage, and they cannot operate on an isolated site, one that is not connected to the power grid. This is a disadvantage for autonomy, but on the other hand, it also prevents electrocution if you touch the inverter's plug: as long as it is not synchronized with a mains outlet, no current flows.Then, the system relies on a simple rule of physics: electrons are lazy and always take the shortest path.

In practice, solar panels capture the sun's rays and transform the photons into electrons. The inverter, synchronized to the electrical grid, injects the solar electrons into the home's electrical circuit. The solar electrons diffuse and power the nearest electrical appliances that are consuming electricity at the same time. Thus, for each solar electron produced and consumed by a home appliance, it's an electron from the electrical grid that doesn't pass through the meter, and is therefore not billed.

In my home, this installation is plugged into an outlet on the terrace, and it probably powers part of my pool pump and the spa, which are the appliances closest to the Avidsen Soria panels :)

The goal here isn't to produce as much electricity as we consume each day, since that would require a much larger and more expensive installation, especially with batteries for the night. The goal here is to eliminate the “electrical tail” of your home. The electrical limit is the minimum electricity consumption of your home, which is present no matter what, even when no one is home. It corresponds to the consumption of the refrigerator, internet box, home automation box, VMC, appliances on standby, etc. If you don't turn on any specific devices, and you take a look at your electricity meter, you'll see that it still displays an electricity consumption that easily reaches 400W in general. This is the consumption we're trying to reduce with the Avidsen Soria kit. And if your electrical limit is higher, it's possible to install multiple kits (up to two per circuit breaker/power line).

And what about the regulations?

The strength of this solution is that it can be installed anywhere, without any complicated formalities. If the panels are installed on the ground or less than 1.80 meters high, no declaration is required at the town hall.
The only thing to do is to declare the installation to Enedis, the company that manages the electricity grid. The declaration is done directly online at https://connect-racco.enedis.fr/prac-internet/login/
. Enedis doesn't have to intervene in any way; it's a purely legal formality. The declaration takes less than 10 minutes.
And if you ever move, you can take your kit with you :)
The big question: cost-effectiveness
The question that always comes up regarding this type of solution is cost-effectiveness.
To take a concrete example, I'm based near Orléans, and I produced 32 kWh in 30 days, an average of 1.06 kWh/day. A very reasonable production, especially since May wasn't exactly exceptional :p And we know that solar production isn't stable throughout the year, especially in winter, when the sun is lower and the days are shorter. In Orléans, statistics indicate that it would be possible to achieve 452 kWh per year. At a rate of €0.27 per kWh (the current EDF rate during peak hours), this represents a saving of €122/year. Feel free to use these websites to calculate your solar exposure and profitability:
JRC Photovoltaic Geographical Information System
Sunearthtools
Let's not forget the annual increase in the cost of electricity. We are among the cheapest countries in Europe, but the price of electricity in France is expected to catch up with the average European country, despite what our Minister of the Economy may be saying right now, who just announced a 10 to 15% drop in February 2025…?
To be realistic, let's assume a 5% increase per year (I'm probably being very optimistic, but let's move on…):(2024) the savings in the first year would be €122(2025) second year: €128
(2026) third year: €134
This gives us a total of €384, which is the payback period for the kit in less than three years in my case. In the south with a full southern exposure, where production will be even better, it will be around two years only. Provided, of course, that you consume all of your solar energy. But 400W is roughly the average price for many households. Check this at home before buying!
With the increase in electricity prices in recent years, the return on amortization of such a solution has melted like snow in the sun, almost dividing it by a factor of three. A three-year return on investment is therefore very attractive. Especially since the panels have a 25-year performance guarantee (minimum efficiency of 80% after 25 years). In short, yes, due to its extremely competitive price, this solution pays for itself very quickly. Avidsen Soria and home automation…
The Avidsen Home app has the great advantage of grouping all of the brand's connected devices, whether it's the connected air conditioner as seen above, connected outlets and lighting, etc. Like any home automation system worthy of the name, it naturally allows you to create scenarios such as “if this is true, then do that.” In just a few seconds, it is therefore possible to set up a scenario to control a device.
Two very simple examples here: if solar production exceeds 250W, I trigger a connected outlet that will allow a power station to recharge and store the excess production. In the second case, if solar production reaches a certain level, I trigger another electrical outlet to heat the spa. This means these devices don't cost me anything when they start up, since they're powered by solar energy. These are just a few examples! Another current scenario is turning on the connected air conditioner based on the room temperature and the level of solar production, so that the air conditioning doesn't impact the electricity bill. Those with a keen eye will no doubt have noticed that this application looks exactly like the Tuya app, well-known for home automation. And indeed, the Avidsen solution relies on this giant IoT specialist. It's therefore entirely possible to connect the Avidsen Soria solution not to the “official” app, but directly to the Tuya app:
As you can see, the dashboard is exactly the same. However, the scenarios here can use all Tuya devices, from air conditioners to robot vacuums, including plugs and connected lighting, regardless of the brand, as long as they are powered by Tuya. This opens up enormous possibilities and is no longer limited to the manufacturer's products!
Not to mention that more and more home automation systems, such as Jeedom or Home Assistant, are Tuya-compatible via a plugin. It will therefore be possible to retrieve production information from your home automation system and trigger various scenarios accordingly.
Preview in Home Assistant Well, be careful, in “theory,” because at the moment the Tuya plugin doesn't report any entities in Home Assistant for this connected inverter. But it's only a matter of time, this device is still very new :) I'll come back and change that as soon as possible.Conclusion
- We've seen it through numerous other tests: it's no longer in doubt, solar stations are profitable. More or less quickly, depending on the purchase price, of course, and the geographic location. But between the skyrocketing price of electricity in recent years and the collapse of solar panel prices, profitability has improved considerably, lowering it to less than 5 years, or even 3 years for the most aggressive solutions, like this Avidsen Soria solution presented here. Admittedly, the quality of the product itself, as well as its aesthetics, falls a bit short of solutions from Beem or Sunology, for example, which currently offer beautiful, perfectly finished products that border on works of art for your garden. Let's face it: Soria is “made in China,” the goal being clearly to offer a very affordable solution. However, China remains the world's leading solar specialist, and the Soria solution does the job perfectly at a very competitive price, suitable for anyone on a budget who wants a quick return on investment.
- So, should you buy it? We'll have to see in 10 or 20 years how the panels, and especially the frames, have aged. It's difficult to judge with such a short time, but Avidsen guarantees the structure for 12 years (and the inverter and mounting brackets for 5 years). But at less than €300, it's indeed a solution worth seriously considering for anyone who doesn't want (or can't) allocate a large budget to this type of solution. With a return on investment in less than three years, the risk isn't huge, and you'll only save on your electricity bill.
You'll just have to be careful to find a good price. Some offer it at the public rate of €499, which is a bit expensive compared to competing solutions. But at €299, like you find at Leroy Merlin, for example, you can go for it! Just be careful if you want wall mounts; the cheapest kits generally don't include them (but they can be purchased as an optional extra in this case).

Note that an optional balcony kit is also available for €34.90.
- If you have trouble finding it in stores, the kit is available on the official Avidsen store for €349, which is still an excellent price for this power:


Please remain courteous: a hello and a thank you cost nothing! We're here to exchange ideas in a constructive way. Trolls will be deleted.