
Over the past two years, solar power stations have become considerably more accessible. And with the rising cost of electricity, this trend is showing no signs of slowing down. We're seeing numerous competitors enter the field, with the difference being in features and pricing. The Sunity solution presented here offers a very competitive price-performance ratio, while still using the best components available. For those new to this type of product, this is a photovoltaic station that can be installed yourself in just a few minutes. It simply requires installing a solar panel on its support and plugging in a power outlet. The energy production is directly deducted from the electricity you consume. Given the rising cost of electricity, this type of installation is very attractive. And this is one of the most productive solutions I've had the opportunity to test, with a panel rated at 425Wp, all bifacial, which allows for up to 552Wp! Installed in my home for a little over a month now, I invite you to discover it in more detail! https://www.youtube.com/watch?v=7EV5akA5fAA Discovering the Sunity solar station
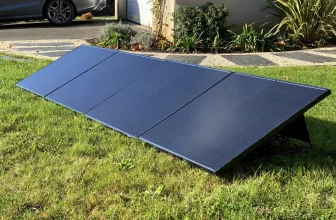
The package arrives on a pallet and is rather imposing, and for good reason: it contains a large photovoltaic panel measuring 1.76m x 1.08m (and weighing about thirty kilos).
On one side, we have the photovoltaic panel, well protected in the corners:
And on the other side, the support elements, the extension cord, and the connected plug for production measurement. A sheet displaying a QR code allows you to consult the installation instructions. And yes, here it's a little less Plug&Play, but rest assured, nothing very complicated, and the whole thing will be functional in less than a quarter of an hour.

The 425Wp photovoltaic panel is from Trina Solar, one of the three leading manufacturers in the field. For the record, Trina Solar has broken 22 world records for photovoltaic production since 2011 and has received the Most Bankable Photovoltaic Module award five times in a row since 2016. It is the only manufacturer to receive this award five years in a row!

Here we have a monocrystalline panel, made up of 144 half-cells, using TopCon technology. This is a type of solar cell technology based on PERC (Passivated Emitter Rear Contact) technology, but TOPCon cells are more efficient than conventional PERC cells because they use a tunneling oxide layer to make the rear contact of the cell more efficient. This layer helps reduce production losses and increase the cell's ability to absorb light. The maximum efficiency of TOPCon cells is approximately 28%, which is higher than the maximum efficiency of approximately 24% for PERC cells. TOPCon cells also have a lower degradation rate than PERC cells, meaning they lose less efficiency over time. The manufacturer guarantees them for 25 years, but their performance is guaranteed for 30 years! In short, we have one of the best panels currently on the market.

The cells allow light to pass between them.

The unique feature of this panel is that it is a bifacial model: the photovoltaic cells are sandwiched between two glass plates, so they can produce energy from both the front and the back. Production won't be doubled, but it will benefit from a 5 to 30% increase in output. All the wiring and electronics are located under the panel, including of course the micro inverter (maximum efficiency of 99.8%), already in place: Here we have a Hoymiles brand inverter, model HM-400 to be precise, also well-known in the field and used on many solar stations.A very good point, by the way, not only for the quality of this inverter, but also because it is OpenDTU compatible, which we've already discussed for integration into third-party systems like Jeedom or Home Assistant, for example. But I'll come back to that later.

The first thing to do is assemble the bracket, which consists of four parts. You should be able to figure it out ;-)

The screws are already in place; you'll need to remove them before proceeding with assembly.

As well as for screw holes:

For assembly, you will only need an Allen key and a 13mm wrench for tightening:

Assemble the uprights, screw them in, and tighten securely:

At the back, two tubes are inserted into each other: they will allow you to adjust the panel's tilt:
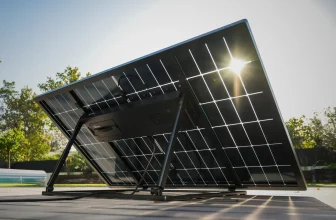
The bracket will allow you to tilt the panel at different angles depending on the season. As we know, the sun is very high in the summer and very low in the winter. And for optimal production, the sun's rays must be at a 90° angle to the panel's surface. Thanks to this adjustable bracket, it will be possible to maintain optimal production throughout the year, something impossible with fixed panels on roofs, for example.

The different degrees of tilt are even indicated on the bracket.

Our bracket once assembled:


Once all the nuts are tightened, the bracket seems sturdy and should not move. You will have noticed the cardboard underneath: as the assembly instructions so clearly indicate, we use the packaging cardboard for assembly, which avoids damaging the paint on the floor ;-)

All that remains is to install our photovoltaic panel. It can be done alone, but it is recommended to do it in pairs, it's still simpler. We place it on the support and tighten the 4 fixing brackets:

And here is our Sunity solar station installed:

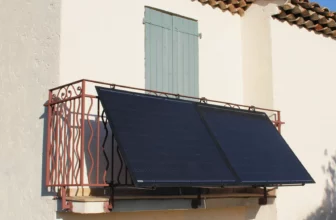
Completely black, whether at the level of the support or the photovoltaic panel, this station is rather pretty.


Interesting detail, this support raises the panel, unlike other solutions where the panel is 2-3cm from the ground. This can prevent splashes and dirt when it rains, and make mowing around the panel easier if it is placed in grass.

Note that the inverter also has a socket to receive another extension kit, to connect several panels together. We can thus connect 2, 3, or 4 stations together, using only one mains socket in the house.


All that remains is to connect the mains cable to the inverter socket:

The whole thing is of course perfectly waterproof.


Last element: the connected socket. A WiFi-connected socket, very classic, but designed for outdoors, and capable of measuring the electricity consumption of the device connected to it. Or its production, in this case.


It is therefore an outdoor connected socket, equipped with a cover to resist bad weather.

Using the Sunity solar station
Using this solar station is very simple. Once assembled, simply position it in the desired location, with good sun exposure, ideally facing south. Then, adjust the panel's height to give it the correct orientation. As mentioned above, the Sunity station can be positioned at any angle. Simply loosen the screw and slide the tubes to adjust the desired tilt.


No ballast system is provided here. You'll need to either add concrete slabs (the kind used for patios or walkways, for example) and position them on the support bars, or secure the support to the ground.

The 5m cable will allow enough space to connect the panel to a nearby electrical outlet.


From now on, our panel will start producing electricity, and our nearest appliances will start consuming this “free” electricity.

Installation takes about twenty minutes, which is still very quick. You'll simply need to find a spot with good sun exposure, ideally facing south, without any shade, to optimize solar production. Here, the station was simply placed on my south-facing terrace. Ideally, a flat roof will be safer, but a terrace works very well, as long as you have the space :)


A small detail, however, to optimize the positioning: we have a bifacial panel here. What does this mean? A traditional photovoltaic panel only captures the sun's rays from above, to produce electricity. This type of panel is composed of photovoltaic cells placed on an opaque side to ensure rigidity, the whole protected by a pane of glass. In the case of a bifacial panel, the opaque side disappears: in its place, we also have a pane of glass. In other words, the photovoltaic cells are sandwiched between two sheets of glass, which allows light to pass between the cells:
This bifacial technology has two advantages:
the top side captures the direct rays of the sun
the bottom side captures the reflection of the sun's rays. This is a phenomenon called albedo: the sun's rays reflect off the ground and “hit” the underside of the panel
To take full advantage of this dual Kiss Cool effect, you must, of course, have some space under the panel. This type of bifacial panel is therefore not suitable for roof mounting. However, on a support like Sunity's, it's perfect, especially when the panel is very upright: the steeper the slope, the greater the efficiency of the rear panel! This will be particularly beneficial in winter, when the sun is low and the panel is normally vertical. This rear-facing production will help to compensate somewhat for the loss of production due to the season.
A light-colored surface is also preferable: placed on the lawn, the bifacial side will be of little interest, since the light reflects little off the grass. However, on a terrace with light-colored tiles, for example, it will be perfect. The same applies when mounted on a light-colored wall.
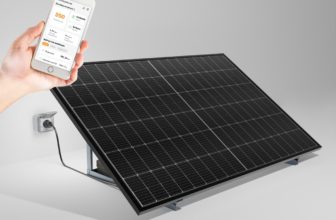
The mobile app
Last step: install the mobile app to track your production. This is the SmartLife app, which allows you to control many connected devices. However, the Tuya app, well-known among home automation enthusiasts, is also compatible. It's my choice, as it allows me to group many connected devices in the house. Whether on iOS or Android, all you have to do is install it and create a user account.
A new device is requested: the connected plug is automatically detected.
Configure the Wi-Fi and confirm. You simply need to have a 2.4 GHz Wi-Fi network accessible at the location where the Sunity solar station is located. This is a point to check carefully because Wi-Fi coverage is often poor outdoors.
- The home screen of our plug is exactly that of a classic connected plug, with an On/Off button. Of course, you'll have to make sure the plug is set to On, otherwise you won't be able to harvest your solar production. To track production, click on the “Energy Consumption” icon in the bottom right.
- This will display a screen with the current power and production since the beginning of the day. Here, for example, we see that we have a power output of 204W (a slightly overcast day, we can sense autumn is here…), that we've already produced 0.25kWh since the beginning of the day, and over 30kWh since its installation!Below, clicking on one of the months allows you to view the day-by-day breakdown in graph form. This allows you to view our production day by day, month by month.We find the same type of information as what Sunology or Supersola offer, for example. This is normal, as many solar stations use the same type of connected plug powered by Tuya. So, we have the same app. It's much less user-friendly than Beem's, but let's just say it gets the job done.
Afterwards, since the system uses a simple connected plug, nothing prevents you from using a connected plug with consumption monitoring that is compatible with your system, via Wi-Fi, Zwave, or ZigBee, for example, to retrieve the information in your Jeedom, eedomus, or Home Assistant system (or others!). There, you can have a representation as you wish, perform efficiency calculations, receive a report, etc. This is what we saw here with ZigBee plugs.
Interesting detail: the inverter used by Sunity is also OpenDTU compatible, meaning it is possible to retrieve all production information via a radio connection. All you need is an OpenDTU box, which then allows you to use all this data in Jeedom or Home Assistant, for example. OpenDTU retrieves all possible information from the inverter.
In short, if the outlet isn't enough for monitoring production, there are many other ways to track it ;-)
Sunity solar station: how does it work?

If you're new to this type of self-consumption station, you're probably wondering how it works? Solar panels that plug directly into an electrical outlet? Doesn't plugging a power source into an outlet that's already powered risk tripping the meter? Etc.

In fact, the operation is based on two things:
First, the inverter synchronizes with the electrical grid to operate. Therefore, it won't work in the event of a power outage, and it can't operate in an isolated location that isn't connected to the electrical grid. This prevents electrocution if you touch the kit's plug: as long as it isn't synchronized with a mains outlet, no current flows. So, there's no risk for children either.

Next, the system relies on a simple rule of physics: electrons take the shortest path. Like any fluid, in fact.
In practice, solar panels capture the sun's rays and transform the photons into electrons. The inverter, synchronized to the electrical grid, injects the solar electrons into the home's electrical circuit. The solar electrons diffuse and power the nearest electrical appliances that are consuming at the same time. Thus, for each solar electron produced and consumed by a home appliance, it's an electron from the electrical grid that doesn't pass through the meter, and therefore isn't billed.
The goal isn't to produce as much electricity as we consume each day, since that would require a much larger and more expensive installation, including the use of batteries for the night. The goal is to eliminate your home's “electrical tail.” The electricity limit is the minimum electricity consumption of your home, which is present no matter what, even when no one is home. It corresponds to the consumption of the refrigerator, internet box, home automation box, VMC, appliances on standby, etc. If you don't turn on any specific devices, and you take a look at your electricity meter, you'll see that it still displays an electricity consumption that easily reaches 300W in general. The consumption limit represents 10 to 20% of your annual energy needs, or between 300 and 1500 kWh per year! This is the consumption we're trying to reduce with the Sunity solar station. If your electricity limit exceeds the 300 to 400W generally observed in most homes, it's possible to increase the number of stations (up to 4 per circuit breaker/power line).And what about the regulations?
The strong point of the Sunity solar station is that it can be installed anywhere, without complicated formalities. If the panels are installed on the ground or less than 1.80 meters high, no declaration is required at the town hall. The only thing to do is to sign a Self-Consumption Agreement Without Injection (CACSI) with Enedis, the company that manages the electricity grid. The declaration is made directly online athttps://connect-racco.enedis.fr/prac-internet/login/

The big question: profitability
Of course, this is the big question that comes up every time: what about profitability? Because the Sunity solar station still costs €635 (thanks to our exclusive offer, see below).
I'm based south of Orléans. For this region, statistics indicate an average production of 500 kWh/year. This site provides an estimate based on your address, but does not take into account the specifics of bifacial solar panels. The latter can improve productivity by 5 to 30%. I was able to compare the productivity of a conventional panel and a bifacial panel, placing the two versions side by side to benefit from the same exposure. And the bifacial version clearly offers better efficiency, with at least the additional 5% advertised by the manufacturer. This difference can be improved with a light-colored floor behind it. Some even go so far as to place mirrors or even simply a survival blanket under the panel: the goal is to increase the reverberation at the rear to further optimize production.
Rest assured, these techniques are for those who truly want to maximize production. But without doing anything other than installing the station as is, this solution still offers one of the best production rates to date.
- In Orléans, if I assume an average of 550 kWh per year thanks to the small gain from bifacial solar panels, and at a rate of €0.2460 per kWh (currently the EDF rate during peak hours), this represents a saving of €135/year. Feel free to use these websites to calculate your solar exposure and your profitability, as this obviously varies from one location to another:
- JRC Photovoltaic Geographical Information System
Sunearthtools
Let's not forget the increasing cost of electricity each year. We are among the cheapest countries in Europe, but the price of electricity in France should catch up with the average for European countries. And we know that
the tariff shield is scheduled to disappear by the end of 2024. For 2024, we can therefore safely expect the same increases as in 2023, namely +15% and +10%, which we'll round up to +25% for simplicity.
Electricity price trends
Beem 420W review: even more electricity savings with the DIY solar kit! 44 Source: The National Energy Mediator
,
CRE
We can then take into account a 5% annual increase (yes, I'm being very optimistic here, though…): (2024) the savings in the first year would be €168 (2025) second year: €177
(2026) third year: €186
(2027) fourth year: €195This gives us a total of €727, which is the depreciation of the kit after only 3.5 years in my case. The return on depreciation is therefore very rapid. Of course, the increase in the price of electricity has something to do with it: two years ago, it would have taken twice as long to make such a solution profitable.As is often the case, some will shout from the rooftops about ecology: but the manufacturing process of panels and their recycling has evolved a lot in 10 years. Most panels are now certified low carbon impact: after one year of use, the energy required for their manufacture has been offset. As for its recycling, this panel is 95% recyclable. And Trina Solar is clearly committed to a responsible approach, since it is a member of the Pvcycle association, which is committed to recycling solar panels that have reached the end of their life. And things will have evolved even further by the time it is scrapped, its lifespan being given as 30 years by the manufacturer. But in reality, a photovoltaic panel has an enormous lifespan, and even if its production weakens over time (87.4% efficiency guaranteed after 30 years), a panel can still be used for many years beyond the official lifespan. I know people who use panels that are over 40 years old and still work perfectly, even though the technology was far inferior to today's.
- Conclusion
- I discovered this principle a little over two years ago now. It was a bit of a shock for me when I first discovered the idea. Of course, while researching the subject, I quickly realized that several companies offered easy-to-install kits based on the same principle: we have already discovered
Beem ,Sunology

.
- Due to its features and efficiency, Sunity is a direct competitor to the Sunology Play Recto Verso. During my tests, the two models were placed side by side:
- Sunity on the left, Sunology Play Recto Verso on the right
- The production is almost identical, as both use a bifacial panel with very similar characteristics, and both use the same microinverter model. The Sunity model will simply require a few extra minutes to assemble the bracket. In return, you'll gain a few months of profitability, as the Sunity solution is sold at a lower price than the Sunology.
- The product is perfectly finished, practical, and easy to install. It's truly a solution within everyone's reach, extremely easy to install, since all you need is four screws and a device plugged into an electrical outlet, which is normally within everyone's reach ;-). I really like its versatility, which allows you to place it on the floor or mount it on the wall, without worrying about choosing the right model when ordering, as the bracket is designed for both uses. But above all, the ability to tilt it as desired, throughout the seasons, to always maintain optimal production. For this type of solution, it's now a classic, but some continue to offer rigid solutions :/
Well, as is often the case, the app is a bit of a weak point: it does the bare minimum, in an austere display. In this respect, no one has yet done as well as Beem :) But it gets the job done by allowing us to monitor production. Afterwards, it will be possible to use another connected plug to retrieve its production in a more attractive interface, in Jeedom or Home Assistant, for example.
Example of photovoltaic monitoring on Home Assistant for those who want to go deeper into monitoring…
Another advantage of this type of product: it can be installed whether you own or rent. Installation is so simple that it's quick to disconnect the panel and fold it up when moving it to a new home. This investment will last, unlike a roof-mounted installation.
For the holidays, the manufacturer is offering a discount, with the station alone costing only €669 instead of €720. But to make it even more cost-effective, my partnership with Sunity allows me to offer you a discount on the station! Simply use the code FETESMAISONETDOM, reducing the price from €669 to €599, a total discount of €121 off the retail price! The promotions are also valid on 2-, 3-, and 4-panel kits, with the additional station costing only €550. All with easy, interest-free payment in 3 or 4 installments. Please note: the discount is for a limited time! Note that the manufacturer has recently also offered a battery-powered solution, notably using the excellent Zendure system that we tested here. At €1,899 with our code FETESMAISONETDOM, it's an excellent option!


Please remain courteous: a hello and a thank you cost nothing! We're here to exchange ideas in a constructive way. Trolls will be deleted.