
While solar stations have become considerably more widespread in recent years, a new phenomenon is booming: storage solutions! Often, a home's solar production is at its peak when the occupants are away, either at work or at school. As a result, a large portion of the solar production is fed into the Enedis grid, sometimes even for free. A storage solution like the Anker Solix Solarbank 2 Pro allows all this free electricity to be stored in a storage battery, for reuse when the home actually needs it. The solar production is then fully consumed, thus maximizing electricity savings. Let's explore this solution in more detail. Unboxing the Anker Solix Solarbank 2 Pro For this review, I was lucky enough to receive the Anker Solix Solarbank 2 Pro, the main component, along with an extension battery, a meter for the electrical panel, and two solar panels (not shown here in the photo; we'll see them later ;-) . As its name suggests, this is the second generation of this solution. We didn't have the opportunity to test the first version, seen at IFA last year, but this V2 apparently improves a lot :) Upon unboxing, the whole thing exudes quality, with all-aluminum casing. It's beautiful, sleek, and stylish. In short, I love it! The Anker Solix Solarbank 2 Pro comes extremely complete, with its power cable of course, but also all the MC4 cables needed to connect the solar panels, a tool to easily disconnect the panels, as well as a wall mounting kit if needed.
Since the Solarbank 2 Pro can accommodate four photovoltaic panels, we have eight 3m cables for connection, which should meet most needs (and if not, extension cords are easily available these days).
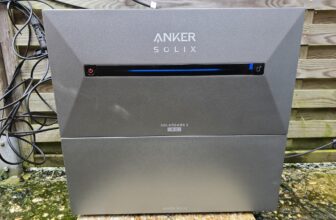
The main unit measures 46 × 25 × 25 cm and weighs 21 kg. The front panel clearly displays the name of the solution, as well as a screen that displays the battery status.A button on the side also turns on the battery, or “wakes up” the screen to display the current battery level.On the sides, we find two recesses that serve as handles, making it easy to handle the battery when moving it.

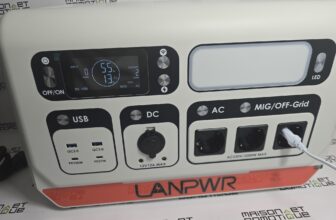
The right side has the connector for the power cable (with 5m cord provided), which will be used to reinject the solar production into the home's electrical circuit. But just below, we also have a 230V Shuko plug: this battery will therefore be able to power devices directly, up to 1000w. This is a particularly interesting detail, because with this type of battery, usually in the event of a power outage they unfortunately cannot power the home. Indeed, as a safety measure, the hybrid inverter part needs to be synchronized to the general network to inject current. So when it is unplugged, it does not risk electrocuting the person who touches its plug. This is a principle that we have already seen on solar stations. But suddenly, in the event of a power outage in the home, the inverter cannot synchronize, and is therefore unable to inject current into the house. It's frustrating to know that you have electricity stored on the batteries, but it's unusable during a power outage :/ Anker solved the problem by integrating a 230V outlet into its Solarbank 2 Pro: in the event of a power outage, the inverter will still be unable to inject electricity into the house's circuit, but it will still be possible to plug the devices that need backup into this 230V outlet. Better still, if you have a source inverter like mine, simply plug it into the battery's outlet to still power the house (while still being mindful of the 1000W power limit…).

On the left side, we find the recess for the handle, but this time we have the MC4 connector for the solar panels:

The Solarbank 2 Pro accepts up to four solar inputs, so each has an MC4 connector for the “+” and one for the “-“. As you can see, all the connectors are protected by silicone caps. The Solarbank 2 Pro is equipped with four 600-watt MPPT regulators, providing a total solar input power of 2,400 watts! It's the first to offer such power in a plug-and-play manner! On the back, there's nothing to note except for the fins for heat dissipation. Between electricity storage and conversion, there are a few functions that naturally generate heat. This main battery integrates a microinverter that directly converts solar energy into usable electricity, thus avoiding the additional cables that can be found on other batteries requiring a separate microinverter. This is actually one of the improvements compared to the V1, which required a separate microinverter. The V2 includes everything you need: MPTT solar manager, battery, and microinverter.Finally, on the bottom, we find the data sheet and four rubber feet to protect the underside:

But above all, the connector for the expansion batteries, perfectly protected under a double silicone cover:

Which brings us to the discovery of this expansion battery, even more streamlined than the main unit. It measures 46 x 23 x 21.7 cm, and weighs 18 kg.

Here, we find the handle system for easier handling of the battery:

Here, there are no connectors on the sides. We simply find the heat dissipation system at the back: But above all, the expansion connector, on the top and bottom: This connector will accommodate an expansion battery underneath:

While the top connector will accommodate either an expansion battery or the main module:

It too is very well protected by a double silicone sleeve:

All you have to do is remove the sleeves and stack the batteries on top of each other. It couldn't be simpler!

This is a system we've already discovered at Zendure, and it's very practical because it eliminates the need for additional cables to connect them, which is also unsightly. Thanks to the additional stackable batteries (up to five 1.6kWh batteries each), it's possible to store up to 9.6 kWh! And with lithium-iron-phosphate technology, the batteries retain 80% of their initial performance even after more than 6,000 charge cycles, offering a lifespan of more than 15 years (the Solarbank 2 also comes with a 10-year warranty!).

This Anker Solix kit comes with the Smart Meter, which is an optional extra, but a really interesting one, as we'll see later in practice. This is actually a DIN rail-mounted module that fits into the electrical panel to monitor the home's overall consumption:

It comes with three metric ampere clamps that allow you to monitor the electricity consumption of a household, even a three-phase one, and an antenna for better Wi-Fi and Bluetooth reception if needed.

The antenna isn't required if you have good Wi-Fi coverage, since a small antenna is already integrated into the Smart Meter:

This module measures 95 x 66.5 x 36 mm, which takes up roughly the equivalent of two DIN rail slots. Compared to the Shelly 3EM Pro, for example, which is often used to monitor energy consumption using the same principle, using three clamps:

On its front panel, the module has an on/off and reset button, as well as three LEDs to indicate its status (Wi-Fi connection, consumption monitoring, etc.).

On the lower part, it has an RJ11 connector for connecting metric ampere clamps. It also has three phase inputs and a neutral input, which will be used to power the module and monitor the household's consumption.

This meter also has an RS-485 cable connection if needed, in addition to Wi-Fi and Bluetooth.

On the back, we find the classic mechanism of a DIN rail module, to secure it to the panel rail:

The metric ampere clamps are relatively standard. They are clamps equipped with magnets, which open slightly to allow the phase whose consumption you want to monitor to pass through. Ideally, of course, you would connect the phase(s) coming from the electric meter to them, in order to monitor the household's overall consumption.

These are the three main components of this storage solution, in addition to the solar panels, of course. So, let's move on to the installation! Installing the Anker Solix Solarbank 2 Pro SolutionTo test this solution, I received two RS50B solar panels from Anker, along with their ground (or wall) mounts, to assemble:

Just 3 screws on each mount, and you're done. They can even be adjusted to different angles if needed, to adjust the tilt over the seasons if desired.

While they may seem relatively standard, the panels used here are particularly large, measuring 2.28 x 1.13 m! But unlike the panels I've tested so far, which generally peak at around 400Wp, these Anker panels each develop 540Wp! In other words, we have 1080Wp of power with just two panels! Designed to withstand the elements (IP68), this model offers a 12-year warranty and a 25-year lifespan.

Next, place the battery near the panels and a 230V electrical outlet to connect it (maximum 5m using the provided cord). Both batteries are fully waterproof (IP65) and can therefore be left outdoors without any problems, withstanding temperatures ranging from -20°C to +55°C thanks to an integrated heating system, which automatically activates when the temperature drops below 0°C. Here, they are placed along the wall of my terrace for testing, slightly elevated so as not to have my feet in the water when it rains heavily (something unfortunately common these days…). With the main battery plus an extension battery, I thus have 3200Wh of autonomy.

Then, simply connect the outputs of the solar panels to the inputs of the main battery. Here, since I only have two panels, I only use the first four inputs (2 per panel). The MC4 connector used here is a standard in solar energy and is fully waterproof. It's also perfectly compatible with most solar panels on the market, as long as the Solarbank 2 Pro's power rating is respected.

Connect the main battery to the mains, and the solution is already operational. But to optimize use, we also installed the Smart Meter module in the electrical panel.Please note: while the battery and panels are very simple to connect, the Smart Meter requires some electrical skills to install it in the electrical panel. Don't hesitate to seek professional help for this part!

You'll need to install the module following this diagram:

It's not very complicated if you have some knowledge of electricity. Place the module on a rail, and connect the phase(s) to the bottom of the module, as well as the neutral. All this with the power off, of course.


Then simply place a metric clamp on the incoming phase of the electric meter, which will allow you to monitor the total consumption of the house. Be careful, a certain direction must be respected, indicated inside the clamp by an arrow, as well as on the top of the box. The direction must be from the electric meter to the devices to be powered.

Once the phase is identified, open the clamp and place it on the phase cable. Close the clamp, and that's it. Here, I'm using single-phase, so I only need to place one clamp. For three-phase, you'll of course need to place a clamp on each of the system's three phases.


The metric clamp in place

Once the electrical panel is closed, we have a relatively standard module that's easy to forget about.
All that's left is to configure everything in the mobile app.
Configuring the Anker Solix Solution
Configuration will be done via the Anker mobile app, which is shared across the brand's various devices. It's available on both iOS and Android, of course. You create an account if you don't already have one, and request to add a new device.

The Solarbank 2 Pro is automatically detected. You specify the Wi-Fi network to connect to (2.4 GHz).

If you have accessories, such as the Smart Meter, you can add them immediately. There's no need to add expansion batteries; they are automatically recognized via the main battery.

As is often the case with connected devices, an update may be offered to take advantage of system improvements.

The application will then adjust the storage system's operation. If you don't have the Smart Meter, the system will automatically switch to custom mode:

In this mode, we decide at what times and at what power the system should supply the home. For example, we can ask the system to supply 300W during the day until 6pm to cover the electrical backlog when the house is unoccupied, and increase the power to 800W from 6pm when everyone is home and the home consumes more energy.
Since I have other solar systems that supply the house during the day, I've opted here for the battery to charge during the day and return it to me when there's no sun:

We then arrive at the system's dashboard, which displays the solar production and the power sent to the home. Here, for example, I've set the system to supply 200W to the home: the Anker Solix system therefore sends the 74W of solar production to the home, but also draws 126W from its batteries to supply the full 200W required by the home. The system is indeed capable of using both sources to meet the home's needs!
In itself, the system already optimizes solar energy consumption and storage. But of course, our electricity consumption varies constantly. This is why the Smart Meter is a particularly interesting device to implement to truly optimize operation, completely automatically!

If you have one, you add it to the app. Here, you also enter your Wi-Fi network:

The app then offers to pair it with the existing system. Accept!

Finally, we're moving from “personalized” mode to “personal consumption” mode: this means that the system no longer relies on fixed schedules and power levels defined by us, but rather on the home's actual consumption, and this is done live! This system has a response time of less than 3 seconds, with an accuracy of ± 10 W, which makes it very quick to modify the power injected into the home. Thanks to it, no more wasted electricity!

A final option allows you to modify the lighting in two modes:

And that's it. The system gets to the point, and for this type of solution, that's quite appreciable. Since the system is plug-and-play, and therefore easy to install (less than 2 hours), the app had to be just as easy to learn.
Now we can just observe :)
Anker Solix Solarbank 2 Pro: In Use

Once the Smart Meter is installed, the dashboard becomes more comprehensive, displaying not only solar production, but also household consumption, battery storage, and the system's injection, this time fully interactive, since the system will automatically adjust it according to the home's needs.

There are also various statistics on solar power throughout the day, but also by week, month, or even year, for the amount of energy stored or injected into the home. And of course, battery status monitoring.

Peaks of 1001W for 1080Wp panels—not bad!

This is the kind of system I love: no need to constantly keep an eye on it to adjust the settings. Once in place, the system is completely autonomous and, above all, intelligent, automatically adapting to the home's energy needs. In short, once in place, you forget about it. It works quietly in the shadows, but helps reduce the electricity bill. Here, in the space of 12 days, it has already given me 39kWh free (that's around ten euros in 12 days, at the current peak hourly rate). It all depends, of course, on the number of panels you have, the geographical location, the number of batteries, etc., but the savings at the end of the year will be there! The manufacturer announces savings of up to €631 per year thanks to a production of 2887kWh, which can quickly recoup the investment. We'll need a little more time to judge this over a full year, but what's certain is that the solar production is fully consumed thanks to this solution. No more waste, the energy is injected into the home when it's needed, and not injected for free into the general grid!

You can get a glimpse of this on the Ecojoko app, which tracks my consumption live:
As you can see, from 8 a.m. to midnight, I consume almost nothing, thanks to solar power and the battery, which takes over when necessary. I only have a few small consumption peaks in the evening, because power-hungry devices were used, and since the Anker solution is limited to 1000W output, it can't cover all the required energy consumption in these cases. But we still save 1000W on this somewhat power-hungry consumption!


Not to mention that it's also available in case of a power outage! As we saw above, it has a 230V outlet capable of supporting a 1000W charge. This means you can plug in your fridge, freezer, etc. to power them during a prolonged outage. It's a minor detail, but it's currently the only solution of its kind to offer this, and it can really come in handy!

Conclusion
I wasn't able to test the first version of this solution, but from what I've read, this V2 brings some great improvements, including the integrated micro-inverter, which makes it a truly plug-and-play solution, and the ability to stack up to five batteries to expand storage capacity.

The solution tested here is, in any case, a very nice product, high-quality, easy to install for most users, and well-designed. It can be installed in many situations: with panels on the roof, panels hung on the balcony, or simply panels placed on the terrace, whether they're Anker or not. The solution adapts to most needs.

The Smart Meter module, while sold as an option, is absolutely necessary if you want to take advantage of the system's full intelligence. Thanks to it, the Anker Solix Solarbank 2 Pro solution is completely invisible, managing solar energy optimization in the background to lower your electricity bill. So, don't miss out, especially since for its launch, the Smart Meter is free depending on the kits purchased (until June 30th).

This Anker Solix Solarbank 2 Pro solution is truly excellent, and borders on perfection. “Borderline” because I have two small comments to make about it:

While the solution supports up to 2400W of panels, it can only output 1000W of power. Therefore, if, for example, the panels provide 2000W, it will only be able to send a maximum of 1000W to the home, with the rest going directly to the battery. Furthermore, if the smart meter detects that the home doesn't need power and the batteries are nearly full, the system will automatically throttle the panels' output, while some might want to maintain grid feed. This is due to battery technology, which cannot be charged at full power at the last few percentages.

Finally, when the smart meter detects grid feed (when you have multiple solar systems), it would have been interesting to be able to charge the Anker batteries via its solar panels, but also via this surplus production from other systems. This is a possibility that we will soon discover on a competing solution. After all, not everyone has multiple solar systems at home ;-)
Aside from these two details, the Anker Solix solution is truly excellent, especially since it offers excellent value for money:
You can also find these introductory offers:

From June 14 to 30, 2024:

Anker SOLIX Solarbank 2 E1600 series, and receive a free smart meter
(value €129).

Value Kit:
Solarbank 2 Pro, two 435W panels, and a smart meter for
€1,819 (recommended retail price: €2,406).
Super Bundle:
Solarbank 2 Pro, four 540W solar panels, a Smart Meter, and three expansion batteries for €4,839 (instead of the recommended retail price of €5,901)
Special offers for existing buyers:
For those upgrading from the first generation to the next, or who already own a balcony power station, the Anker SOLIX storage system is available individually.
- Until June 30th, the Solarbank 2 Plus is €1,199 (recommended retail price: €1,399), and the Solarbank 2 Pro is €1,399 (recommended retail price: €1,599).

Please remain courteous: a hello and a thank you cost nothing! We're here to exchange ideas in a constructive way. Trolls will be deleted.